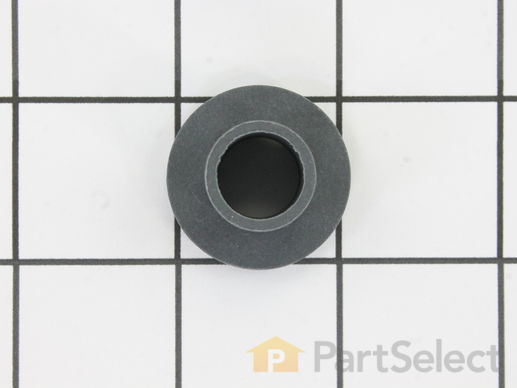
Part Location Diagram of WE1M462 GE Drum Bearing Sleeve
See part 3106 in the diagram
Replacing your General Electric Dryer Drum Bearing Sleeve
( Grid squares measure 1x1 inch )
Customer Service Representative

Get in touch, we're here to help!

Daily 8am - 9pm EST

customerservice@partselect.ca

Drum Bearing Sleeve

★★★★★
★★★★★
1 Review
$9.84
  Special Order
PartSelect Number PS266777
Manufacturer Part Number WE1M462
Manufactured by GE
Product Description

Drum Bearing Sleeve Specifications

Sold individually.
How Buying OEM Parts Can Save You Time and Money

How Buying OEM Parts Can Save You Time and Money

Part Videos

Replacing your General Electric Dryer Drum Bearing Sleeve

Replacing your General Electric Dryer Drum Bearing Sleeve
Troubleshooting
This part fixes the following symptoms:
Noisy
This part works with the following products:
Dryer, Washer Dryer Combo.
This part works with the following products:
General Electric, Hotpoint, Kenmore.
Part# WE1M462 replaces these:
AP2621911, 877502, WE01M0462
Back to Top
Customer Reviews
Average Rating:
★★★★★
★★★★★
1 Review
5.0
Filter By Rating:
  • 5 Stars
    1
  • 4 Stars
    0
  • 3 Stars
    0
  • 2 Stars
    0
  • 1 Star
    0
  • 1
Sort by:
Sorry, we couldn't find any existing reviews that matched. Try using some different or simpler keywords.
  • 1
Customer Repair Stories
 Average Repair Rating: 2.9 / 5.0, 8 reviews. What's this?
  • 1
Sort by:
Sorry, we couldn't find any existing installation instruction that matched.
Rubbing/Squealing Noise While Drying, especially during cold weather
This part arrived at our house two days after I ordered it. I was stunned by how quickly it arrived.

Our dryer was making a very annoying squeaking/rubbing noise while drying and it became worse as the outside temps dropped (it's winter)...colder air cooling the exhaust line, causing metal in dryer to contract more.

I called an appliance repair service and they said, "Honestly, your money is going to be better spent to just buy a new dryer. The bearings on these are a pain to replace."

Yeah, right.

I've never taken apart a dryer, but it took me less than 45 minutes to complete this repair and our dryer is back to normal. Total cost was $18, including shipping. A $300 savings versus buying a new dryer.

There is another description of the process for this part so I won't repeat it all.

I did it a little differently than most, namely I did not remove the dryer drum. I simply pulled it out about six inches (make sure and slide belt back as you inch out the drum). But first, unplug the dryer, then remove the top, then the front.

A Philips screwdriver will quickly remove the top of the dryer (two screws on inside front, where door closes) and the front face (two screws at top of front, inside face). Lift the front up about an inch and it is free. I had to disconnect a couple wires, just make sure you mark before you disconnect them.

With that done, the drum will pull straight toward you (out). Make sure and support the weight of the drum as you slide it out. I found no need to remove the drum.

At the rear inside of our drum, there are three Torx screws that hold the bearing assembly on. I have a pretty long reach so I just removed two of the Torx screws, then reached around the back of the drum while removing the third screw, to keep the bearing assembly from falling onto the floor behind the back of the drum.

This plastic bearing is held to the bearing shaft by a little o-ring. Just pull the o-ring off, slide off the old bearing, slide the new bearing on and replace the o-ring (if yours is broken, any home store will have one that will work as a replacement in their faucet repair department).

Reattach the bearing housing to the drum with the Torx screws (get all three started before you tighten any of them), slide the drum back in - make sure you slide the belt as you move the drum back in and support the weight of the drum so you don't bash the bearing assembly into the back of the dryer.

You're doing this part blind, but in a few seconds, you can guide the bearing back into the hole in the back wall of the dryer. It just slides into the hole, nothing fancy.

Put the front of the dryer back on. Then replace the top (I had to remove the five screws on top of the dial panel to give it some flex so the top would pop back into place without stressing the dial panel), plug the dryer back in, and fire it up.

45 minutes after this part arrived at our home, our dryer problems were gone. Now that I've done one, I could probably do it in 20 minutes the next time (it's that simple/easy). And we didn't need a new dryer. Makes me think I should have the appliance guy who told me we needed a new dryer to direct all of these "pain in the fanny" bearing replacements to me because I could charge someone $50 total for the repair and make good money.

Hope all this babble helps someone else who doesn't need a new dryer.
Other Parts Used:
  • Gary from Spring Hill, TN
  • Difficulty Level:
    Easy
  • Total Repair Time:
    30 - 60 mins
  • Tools:
    Screw drivers
51 of 61 people found this instruction helpful.
Was this instruction helpful to you?
Thank you for voting!
Dryer making squeaking noise when operating
First I had to remove the top by taking out the two screws inside the door. Then I removed the front by taking out the two screws holding it from the inside. I needed to remove the drum and to the the belt off, I removed the left side. It has several screws down the back, two on the bottom and two in the front. I removed the belt and drum. I took out the old sleeve bearing. Part of it was broken off into the hole it goes into. I then had to remove the plate that holds the heating element. Once that was done, I put the new bearing on and replaced the drum slides on the from section. Then I reversed the process to reassemble. Not too bad.
Other Parts Used:
Drum Bearing Slide - Green (Sold individually) Drum Bearing Slide - White (Sold individually)
  • Michael from Clay, NY
  • Difficulty Level:
    Easy
  • Total Repair Time:
    30 - 60 mins
  • Tools:
    Screw drivers
32 of 44 people found this instruction helpful.
Was this instruction helpful to you?
Thank you for voting!
Noisy like a chain rattling inside
Disconnect Power from the Dryer
Remove 2 screws that held the top on the dryer.
Removed the 2 screw that held the front on the dryer.
Unhooked the belt from the tensioner and motor pulley.
Pulled the drum out. Removed the belt.
Removed the three screws that held the bearing assembly
on the back of the drum.
Removed the keeper o-ring slide the bad bearing off of shaft. Slide the new bearing on the shaft put the new o-ring on the shaft. Reassembled the bearing on back of the drum. Put belt back around the drum and put drum back in place. Put The belt around the motor pulley and tensioner
(this is probably the hardest part).
Put the front and top back together.
Turned the power back on. Job done
Other Parts Used:
Retainer O-Ring Bearing Retainer
  • Kerry from New Martinsville, WV
  • Difficulty Level:
    A Bit Difficult
  • Total Repair Time:
    30 - 60 mins
  • Tools:
    Pliers, Screw drivers, Socket set
23 of 39 people found this instruction helpful.
Was this instruction helpful to you?
Thank you for voting!
Very loud squeeks coming from dryer
I had to remove all screws from the back of the dryer, control panel, and one side. Pulled top off. Took out two screws that held front door panel on. Disconnected 3 wires into door and completely removed door panel. Disconneted pink wire from heating element then slide belt off drum as I removed the drum. Pulled off the old completly worn out drum bearing sleeve and replaced it. Replaced drum slides as some were worn through. Had a little trouble getting belt back on when I reconnected everything but for 50 dollars in parts and shipping I have working dryer, so I would say it was well worth the effort.
Other Parts Used:
Drum Bearing Slide - Green (Sold individually) Retainer O-Ring Drum Bearing Slide - White (Sold individually)
  • Gretchen from Port Republic, VA
  • Difficulty Level:
    A Bit Difficult
  • Total Repair Time:
    1- 2 hours
  • Tools:
    Pliers, Screw drivers
22 of 44 people found this instruction helpful.
Was this instruction helpful to you?
Thank you for voting!
Loud noise
Unplugged dry cord . Removed top and front cover. Removed drum to replace rear Bearing. Reinstalled drum replaced front bearings and sleeve. Reinstalled both covers and plugged in.
Other Parts Used:
Front Drum Bearing Drum Bearing Slide - Green (Sold individually) Retainer O-Ring Drum Bearing Slide - White (Sold individually)
  • Aaron from Needville, TX
  • Difficulty Level:
    Easy
  • Total Repair Time:
    15 - 30 mins
  • Tools:
    Screw drivers
17 of 29 people found this instruction helpful.
Was this instruction helpful to you?
Thank you for voting!
Dyer made a squealing/screeching noise
I have read other postings which describe most of the procedure very well, so I'm just going to add things that should be considered, which I have not read about here.
Removing the drum proved difficult due to the lack of room on the two sides.The vent blower motor bracket is at the front bottom of the dryer, and when the two screws on either the left or right side are removed, the dryer sides spread more easily and allow the drum to be removed or re-installed more easily.
Next, the rear drum bearing I bought has a rubber o-ring which holds it in place. There is a good chance this o-ring will be hard and brittle after years of service, and will crumble when removed, in order to replace the bearing. I had to run to the local hardware store to get a new o-ring, and could only find one that did was not rated for high heat usage. I presumed once the drum is re-installed that the bearing can't dislodge even with a missing o-ring. I think it just holds the bearing in place while removing and re-installing the drum, but I cannot be certain about this.So if you plan to replace the rear drum bearing, make sure to also order the o-ring that holds it in place. It is doubtful you can re-use the old one depending on the age of your dryer.
Replacing the old white belt tensioning pulley requires the removal and re-installation of a "nut" that has no threads. It is forced on and off and not simple to re-install. The removal was easy simply by using a wrench to "unscrew" it counterclockwise. But re-installing it is another matter. It requires force to get it back onto the shaft. I saw a tip to use a 7/16" socket placed over the nut and hit with a hammer while bracing the bracket from the other side. I did this by used a smaller tool, linesman's pliers, which provided the force needed. Install it about 1/4" past the end of the bracket shaft. Careful, that nut has sharp edges and I ended up bleeding from that process. Three hands would help: one to brace the bracket, one to hold the nut and socket in place, and one to hammer. So good luck with that. Probably there is a smarter way to do this.
If you replace the old white plastic belt tensioning pulley with a new yellow one, it is not simple to understand how to re-install the belt properly. The videos do not do the trick adequately. I did find one on youtube where they removed the dryer side in order to show the belt installation and I had an "aha moment". Since you cannot see the belt, the pulleys, the motor, or anything else during installation, it is not a simple thing to do. Here are my tips: Before re-installing the drum, move the belt tensioning pulley bracket to the right (when facing the dryer front) and you will see a little spot where the bracket will stay to the right when engaged in this spot. Engage the bracket and then proceed to re-install the drum. That way, when you reach under the drum to set the belt properly on the pulleys, you won't have to engage the tensioning bracket without being able to see. Once the belt is in place, carefully remove the bracket from the right holding spot and allow it to move back to the left operating position. I used two hands and don't think I could have done it with one. When the belts are new, they can be naturally twisted and you have to be careful to install the belt with no twist. I had to do it twice to get it right. If someone can take up the top belt slack for you, it's easy to feel the belt underneath the drum and get any twists out.
Next, i had a hard time inserting the drum back into the dryer and finding the hole where the bearing inserts. The problem is, if you are not careful, it's easy to move, bend, or break the heater wires which surround the hole you need to locate blindly and slip the drum bearing into. I did bend those wires, but luckily not break them. In hindsight, applying some masking tape to the rear inside panel of the dryer right at the top, left and right of the drum BEFORE removing the drum would have made it much easier estimating the proper drum height while maneuvering the bearing into the rear hole. Then remove the masking tape when done.
I ordered a new top plastic front bearing that supports the drum in the front. Good thing I did because mine was split about 5" where one set of the green and white sliders install. I had one white "plastic" insert visible. The other one plus the two green bearings were totally missing. No wonder it was squealing.
Finally, the hardest part for me was re-installing the top of the dryer! Take a good look before removing it so you can see exactly how the top fits to the dryer and how the parts need to be lined up first.
Thanks to PartSelect.com! Every part was correct and the installation videos gave me so much help. Also, parts arrived in two days, which surprised me. I will be ordering all parts here.
Other Parts Used:
Duct Felt Seal Drum Bearing Slide - Green (Sold individually) Drive Belt Front Drum Bearing Drum Bearing Slide - White (Sold individually) Idler Pulley Wheel
  • KENNETH from HOLLAND, PA
  • Difficulty Level:
    A Bit Difficult
  • Total Repair Time:
    More than 2 hours
  • Tools:
    Screw drivers, Wrench (Adjustable)
4 of 4 people found this instruction helpful.
Was this instruction helpful to you?
Thank you for voting!
Loud sqeeking.
I followed some simple instructions from GE. It was really easy and I even found some spare change inside the cabinet which my wife took off my hands. :/
Other Parts Used:
Drum Bearing Slide - Green (Sold individually) Front Drum Bearing Drum Bearing Slide - White (Sold individually) Retainer O-Ring
  • Kevin from HENDERSON, NV
  • Difficulty Level:
    Really Easy
  • Total Repair Time:
    30 - 60 mins
  • Tools:
    Nutdriver, Screw drivers
2 of 3 people found this instruction helpful.
Was this instruction helpful to you?
Thank you for voting!
Loud noise
With the help of doityourself guy on the internet
Other Parts Used:
  • Mary from Enterprise, AL
  • Difficulty Level:
    Easy
  • Total Repair Time:
    15 - 30 mins
  • Tools:
    Screw drivers
0 of 1 people found this instruction helpful.
Was this instruction helpful to you?
Thank you for voting!
  • 1
Questions and Answers

Ask our experts a question about this part and we'll get back to you as soon as possible!

3 questions answered by our experts.
  • 1
Sort by:
Sorry, we couldn't find any existing answers that matched.Try using some different or simpler keywords, or submit your new question by using the "Ask a Question" button above!
Alex
July 13, 2021
Does the bearing sleeve need any lubrication/grease applied on the inside or outside?
For model number GTDP300EM1WS
PartSelect logo
Hello Alex, Thank you for the question. No Lubrication or Grease is requited to install the Bearing Sleeve. We hope this helps!

5 people found this helpful.

Was this helpful?
Thank you for voting!
Valencia
March 8, 2019
What would cause the dryer not to spin
For model number GTD45EASJ2WS
PartSelect logo
Hello Valencia, Thank you for the question. The most commonly replaced part to replace with no spinning is the Belt, PartSelect Number PS1766009. Thank you for your inquiry, good luck with this repair!

2 people found this helpful.

Was this helpful?
Thank you for voting!
Marlin
May 15, 2019
Dryer when turned on makes load thumping noise .
For model number DWSR405EB2WW
PartSelect logo
Hello Marlin, Thank you for the question. I suggest checking for wear on the Rear Drum Bearing Kit PartSelect Number PS267529 Front Drum Bearing, PartSelect Number PS960316, Lint Trap Duct Assembly PartSelect Number PS10061344 and the Drum Bearing Slide - Green and White PartSelect Number PS6447706 and PartSelect Number PS755842. Over time, these parts will wear out, cause your dryer to be noisy, and you will have to replace it. Thank you for your inquiry, good luck with this repair!

2 people found this helpful.

Was this helpful?
Thank you for voting!
Related Parts:
  • 1
Related Parts
Model Cross Reference
This part works with the following models:
PartSelect Number: PS266777
Manufacturer Part Number: WE1M462
Brand
Model Number
Description
Kenmore
2661532513
Washer Dryer Combo - HOME LAUNDRY COMBO
General Electric
633616
Dryer
General Electric
633617
Dryer
General Electric
653616
Dryer
General Electric
653617
Dryer
General Electric
662310
Dryer
General Electric
662311
Dryer
General Electric
662410
Dryer
General Electric
662411
Dryer
General Electric
662412
Dryer
General Electric
663616
Dryer
General Electric
663617
Dryer
General Electric
664110
Dryer
General Electric
664210
Dryer
General Electric
664211
Dryer
General Electric
664616
Dryer
General Electric
664617
Dryer
General Electric
672410
Dryer
General Electric
672411
Dryer
General Electric
672412
Dryer
General Electric
672510
Dryer
General Electric
672511
Dryer
General Electric
672512
Dryer
General Electric
672710
Dryer
General Electric
672711
Dryer
General Electric
672712
Dryer
General Electric
672810
Dryer
General Electric
672811
Dryer
General Electric
672812
Dryer
General Electric
674310
Dryer
Customer Service Representative

Get in touch, we're here to help!

Daily 8am - 9pm EST

Contact Customer Service