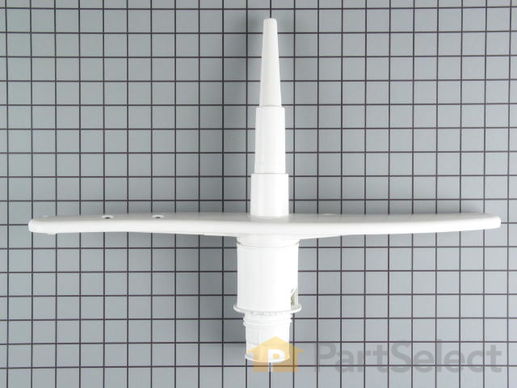
Part Location Diagram of WD22X10017 GE Lower Spray Arm Assembly
See part 501 in the diagram
( Grid squares measure 1x1 inch )
Customer Service Representative

Get in touch, we're here to help!

Daily 8am - 9pm EST

customerservice@partselect.ca

Lower Spray Arm Assembly

★★★★★
★★★★★
4 Reviews
$90.72
  Special Order
PartSelect Number PS260538
Manufacturer Part Number WD22X10017
Manufactured by GE
Product Description

Lower Spray Arm Assembly Specifications

This white lower spray arm assembly comes with a telescopic wash tower.
How Buying OEM Parts Can Save You Time and Money

How Buying OEM Parts Can Save You Time and Money

Troubleshooting
This part fixes the following symptoms:
Not cleaning dishes properly | Leaking
This part works with the following products:
Dishwasher.
This part works with the following products:
General Electric.
Part# WD22X10017 replaces these:
AP2039859, 824344
Back to Top
Customer Reviews
Average Rating:
★★★★★
★★★★★
4 Reviews
5.0
Filter By Rating:
  • 5 Stars
    4
  • 4 Stars
    0
  • 3 Stars
    0
  • 2 Stars
    0
  • 1 Star
    0
  • 1
Sort by:
Sorry, we couldn't find any existing reviews that matched. Try using some different or simpler keywords.
  • 1
Customer Repair Stories
 Average Repair Rating: 3.8 / 5.0, 7 reviews. What's this?
  • 1
Sort by:
Sorry, we couldn't find any existing installation instruction that matched.
Lower spray arm assembly broke
Took lower basket out. Unscrewed lower arm assembly, removes it. Hand screwed it back in. No tools required at all.
Other Parts Used:
  • EVE from NOKESVILLE, VA
  • Difficulty Level:
    Really Easy
  • Total Repair Time:
    Less than 15 mins
21 of 30 people found this instruction helpful.
Was this instruction helpful to you?
Thank you for voting!
How To Replace The Lower Spray Arm Assy.
First make sure the dishwaher is off and secure to work on: remove the lower basket, turn the broken spray arm assy counter clockwise, it may be tight, but no tool be need it, screw it all way out, remove it and replace it with your new one by turning clockwise,make sure its tight, no tools need it but basket in place and the dishwasher is ready to go
Other Parts Used:
  • Franz from Hazlet, NJ
  • Difficulty Level:
    Easy
  • Total Repair Time:
    Less than 15 mins
10 of 14 people found this instruction helpful.
Was this instruction helpful to you?
Thank you for voting!
Broken Spray Tower in Lower Arm
This was one of the easiest fixes i have ever done. All you need is a screwdriver. the hardest part about it was unscrewing the old spray arm. I found it was easiest to break the tabs on the old spray arm and pull out the spray tower, leaving the bottom part in. The bottom is the part to unscrew. I then put the metal end of the screwdriver through the two holes where the tabs were and used the screwdriver as a handle to unscrew it. Once it was taken out, I screwed the new spray arm in - buy hand -. You can feel it lock when it is all the way in.
Other Parts Used:
  • Kevin from Phoenix, AZ
  • Difficulty Level:
    Really Easy
  • Total Repair Time:
    Less than 15 mins
  • Tools:
    Screw drivers
9 of 10 people found this instruction helpful.
Was this instruction helpful to you?
Thank you for voting!
Standing water after cycle
Easy. I removed the dishwasher and all water from inside. After laying the dishwasher on floor, the valve flapper was installed using a pair of pliers. I then set the unit upright, and removed the rear screen from the inside back of the unit. This part has 4 nut screws, and runs the width of the unit. Under the screen, the Piston and Nut Assembly for Check Value simply unscrewed. When I looked at it, I knew this would do the trick. I simply screwed the new one in, and re-installed the dishwasher. After the first cycle, I smiled thinking of all the $$$ I saved.

Parts Select is great :)
Other Parts Used:
Piston and Nut Assembly Check Valve Flapper
  • William from Broomfield, CO
  • Difficulty Level:
    Easy
  • Total Repair Time:
    30 - 60 mins
  • Tools:
    Screw drivers, Wrench (Adjustable), Wrench set
5 of 6 people found this instruction helpful.
Was this instruction helpful to you?
Thank you for voting!
Poor draining, broken spray arm assembly, leaking under dishwasher
I tried to take it apart, clean it an put it back together. In the process I found the valve flapper to be old and in need of replacement and the lower spray arm assembl tabs broke and required replacement of the entire assembly when I only needed the bottom half. I cleaned all hose/wet connections, coated with plumbers grease and put back together. No leaks, drains properly. Took a bit more time than expected due to door within pump housing that was removed for cleaning that didn't want to be put back on.
Other Parts Used:
Check Valve Flapper
  • Barry from Flint, MI
  • Difficulty Level:
    A Bit Difficult
  • Total Repair Time:
    1- 2 hours
  • Tools:
    Nutdriver, Pliers, Screw drivers, Socket set, Wrench (Adjustable), Wrench set
3 of 5 people found this instruction helpful.
Was this instruction helpful to you?
Thank you for voting!
Water was not draining properly
Looked up Model number on site, checked "symptoms", and 64% of the time it was the Piston & Nut Assembly, which was correct. While I had it apart, I replaced Filter Gasket that was deteriorating, and lower spary arm that had a crack. Very easy fix.
Other Parts Used:
Filter Gasket Assembly Piston and Nut Assembly
  • Larry from Woodbridge, VA
  • Difficulty Level:
    Really Easy
  • Total Repair Time:
    15 - 30 mins
  • Tools:
    Nutdriver, Screw drivers
2 of 5 people found this instruction helpful.
Was this instruction helpful to you?
Thank you for voting!
Part of lower spray arm assembly was broken
This large part is located at the bottom of the tub. It can be accessed by removing the lower dish rack. The assembly is held in place by threads. It can be removed by hand by unscrewing as shown in the PartSelect video. Replacing is just the reverse. The video was very helpful.
Other Parts Used:
  • Willard from Los Alamos, NM
  • Difficulty Level:
    Really Easy
  • Total Repair Time:
    30 - 60 mins
1 person found this instruction helpful.
Was this instruction helpful to you?
Thank you for voting!
  • 1
Questions and Answers

Be the first to ask our experts a question about this part!

Model Cross Reference
This part works with the following models:
PartSelect Number: PS260538
Manufacturer Part Number: WD22X10017
Brand
Model Number
Description
General Electric
400910
Dishwasher
General Electric
400911
Dishwasher
General Electric
400912
Dishwasher
General Electric
400913
Dishwasher
General Electric
EDW2020F00BB
Dishwasher
General Electric
EDW2020F01BB
Dishwasher
General Electric
EDW2030F00WW
Dishwasher
General Electric
EDW2030F01WW
Dishwasher
General Electric
EDW2030F02WW
Dishwasher - DISHWASHER
General Electric
EDW2050F00CC
Dishwasher
General Electric
EDW2050F01CC
Dishwasher
General Electric
EDW2050F02CC
Dishwasher
General Electric
EDW2060F00SS
Dishwasher
General Electric
EDW2060F02SS
Dishwasher
General Electric
EDW3000G00BB
Dishwasher
General Electric
EDW3000G00CC
Dishwasher
General Electric
EDW3000G00WW
Dishwasher
General Electric
EDW3000G01BB
Dishwasher
General Electric
EDW3000G01CC
Dishwasher
General Electric
EDW3000G01WW
Dishwasher
General Electric
EDW3000G02BB
Dishwasher
General Electric
EDW3000G02CC
Dishwasher
General Electric
EDW3000G02WW
Dishwasher
General Electric
EDW3000G03BB
Dishwasher
General Electric
EDW3000G03CC
Dishwasher
General Electric
EDW3000G03WW
Dishwasher
General Electric
EDW3060G02SS
Dishwasher
General Electric
EDW3060G03SS
Dishwasher
General Electric
GHD5015F00AA
Dishwasher
General Electric
GHD5015F01AA
Dishwasher
Customer Service Representative

Get in touch, we're here to help!

Daily 8am - 9pm EST

Contact Customer Service