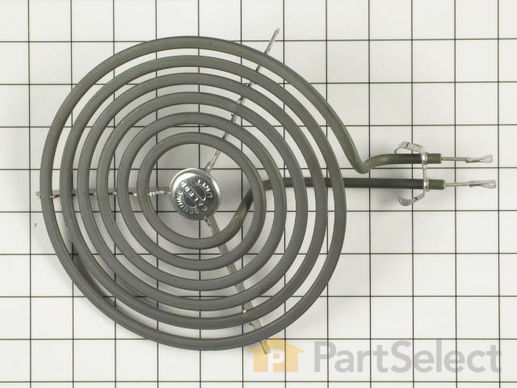
Part Location Diagram of WB30X219 GE 8 Inch Surface Burner Element
See part 284 in the diagram
( Grid squares measure 1x1 inch )
Customer Service Representative

Get in touch, we're here to help!

Daily 8am - 9pm EST

customerservice@partselect.ca

8 Inch Surface Burner Element

$139.07
  Special Order
PartSelect Number PS244001
Manufacturer Part Number WB30X219
Manufactured by GE
Product Description

8 Inch Surface Burner Element Specifications

This part fits most ranges where a ceramic terminal block is used.
How Buying OEM Parts Can Save You Time and Money

How Buying OEM Parts Can Save You Time and Money

Troubleshooting
This part fixes the following symptoms:
Element will not heat
This part works with the following products:
Range, Microwave Oven Combo, Cooktop.
This part works with the following products:
General Electric, Hotpoint.
Part# WB30X219 replaces these:
AP2027804, 2, WB30X0219, WB30X219R
Back to Top
Customer Repair Stories
 Average Repair Rating: 5.0 / 5.0, 14 reviews. What's this?
  • 1
  • 2
Sort by:
Sorry, we couldn't find any existing installation instruction that matched.
Two burners kept cuttin out.
On Friday, the day after Thanksgiving, I placed an order for two replacement burners, four new pans, and two receptacle ASM's for my 30+ year old GE stove. I didn't know the exact model number, but because of your very informative website, I was able to look at the parts and find what I needed.

Much to my amazement, the parts arrived the next day (24 hours after ordering!). I didn't pay for overnight or weekend delivery. You quickly fulfilled the order and shipped it the same day. It really was a great surprise to see the parts so quickly.

To top it off, the installation was so simple that my 3 and 5 year olds helped out (after disconnecting the power first!) the installation was so straight forward, that my 5 year old unscrewed the nut that held the receptacle in place while the 3 year old unwrapped the new pans. All I needed was a Phillips head screw driver and a open ended wrench to complete the job. I replaced all the parts and had a stove that looked brand new (and worked) within 10 minutes.

After 5 years of fighting a stove the intermittently worked, worrying about where to get parts, and wondering if I needed to purchase a new stove, it is all over. My wife is happy, I am happy, and my kids are happy that they had a fun Saturday project to help dad with. If I only knew about PartSelect 5 years ago, we would have been cooking worry free, knowing the stove is actually heating up.

The procedure was simple! Here is what I did:
1.) disconnected the power by lifting up the lever under the stove that held the power cable.
2.) Removed the burners by simply pulling them out of the socket, and removed the drip pans.
3.) used a wrench set to remove the screw holding the ceramic terminal block in place
4.) removed the wires from the back of the terminal block with a Phillips head screw driver. On one of the burners, the terminal block assembly was so damaged, I used the pliers to break the ceramic and then held onto the receiving terminal to loosen the screw.
5.) connected the new terminal block. I made sure by simply screwing on the wires. I made sure I clipped in the new plastic covering that protected the screws.
6.) re-attached the terminal assembly block to the stove top. BE CAREFUL so as to not over-tighten, you can strip the screw
7.) installed the new drip pans.
8.) re-connected the power by simply plugging in the main power and re-camping the quick-disconnect.
9.) Checked the stove to make sure everything worked.
10.) Cooked dinner!
Other Parts Used:
Drip Bowl - 8 Inch Drip Bowl - 6" Terminal Block Assembly
  • Robert from Chesterfield, MO
  • Difficulty Level:
    Easy
  • Total Repair Time:
    Less than 15 mins
  • Tools:
    Pliers, Screw drivers, Wrench set
13 of 18 people found this instruction helpful.
Was this instruction helpful to you?
Thank you for voting!
2 main burners would not heat - connectors on elements were corroded
Removed old heating elements and drip bowls and replaced. Doesn't get much easier than that. parts deleivered in 1 day (even though I chose the slow delivery option) and was fixed that day - Wife HAPPY - me happy!
Other Parts Used:
Drip Bowl - 8 Inch
  • James from Dixon, IL
  • Difficulty Level:
    Really Easy
  • Total Repair Time:
    Less than 15 mins
5 of 6 people found this instruction helpful.
Was this instruction helpful to you?
Thank you for voting!
2 elements not heating
First I pulled the heating elements from sockets
Removed 1/4 " screw from socket brackets.
Removed two wires from socket , reversed procedure, tested , work fine ,wife happy, me happy.
Parts were delivered in 3 days.
Other Parts Used:
Terminal Block Assembly
  • Jeffrey from St. Charles, MO
  • Difficulty Level:
    Really Easy
  • Total Repair Time:
    Less than 15 mins
  • Tools:
    Nutdriver, Screw drivers
4 of 5 people found this instruction helpful.
Was this instruction helpful to you?
Thank you for voting!
No place in my area carry this type of range element
Was able to slide it right in
Other Parts Used:
  • Michael from TAMPA, FL
  • Difficulty Level:
    Very Easy
  • Total Repair Time:
    Less than 15 mins
2 of 2 people found this instruction helpful.
Was this instruction helpful to you?
Thank you for voting!
Could not find a replacement part anywhere
The Surface Element on our GE stove made in the mid 70's finally gave up and would not heat. I went to several of the big home improvement stove with not luck in finding the right heating element for our stove so I turned to a local appliance stove that carries GE products, they did sell me an element and asured me it was the correct one, but once again the element was the wrong one. Then with a simple google search for GE replacment parts I found partselect.com. With the detailed description and images with measuring grids I was able to quickly find the correct heating element for me stove. I am very pleased and the stove is back to 100%.
Thanks partselect.com
Other Parts Used:
  • Anthony from Bowden, WV
  • Difficulty Level:
    Really Easy
  • Total Repair Time:
    Less than 15 mins
2 of 3 people found this instruction helpful.
Was this instruction helpful to you?
Thank you for voting!
Element burned out
Partselect had the right part, clearly indicated in the diagrams and menus. Shipped quickly. Easy to use web site.
Other Parts Used:
  • J. from Durham, NC
  • Difficulty Level:
    Really Easy
  • Total Repair Time:
    Less than 15 mins
2 of 7 people found this instruction helpful.
Was this instruction helpful to you?
Thank you for voting!
Burners old, worn out
1. Went on line to your website.
2. Ordered the parts
3. Rec'd your package.
4. Installed ("plugged in") the new parts.
5. Voila !
Other Parts Used:
Drip Bowl - 8 Inch Drip Bowl - 6" Surface Element - 6" - 1325W
  • Captain Bernie from Stamford, CT
  • Difficulty Level:
    Really Easy
  • Total Repair Time:
    Less than 15 mins
1 of 5 people found this instruction helpful.
Was this instruction helpful to you?
Thank you for voting!
Element would not heat to max temp.
The interesting part of this story was troubleshooting the problem. Was it the element or the control? Turns out the element was making poor contact, generating excess heat ,which corroded the element contact generating even more heat, and so on and so on until the termional block eventually broke. The repair itself was simple once I separated the element from the terminal block. After that I removed the terminal block, one screw, removed the connecting wires, two screws, reversed the procedure to install the the new terminal boplck and element. Before the whole process began I made sure to turn the breaker to OFF.
Other Parts Used:
Porcelain Drip Bowl - 8" Porcelain Drip Pan - 6" Trim Ring - 8 Inch Trim Ring - 6 Inch Terminal Block Assembly
  • Alfred from East Northport, NY
  • Difficulty Level:
    Really Easy
  • Total Repair Time:
    Less than 15 mins
  • Tools:
    Screw drivers
1 person found this instruction helpful.
Was this instruction helpful to you?
Thank you for voting!
Surface Element contacts when they were insert into the Terminal Block became burned up they were not making any contact to heat up.
First I removed the one screw that hold the terminal block in place. I then pulled the terminal block out about 3 inches and unscrewed the two screws and disconnected the two wires. Then I got the new terminal block and re-attached the two wires with the two screws. Then I screwed the terminal blocked with the one screw and then I inserted the 8" Surface Element and I turned it on and it heated up very quickly. It works better than it has in many years.
Other Parts Used:
Terminal Block Assembly
  • Sean from Anaheim, CA
  • Difficulty Level:
    Really Easy
  • Total Repair Time:
    Less than 15 mins
  • Tools:
    Screw drivers
1 person found this instruction helpful.
Was this instruction helpful to you?
Thank you for voting!
The old surface unit was not generating heat
We just remove the old surface unit and insert the new one by hand. Thanks to PartSelect, we were able to buy really good quality part that works right away! It was a 26-year-OLD GE Stove/Microwave space maker, the parts were hard to find in stores. Thank you for selling this! All the best for your business!
Other Parts Used:
  • Yi from Miami, FL
  • Difficulty Level:
    Really Easy
  • Total Repair Time:
    Less than 15 mins
0 of 1 people found this instruction helpful.
Was this instruction helpful to you?
Thank you for voting!
  • 1
  • 2
Questions and Answers

Be the first to ask our experts a question about this part!

Related Parts
Model Cross Reference
This part works with the following models:
PartSelect Number: PS244001
Manufacturer Part Number: WB30X219
Brand
Model Number
Description
General Electric
J313*R1
Range - GE Range/Stove/Oven Model J313*R1 Parts
General Electric
J313*R2
Range - GE Range/Stove/Oven Model J313*R2 Parts
General Electric
J316*R1
Range - GE Range/Stove/Oven Model J316*R1 Parts
General Electric
J316*R2
Range - GE Range/Stove/Oven Model J316*R2 Parts
General Electric
J316*R3
Range - GE Range/Stove/Oven Model J316*R3 Parts
General Electric
J322*01
Range - GE Range/Stove/Oven Model J322*01 Parts
General Electric
J322*02
Range - GE Range/Stove/Oven Model J322*02 Parts
General Electric
J322*R1
Range - GE Range/Stove/Oven Model J322*R1 Parts
General Electric
J322*R2
Range - GE Range/Stove/Oven Model J322*R2 Parts
General Electric
J335*01
Range - GE Range/Stove/Oven Model J335*01 Parts
General Electric
J335*02
Range - GE Range/Stove/Oven Model J335*02 Parts
General Electric
J335*R1
Range - GE Range/Stove/Oven Model J335*R1 Parts
General Electric
J335*R2
Range - GE Range/Stove/Oven Model J335*R2 Parts
General Electric
J335*R3
Range - GE Range/Stove/Oven Model J335*R3 Parts
General Electric
J351*R1
Range - GE Range/Stove/Oven Model J351*R1 Parts
General Electric
J351*R2
Range - GE Range/Stove/Oven Model J351*R2 Parts
General Electric
J351*R3
Range - GE Range/Stove/Oven Model J351*R3 Parts
General Electric
J356*R1
Range - GE Range/Stove/Oven Model J356*R1 Parts
General Electric
J356*R2
Range - GE Range/Stove/Oven Model J356*R2 Parts
General Electric
J356*R3
Range - GE Range/Stove/Oven Model J356*R3 Parts
General Electric
J3560R2WH
Range - GE Range/Stove/Oven Model J3560R2WH Parts
General Electric
J3560R3WH
Range - GE Range/Stove/Oven Model J3560R3WH Parts
General Electric
J361*01
Range - GE Range/Stove/Oven Model J361*01 Parts
General Electric
J361*R1
Range - GE Range/Stove/Oven Model J361*R1 Parts
General Electric
J361*R2
Range - GE Range/Stove/Oven Model J361*R2 Parts
General Electric
J361*R3
Range - GE Range/Stove/Oven Model J361*R3 Parts
General Electric
J365*01
Range - GE Range/Stove/Oven Model J365*01 Parts
General Electric
J365*02
Range - GE Range/Stove/Oven Model J365*02 Parts
General Electric
J365*R1
Range - GE Range/Stove/Oven Model J365*R1 Parts
General Electric
J365*S1
Range - GE Range/Stove/Oven Model J365*S1 Parts
Customer Service Representative

Get in touch, we're here to help!

Daily 8am - 9pm EST

Contact Customer Service