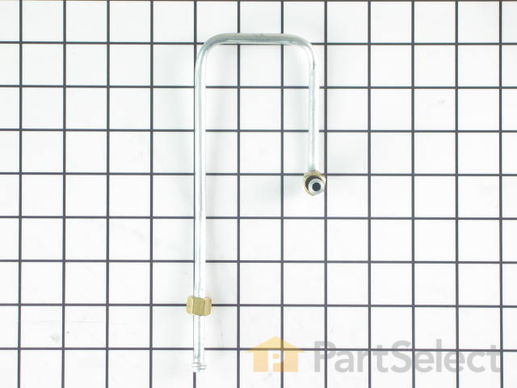
Part Location Diagram of WB28K10025 GE Burner Tube - Left Front
See part 22 in the diagram
( Grid squares measure 1x1 inch )
Customer Service Representative

Get in touch, we're here to help!

Daily 8am - 9pm EST

customerservice@partselect.ca

Burner Tube - Left Front

$61.07
  Special Order
PartSelect Number PS240685
Manufacturer Part Number WB28K10025
Manufactured by GE
Troubleshooting
This part fixes the following symptoms:
Gas smell | Will Not Start | Element will not heat
This part works with the following products:
Range.
This part works with the following products:
General Electric, Kenmore, Hotpoint.
Part# WB28K10025 replaces these:
AP2026913, 770074
Back to Top
Customer Repair Stories
 Average Repair Rating: 4.0 / 5.0, 11 reviews. What's this?
  • 1
  • 2
Sort by:
Sorry, we couldn't find any existing installation instruction that matched.
On Thankgiving Day with company coming and the turkey in the oven, my kenmore stove decided to act up. The oven burner started to smell awful and start carboning up due to improper burning at the burner tube. We then abandoned our attempts to roast the turkey in the oven for that day.
After removing the bake tube and ignitor assembly the following day for a close inspection which involved removal of the bottom pan, racks etc. and disconnecting the ignitor / tube assembly by unscrewing the sheet-metal screws holding them in place, I discovered that the ignitor had burned a hole in the bake tube which could not be seen without unscrewing the ignitor from the tube first. This caused the air / propane ratio to dramaticly change causing the oven to have a strong odor, start to carbon up the bake tube and effect the temperatures and cook time and the possibility of monoxide fumes effecting the chef. The parts that partselect.com supplied, which were in stock ,worked perfectly and saved my Christmas goose. Happy Holidays!
Other Parts Used:
Burner with Igniter Burner Tube - Right Front Flat Style Oven Igniter Kit
  • Edward from Pipersville, PA
  • Difficulty Level:
    Easy
  • Total Repair Time:
    1- 2 hours
  • Tools:
    Nutdriver, Screw drivers
127 of 201 people found this instruction helpful.
Was this instruction helpful to you?
Thank you for voting!
Damaged both front burner tubes.
While i was inserting the new lp,gas orriface to the right rear burner tube I dropped the oriface.Without looking i popped the top of the burner unit, like most older type stoves, and thats when i ran into my problem. I realized the burner tube assemblies are attached by 3 screws to the top cover.Not attached to the cabinet as the older models, Basically cracked both front aluminum tubes trying to retrieve the dropped oriface. so i had to replace the burner tube units, which involved removing 3 screws, and loosing up and removal of the nut to the main gas tube. extremely easy repair, next time i`ll try to remember look before i leap,total time to (r+r)burner tubes about 20 minutes.Parts select pulled me out of the fire on this one, great staff and service, with quick delivery.
Other Parts Used:
Burner Tube - Right Front
  • william from Tampa, FL
  • Difficulty Level:
    Really Easy
  • Total Repair Time:
    15 - 30 mins
  • Tools:
    Screw drivers, Wrench set
15 of 15 people found this instruction helpful.
Was this instruction helpful to you?
Thank you for voting!
burner tubes both had pin holes in them and the ignighter didnt work
This was a real easy job and a success,of course any repair i do on a gas appliance and when finished It doesnt blow up i consider a success.
Thank you,David Williams
Other Parts Used:
Burner Tube - Right Front Top Burner Electrode
  • David from easton, MD
  • Difficulty Level:
    Really Easy
  • Total Repair Time:
    15 - 30 mins
  • Tools:
    Socket set, Wrench (Adjustable), Wrench set
10 of 20 people found this instruction helpful.
Was this instruction helpful to you?
Thank you for voting!
Cracked the burner tubes while cleaning
While I was waiting on another part to arrive, I decided it would be a good time to do a thorough cleaning. When I lifted the top of the range, I lifted it to far and cracked both front burner tubes. The top of the range should not be lifted more than 4 inches without removing the 3 screws that hold each burner in place. When the new lines came in, I removed both front burners, knobs, and then removed the front plate behind the knobs using a Phillips screwdriver. The screws are located on the bottom of the plate. Using my adjustable wrench I replaced the lines. Then I CAREFULLY bent the gas tubes and remounted the burners. Over all an easy install. Just be careful, the gas tubes are aluminum and will break very easy. This is the second time I used PartSelect, and I am very satisfied.
Other Parts Used:
Burner Tube - Right Front
  • Rocky from Liberty, TX
  • Difficulty Level:
    Really Easy
  • Total Repair Time:
    15 - 30 mins
  • Tools:
    Screw drivers, Wrench (Adjustable)
9 of 10 people found this instruction helpful.
Was this instruction helpful to you?
Thank you for voting!
Wife broke gas lines when trying to clean under hood
Removed old line with wrench and attached new line to gas valve first. Then lowered hood to the stop and attached gas line to burners.........very easy and works fine now.
Other Parts Used:
Burner Tube - Right Front
  • Scott from Corinth, MS
  • Difficulty Level:
    Easy
  • Total Repair Time:
    Less than 15 mins
  • Tools:
    Wrench set
4 of 6 people found this instruction helpful.
Was this instruction helpful to you?
Thank you for voting!
broke tubes while cleaning under top
was still using back burners while waiting for parts (after safety check). I unplugged the electric for the igniters, raised top, installed tubes, checked for leaks with soap solution, closed top, plugged in electric tested burners. Got a big hug and kiss from my wife.
Other Parts Used:
Burner Tube - Right Front
  • Sally from Bakersfield, CA
  • Difficulty Level:
    Really Easy
  • Total Repair Time:
    Less than 15 mins
  • Tools:
    Wrench set
2 of 3 people found this instruction helpful.
Was this instruction helpful to you?
Thank you for voting!
while cleaning I broke the tubes either lifting or closing the top.
I bent the tubes very slghtly to rech the area of attachment. I first screwed them with my hand then tightened them with an adjstable wrench. It was really simple and fast.
Other Parts Used:
Burner Tube - Right Front
  • DAPHNE from CHICAGO, IL
  • Difficulty Level:
    Really Easy
  • Total Repair Time:
    15 - 30 mins
  • Tools:
    Wrench (Adjustable)
2 of 4 people found this instruction helpful.
Was this instruction helpful to you?
Thank you for voting!
burners would not light
Remove the old tubes. Lift the lid NO MORE THAN FOUR INCHES. !!!!! Feel for the connections on the switch ends and attach losely. Carefully ( with some slight bending ) attach tubes to the burners. Tighten all connections. Do not over tighten.
The tubes broke originaly because , attempting to clean the area I lifted the lid too high.
Other Parts Used:
Burner Tube - Right Front
  • michael from The Villages, FL
  • Difficulty Level:
    A Bit Difficult
  • Total Repair Time:
    15 - 30 mins
  • Tools:
    Wrench set
2 of 5 people found this instruction helpful.
Was this instruction helpful to you?
Thank you for voting!
Front burners had to be lit with lighter
My son lifted up cooktop, unscrewed the front plate to gain access to old tube burners, removed and replaced with new parts.
Other Parts Used:
Burner Tube - Right Front
  • Marie from Woodstock, IL
  • Difficulty Level:
    Really Easy
  • Total Repair Time:
    15 - 30 mins
  • Tools:
    Screw drivers, Wrench set
2 of 5 people found this instruction helpful.
Was this instruction helpful to you?
Thank you for voting!
tube that sends gas to burners broke both left and right front this happen due to opening the range hood to clean inside
I turn gas off to the appliance then I remove the old gas lines and installed the new ones. I did find it easlier to attach the line at the burner knob first then attach it to the burner.
Other Parts Used:
Burner Tube - Right Front
  • LEAH from YUMA, AZ
  • Difficulty Level:
    A Bit Difficult
  • Total Repair Time:
    15 - 30 mins
  • Tools:
    Pliers, Screw drivers, Socket set, Wrench (Adjustable)
1 person found this instruction helpful.
Was this instruction helpful to you?
Thank you for voting!
  • 1
  • 2
Questions and Answers

Ask our experts a question about this part and we'll get back to you as soon as possible!

1 question answered by our experts.
  • 1
Sort by:
Sorry, we couldn't find any existing answers that matched.Try using some different or simpler keywords, or submit your new question by using the "Ask a Question" button above!
Wayne
October 6, 2021
Neither top or bottom burners will light. Igniters do not heat up at all. Have power to the unit/display works fine. Replaced the bottom igniter w/no luck.
For model number JGBP30BEA1WH
PartSelect logo
Hello Wayne, Thank you for the question. If both the Broil and Bake elements are not turning on in the oven, we suggest checking the Dual Oven Safety Valve. I suggest testing for 3.2-3.6 volts AC at the gas safety valve with the igniter turned on. If the voltage is there, you have a bad safety valve. We hope this helps!

Was this helpful?
Thank you for voting!
Related Parts:
  • 1
Related Parts
Model Cross Reference
This part works with the following models:
PartSelect Number: PS240685
Manufacturer Part Number: WB28K10025
Brand
Model Number
Description
Kenmore
36272181890
Range
Kenmore
36272181891
Range
Kenmore
36272188890
Range
Kenmore
36272188891
Range
Kenmore
36272191890
Range
Kenmore
36272191891
Range
Kenmore
36272191892
Range
Kenmore
36272198890
Range
Kenmore
36272198891
Range
Kenmore
36272198892
Range
Kenmore
36272201890
Range
Kenmore
36272201891
Range
Kenmore
36272201892
Range
Kenmore
36272201893
Range
Kenmore
36272205891
Range
Kenmore
36272205892
Range
Kenmore
36272205893
Range
Kenmore
36272206891
Range
Kenmore
36272206892
Range
Kenmore
36272206893
Range
Kenmore
36272208891
Range
Kenmore
36272208892
Range
Kenmore
36272208893
Range
Kenmore
36272210101
Range
Kenmore
36272210102
Range
Kenmore
36272211101
Range
Kenmore
36272211102
Range
Kenmore
36272212101
Range
Kenmore
36272212102
Range
Kenmore
36272214101
Range
Customer Service Representative

Get in touch, we're here to help!

Daily 8am - 9pm EST

Contact Customer Service