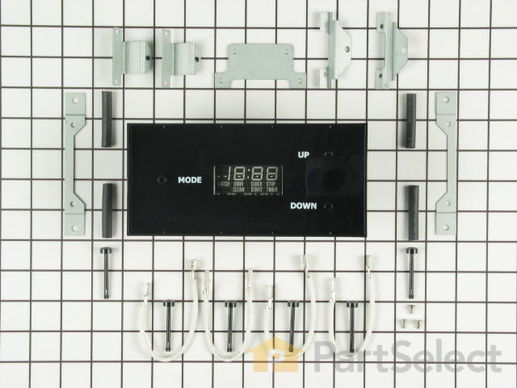
Part Location Diagram of WB19X10006 GE Electronic Clock and Timer Kit
See part 16 in the diagram
( Grid squares measure 1x1 inch )
Customer Service Representative

Get in touch, we're here to help!

Monday to Saturday
8am - 9pm EST

customerservice@partselect.ca

Electronic Clock and Timer Kit

$567.21
  Special Order
PartSelect Number PS233996
Manufacturer Part Number WB19X10006
Manufactured by GE
Product Description

Electronic Clock and Timer Kit Specifications

This electronic clock replaces the mechanical clocks with a more reliable digital timer. As per the manufacturer, this part should be installed by appliance repair person.
How Buying OEM Parts Can Save You Time and Money

How Buying OEM Parts Can Save You Time and Money

Troubleshooting
This part fixes the following symptoms:
Timer will not advance
This part works with the following products:
Range, Wall Oven, Microwave Oven Combo.
This part works with the following products:
General Electric, Hotpoint, Kenmore.
Part# WB19X10006 replaces these:
AP2633678, 3595, WB19X0134, WB19X0142, WB19X0143, WB19X142, WB19X5223, WB19X5231, WB19X5269, WB19X5282
Back to Top
Customer Repair Stories
 Average Repair Rating: 2.1 / 5.0, 4 reviews. What's this?
  • 1
Sort by:
Sorry, we couldn't find any existing installation instruction that matched.
Electronic Timer went out and Top Oven No Longer worked
There are about 12 wires behind the panel...and this was the second time I've replaced the electronic clock in the past four years. I replaced the analog clock four years ago with the digital version because the analog was no longer available, so I knew what I was in for. There are four screw (top of the frame and lower frame) to remove before the frame holding the clock will come out. First DISCONNECT the power! You've have to remove the clock control knobs, and the plastic lever on the self cleaning handle. The first time I ordered this replacement part from PartsSelect there was a diagram included on which wire goes where. This time there wasn't! So it gets a little complicated. Make sure you label all the wired before you disconnect the old clock panel. Anyway, remove the four nuts holding the old clock in place; put the new clock panel in; replace the four nuts. I'll be glad to talk anyone through the rest and I have photos of the whole repair.
Other Parts Used:
  • David from Owings Mills, MD
  • Difficulty Level:
    Difficult
  • Total Repair Time:
    1- 2 hours
  • Tools:
    Pliers, Screw drivers
60 of 73 people found this instruction helpful.
Was this instruction helpful to you?
Thank you for voting!
Mechanical/electrical clock/timer not working
Followed the instruction provided except had to add a NEUTRAL LEAD which on the old part had been provided by the frame as it was metal/ electrical vs plastic/electronic . Used one of the extra Wire Extensions provided, drilled a hole in the clip connection and attached it to the metal frame holding in the replacement clock. The need for a NEUTRAL LEAD was not discussed in the instructions.
Other Parts Used:
  • Maxwell from RINGWOOD, NJ
  • Difficulty Level:
    A Bit Difficult
  • Total Repair Time:
    15 - 30 mins
  • Tools:
    Nutdriver, Pliers, Screw drivers
29 of 36 people found this instruction helpful.
Was this instruction helpful to you?
Thank you for voting!
Old mechanical timer worn out.
This digital timer, GE Part # WB19X10006 (PartSelect PS233996) is called out by GE as the current replacement for the mechanical timer in the JB500G*J1 range. I had tried to get one some time ago from another dealer but was told it was discontinued and no longer available, so I was pretty happy to come across it in the PartSelect catalog.

It comes with a number of mounting brackets and instructions to use the brackets that resemble the old parts, but when I did that the control buttons did not line up with the holes in the glass and were offset about 1/4" to the left. It was impossible to simply slide the timer over that far because it bumped into the underlying metal frame. I ended up using a longer set of brackets which lifted the timer about 1/2" off the glass, thereby avoiding interference with the frame, and bent the brackets sideways to line up with the holes in the glass. But then a transformer on the new timer stuck out about 1/4" too far in back to get the rear cover back on. I made two vertical cuts in the rear cover from the edge down past the timer and bent the resulting flap around the transformer. The resulting installation looks like it was made that way and works great.
Other Parts Used:
  • Theodore from Atwater, CA
  • Difficulty Level:
    A Bit Difficult
  • Total Repair Time:
    1- 2 hours
  • Tools:
    Nutdriver, Pliers
26 of 32 people found this instruction helpful.
Was this instruction helpful to you?
Thank you for voting!
After 33 years our double oven clock stopped working.
I studied the drawings on the instruction sheet off and on for about 3 hours. I'm 76 and my memory and ability to identify the relevant parts of the old and replacement clock as depicted on the drawings aren't what they were a few decades ago. I took my time studying this until I was confident that I knew which wires needed to go on which terminals on the new clock module. It took me a while to figure out which side (left or right) of the drawing for the old and new clocks were at the end of the module and which side was adjacent to the rest of the module. Careful study of the drawings and examinations of the modules cleared this up. It also took me some time to figure out if the top or bottom of the drawings as depicted on the paper matched up with the top and bottom of the modules when viewed from the front of the oven. After this became clear removal of the wires from the old module (I labeled all of them with masking tape, for example, as L1, L2, common or neutral, Output 1 and Output 2) and placement on the new module was quite straight forward. I then covered all bare wires with the rubber insulators or electricians tape. However, the clock didn't light up when the panel was reassembled and the power was turned back on. I hired a local appliance technician to examine my work. He found 2 wires touching that weren't supposed to be touching where they plugged into the module. After separating them and turning on the power the clock has worked perfectly. The metal bracket on my oven worked with the new clock module. I didn't have to use any of the new brackets that came with the new clock. A few other manageable problems: I needed a torx screwdriver I didn't have to remove 3 screws holding the panel holding the oven dials and clock module on to the oven. A neighbor provided the needed screwdriver. I cut my index finger when removing the black knob attached to the lever used to lock the oven during cleaning. A band aid stopped the bleeding and allowed work to continue. The spring fitting over the end of the lever that wedges the black handle in place cut my finger. I'll use a pliers or protect my fingers with a towel the next time when removing this knob. I had a few hiccups doing this task but am thoroughly pleased with the end result.
Other Parts Used:
  • Thomas from KNOXVILLE, TN
  • Difficulty Level:
    A Bit Difficult
  • Total Repair Time:
    More than 2 hours
  • Tools:
    Nutdriver, Pliers, Screw drivers
11 of 12 people found this instruction helpful.
Was this instruction helpful to you?
Thank you for voting!
  • 1
Questions and Answers

We're sorry, but our Q&A experts are temporarily unavailable.
Please check back later if you still haven't found the answer you need.

Related Parts
Model Cross Reference
This part works with the following models:
PartSelect Number: PS233996
Manufacturer Part Number: WB19X10006
Brand
Model Number
Description
Kenmore
21131
Range - Kenmore Range/Stove/Oven Model 21131 (1988) (21131(1988)) Parts
Kenmore
21132
Range - Kenmore Range/Stove/Oven Model 21132 (1988) (21132(1988)) Parts
Kenmore
21133
Range - Kenmore Range/Stove/Oven Model 21133 (1988) (21133(1988)) Parts
Kenmore
21231
Range - Kenmore Range/Stove/Oven 21231 (1988)
Kenmore
21232
Range - Kenmore Range/Stove/Oven Model 21232 (1988) (21232(1988)) Parts
Kenmore
21233
Range - Kenmore Range/Stove/Oven Model 21233 (1988) (21233(1988)) Parts
Kenmore
21234
Range - Kenmore Range/Stove/Oven Model 21234(1988) Parts
Kenmore
21235
Range - Kenmore Range/Stove/Oven Model 21235(1988) Parts
General Electric
J500XD1
Range - GE Range/Stove/Oven Model J500XD1 Parts
General Electric
J500XD2
Range - GE Range/Stove/Oven Model J500XD2 Parts
General Electric
JB390G*H1
Range - Electric
General Electric
JB390G0H1
Range - GE Range/Stove/Oven Model JB390G0H1 Parts
General Electric
JB390G1H1
Range - GE Range/Stove/Oven Model JB390G1H1 Parts
General Electric
JB390G2H1
Range - GE Range/Stove/Oven Model JB390G2H1 Parts
General Electric
JB390G3H1
Range - GE Range/Stove/Oven Model JB390G3H1 Parts
General Electric
JB390G4H1
Range - GE Range/Stove/Oven Model JB390G4H1 Parts
General Electric
JB391G*H1
Range - Electric
General Electric
JB391G*J1
Range - Electric
General Electric
JB391G*J2
Range - GE FREE-STANDING / DROP-
General Electric
JB391G*J3
Range - Electric
General Electric
JB391G*J4
Range - Electric
General Electric
JB391G*K1
Range - Electric
General Electric
JB391G0H1
Range - GE Range/Stove/Oven Model JB391G0H1 Parts
General Electric
JB391G0J1
Range - GE Range/Stove/Oven Model JB391G0J1 Parts
General Electric
JB391G0J3
Range - GE Range/Stove/Oven Model JB391G0J3 Parts
General Electric
JB391G0J4
Range - GE Range/Stove/Oven Model JB391G0J4 Parts
General Electric
JB391G0K1
Range - GE Range/Stove/Oven Model JB391G0K1 Parts
General Electric
JB391G1H1
Range - GE Range/Stove/Oven Model JB391G1H1 Parts
General Electric
JB391G1J1
Range - GE Range/Stove/Oven Model JB391G1J1 Parts
General Electric
JB391G1J3
Range - GE Range/Stove/Oven Model JB391G1J3 Parts
Customer Service Representative

Get in touch, we're here to help!

Monday to Saturday
8am - 9pm EST

Contact Customer Service