This kit comes with three separate thermal fuses and is usually used with clothes dryers that have a fan mounted on the motor shaft. Included within this kit is the high limit (Limit: 258) the gas high limit (Limit: 240) and the gas and electric high limit thermostat (Limit: 300).
Keep searches simple. Use keywords, e.g. "leaking", "pump", "broken" or "fit".
Sorry, we couldn't find any existing reviews that matched. Try using some different or simpler keywords.
★★★★★
★★★★★
Art H - December 23, 2023
Verified Purchase
Easy repair.
Part here quickly and was easy to install. Dryer working great now.
★★★★★
★★★★★
Ramil C - July 7, 2023
Verified Purchase
A Snappy Repair
Parts came as advertized and quickly. My Dryer was back in action in a jiffy at a very affordable price. Thanks PartSelect!
★★★★★
★★★★★
Brenda H - March 25, 2023
Verified Purchase
Happy we played the odds
The dryer quit working. After determining the model number I googled possible causes. This part was given a 60% chance of being the problem. We ordered it and got it the next day, followed the video to install it and have a dryer working again. So glad we took the chance!
★★★★★
★★★★★
Aiden M - October 9, 2022
Verified Purchase
Easy repair worked as expected
My dryer is back in working condition
★★★★★
★★★★★
Fred M - March 31, 2021
Verified Purchase
Great buy.
The part arrived before the estimated time, was able to track to know when it would arrive and it was very easy to replace in my Maytag dryer. I would highly recommend this product. Be sure the lint is removed from internal air tracks and from the external ducts. this was the cause of the problem. Thank you.
★★★★★
★★★★★
John T - October 21, 2020
Verified Purchase
Worked well
My bro changed the part in a few minutes and my dryer worked right off
★★★★★
★★★★★
Esta P - October 14, 2020
Verified Purchase
Great service
So we are just homeowners living in very rural BC. Dryer just stopped... and we researched it, cleaned out the messy build up of lint... and ordered this part as the fuse was blown. Well, the part came the very next day despite being out in the bush! We were amazed. Thanks for great service and being able to dry the clothes....
★★★★★
★★★★★
Cory N - September 27, 2020
Verified Purchase
worked as expeceted
took a week to arrive, purolator is worse than canada post because they will not leave at your door
★★★★★
★★★★★
Ted H - September 12, 2020
Verified Purchase
This was the problem with an electric dryer
PartSelect diagnosis was right on, this was the part that had failed. Demonstrated as well the importance of keeping the dryer vent clean.
★★★★★
★★★★★
Dave Q - September 4, 2020
Verified Purchase
Easy repair
Repair went exactly as the video showed. So easy. Part came in two days. Thanks for the part and the video
< Prev
1
2
3
Next >
Customer Repair Stories
Average Repair Rating: 3.5 / 5.0, 95 reviews.
What's this?
< Prev
1
2
3
Next >
Sort by:
Search filter:
Clear Filter
Your search term must have 3 or more characters.
Keep searches simple. Use keywords, e.g. "leaking", "pump", "broken" or "fit".
Sorry, we couldn't find any existing installation instruction that matched.
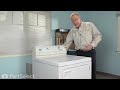
Electric dryer would not heat - Thermal fuses - $25 fix - I love DIY
1. Unplug dryer from power outlet 2. Lift dryer top from front (hinged in rear). Just friction holding top down. Use flat scewdriver wrapped in cloth to help lift. 3. Locate heating element - rear top behind drum 4. Unplug red wires to the high limit thermal fuse 5. Unplug red wires to the heating element 6. Unlug white wires to the high limit fuse 7. Remove high limit thermal fuse 8. Remove heating element 9. Remove high limit fuse 10 Clean heating box Installation is reverse order but do the following first! Clean lint trap - Remove front of dryer 1. Unplug white door switch wires. inside front top right 2. remove two screws securing the front of dryer - inside front top left and top right. Front of dryer is hinged at bottom 3. Clean all the lint you can find. If you have never cleaned out the lint, there might be a lot and the cause of over heating (shorting fuse life). Add to your yearly things to do list. 4. While your at it check the alignment of the plastic glides the drum sits on. 5. Also check the foam gasket between the fan housing and lint trap. Mine was off a bit. Realigned with doubled sided tape.
Other Parts Used:
Ronald from Fredericksburg, VA
Difficulty Level:
Easy
Total Repair Time:
30 - 60 mins
Tools:
Nutdriver, Pliers, Screw drivers
214 of 234 peoplefound this instruction helpful.
Was this instruction helpful to you?
Thank you for voting!
Dryer would not start.
The first issue I had was diagnosing the problem, but after researching on the internet I was able to determine that the High Limit Switch caused the Thermal Fuse to blow. I found instructions on how to check the Thermal Fuse with an Ohm Meter, which was bad. This was a simple test. I removed the Thermal Fuse from the machine and tested it by using my Ohm Meter on the continuity setting. The instruction said that the fuse should always be closed and have continuity. Simply put, its like having a light switch in the on position. I put the leads from the Ohm Meter on the two connectors of the Thermal Fuse and found that there was no current passing through it, telling me that it was bad and needed replacing. The bigger issue for me was what caused the Thermal Fuse to go bad in the first place, which was evident after I opened the dryer to check the part. The dryer was full of lint. Now understand that the lint that was inside the dryer was just a dusty coating, but I am one of those people that when he takes something apart and it is dirty I have to clean it before I put it back together, which payed off for me. I removed the front panel to make it easier to clean the machine. This is when I noticed that the lint trap was almost completely blocked. Most people like me just before starting a load will clean the lint screen, but we never think that over time some of that lint gets by the screen and has to go somewhere. Well in this machine this happened and eventually clogged the tunnel leading out of the machine, which caused the machine to not be able to breath, which caused the heating element to overheat and blow the Thermal Fuse. I also used this time to inspect the rest of the machine, which again payed off. During my inspection I found that the belt was beginning to fray, the drum seals were starting to tear and the pads under the drum glides had started to fall out, so I decided to order all the parts and refurbish the machine. While I was waiting on the parts to arrive I disassembled the machine and cleaned everything and removed the old parts. The first step I took was to clean out the lint tunnel on the front panel of the machine. To do this I first had to remove the front drum seal which is held on using a double sided tape. I then opened the door and removed the two screws that held the tunnel in place. I then removed the tunnel from the front panel and was able to remove all the lint that was clogged inside. This tunnel also has a foam seal, which is used to seal it against the front panel stopping the lint from escaping into the inside of the dryer compartment, which I also replaced. It was easy to install as it comes with a self adhesive backing. The next step was to reassemble these parts in the reverse order that I took them apart. This is where I ran into my first setback. Reinstalling the tunnel was not a problem but, when I went to install the felt drum seal I found that it did not come with a self adhesive backing and I had no way to secure it on the machine. So I had to go the next day and purchase some double sided tape which I used to attach the seal. The next thing I did was to remove the drum from the machine. I did this by reaching inside the machine and releasing the belt off the tensioner. I then took hold of the front of the drum and lifted it slightly while pulling it towards me which allowed it to pop off the rollers which the back side of the drum rides on. I then removed the felt seal from the back side of the machine. This seal was a little more difficult to remove as the factory glues this seal in place. I cleaned this surface and reattached the felt seal using the double sided tape. The next step was to replace the front drum glides. These glides are a two part component. The first part is a Teflon coated glide and the second part is a felt pad that goes underneath it. I removed the old parts, cleaned the surfaces and reinstalled the glides in the reverse order.
Popped the two latches at the front of the machine inorder to raise the lid/cover. Found the part just above and behind the drum. Removed the screws, disconnected the wires and replaced the parts. I did have to remove the heating coils, but that was easy too. No wonder the Maytag repair man has nothing to do! Thank you Partselect.com. Not only did you ship the part to my house fast, but it was just as expensive if not cheaper than going out for it. Plus, I found instructions for the repair on your forums. Thanks again, you have a customer for life!
Other Parts Used:
Kevin from Lawrenceville, GA
Difficulty Level:
Really Easy
Total Repair Time:
Less than 15 mins
Tools:
Nutdriver
53 of 58 peoplefound this instruction helpful.
Was this instruction helpful to you?
Thank you for voting!
Lost all power even the light.
I removed the top and front panel. I first cleaned all the lint from the bottom of the lint trap which clogged the vent and caused the dryer to overheat. Then I replaced the high limit thermostat and thermal fuse. Bingo!! Worked good as new.
Other Parts Used:
Jeremiah from Laureldale, PA
Difficulty Level:
Really Easy
Total Repair Time:
15 - 30 mins
Tools:
Screw drivers
36 of 38 peoplefound this instruction helpful.
Was this instruction helpful to you?
Thank you for voting!
Dryer would not start
This repair could not have been easier. I went to the web site, answered a few questions and read a few examples of the repair, ordered the parts suggested and in a few days the parts arrived at my home. I opened the top of my dryer with a long handled screw driver, as suggested in the instructions, and vacuumed out the lint around the part. I called my handy son who brought over the correct tools and we followed the instructions sheet that came with the part and repaired my dryer in about 15 minutes total. It works just as it should and I am so happy. I only paid $39.00 including Shipping and Handling to repair my Maytag dryer and it works like new. Thanks to PartSelect.com! I don't think I'll ever call a repair service again.
Other Parts Used:
Kay from Kingsland, TX
Difficulty Level:
Really Easy
Total Repair Time:
15 - 30 mins
Tools:
Nutdriver, Pliers, Socket set
32 of 39 peoplefound this instruction helpful.
Was this instruction helpful to you?
Thank you for voting!
My dryer was completely dead
I checked this site and determined all of the possible causes. I watched the video when available. I checked prices on a replacement set ($2300.00) if I got what I really wanted but decided to tackle the repairs myself and save $2100.00. My only mistake was becoming distracted when testing the timer resistor before placing my order and not knowing where to connect the replacement. I ended up paying for assistance online ($24.00). It was much cheaper then replacing my washer and dryer or even calling a service person out for help. I applaud the services offered at this site and would recommend it to friends and family.
Raise the top of the dryer. This exposed the elements in the back. Removed old elements,paying attention to where the wires go. Installed new elements, hooked the wires up, and I was done.
First off, the parts were exactly what I needed and arrived at my front door in less than 48 hours. The repair was quite easy. 1. access the "guts" by popping the two clipps and open top panel like a car hood.2. remove the high temp doohickie with a nut driver, one screw, two wires.3. Remove the heating element from its mount. 4. remove the high temp fuse doohickie, By popping off its wires and little retaining bracket. 5. do steps (in this order) 5-1 replacing new parts. 6. spend three hours looking for the dryer brush, you know you have somewhere, to clean 5 years of accumulated lint out of the lint trap.7. drive to Ace, by dryer brush. 8. (most important step) clean the lint trap, or be forced to repeat steps 1-5. 9. Pop a cold one and relish the peace and quiet, devoid of spousal nagging to fix the damn dryer. 10. Take down clothesline in backyard.
Other Parts Used:
justin from navarre, FL
Difficulty Level:
Easy
Total Repair Time:
15 - 30 mins
Tools:
Nutdriver, Pliers, Screw drivers
14 of 14 peoplefound this instruction helpful.
Was this instruction helpful to you?
Thank you for voting!
Dryer went dead during a load and needed to replace the fuses.
Very easy repair. Just needed to remove some screws to access the heating element area. The fuses are (1) just above the elements and (2) to the right side of them (if facing from the front). Alittle loosening with a philips screwdriver, removing blown fuses, replace with new fuses, tighten new fuses in place, replace outer screws and job done. Also made sure to fully clean lint collection area. I had a good amount stuck in there and it restricted air flow which caused the fuses to blow. It took 6 years worth of drying to make it happen.
Other Parts Used:
Andy from Lawrenceville, GA
Difficulty Level:
Easy
Total Repair Time:
15 - 30 mins
Tools:
Screw drivers
13 of 14 peoplefound this instruction helpful.
Was this instruction helpful to you?
Thank you for voting!
< Prev
1
2
3
Next >
Questions and Answers
Ask our experts a question about this part and we'll get back to you as soon as possible!
22 questions answered by our experts.
< Prev
1
2
3
Next >
Sort by:
Search filter:
Clear Filter
Your search term must have 3 or more characters.
Keep searches simple. Use keywords, e.g. "leaking", "pump", "broken" or "fit".
Sorry, we couldn't find any existing answers that matched.Try using some different or simpler keywords, or submit your new question by using the "Ask a Question" button above!
Gerry
September 1, 2017
I believe the high limit switch has tripped and the dryer will not run.. your switches have two listed. a package of three that will shut off and needs to be replaced and a package of one that will shut down and come back as the dryer cools down. do they work in my dryer and if sow which one should i ger?
For model number PYE2200AYW
Hi Gerry,
Thank you for your inquiry. The thermostats that are listed under your model number are designed to work with your appliance. There is a high limit kit listed under your model number, part number PS2162282. The high limit kit comes with three separate thermal fuses for dryers. One electric thermal fuse with a limit of 258, one gas high limit at 240, and one gas and electric high limit thermostat with a limit at 300. The thermal fuse kit shuts off the motor in the dryer when it begins to overheat. If the dryer will not heat, is overheated, shuts off too soon, or takes too long to dry then the thermal fuse might have exploded and need to be replaced. For replacement instructions refer to the diagram by manufacturer. For safety, unplug the dryer before installing the part. I hope this helps. Thank you and have a great day!
12 people found this helpful.
Was this helpful?
Thank you for voting!
John
May 1, 2019
The high limit kit comes with three separate thermal fuses for dryers. One electric thermal fuse with a limit of 258, one gas high limit at 240, and one gas and electric high limit thermostat with a limit at 300. The two smaller thermal fuses has a marker on them. One with a yellow dot and the other with a pink dot. Which one goes with the larger thermal fuse in my electric dryer.
For model number pye2300ayw
Hello John, Thank you for the question. The one with the Pink Dot is for the electric dryer. Hope this helps!
7 people found this helpful.
Was this helpful?
Thank you for voting!
Gerry
September 1, 2017
Original question:I believe the high limit switch has tripped and the dryer will not run.. your switches have two listed. a package of three that will shut off and needs to be replaced and a package of one that will shut down and come back as the dryer cools down. do they work in my dryer and if sow which one should i get? the response repeated what the item said and did not mention the question of the limit switch for for additional or alternate item pn11742806 that will reset?
For model number PYE2200AYW
Hi Gerry,
Thank you for getting back to us. Please accept our apologies that your previous question was misunderstood. These parts are listed under your model number and are designed to work with your appliance. To verify which part is causing the issue, you will need to check the continuity of each part with a multimeter. I hope this helps with the repair.
5 people found this helpful.
Was this helpful?
Thank you for voting!
Ibarionex
February 4, 2018
The thermal high limit component that is being sold here has two connectors while the original one on my dryer has four. Yet, your site indicates that this is the correct part. Could you clarify.
For model number PYG10000AWW
Hello, thank you for your question. Yes, per the manufacturer, this is the correct part for your appliance. The part has been changed from the original and should come with instructions for the install of the new parts. Good luck with your repair!
4 people found this helpful.
Was this helpful?
Thank you for voting!
Amit
February 6, 2018
I have verified the thermal fuse is the issue causing the dryer not to start. Do i need the whole high limit kit, or can i just replace the thermal fuse?
For model number PYE2300AYW
Hi Amit,
Thank you for your question. You would have to buy the kit to get the fuse as that is the only way the part is sold. I hope that helps. Good luck with your repair.
4 people found this helpful.
Was this helpful?
Thank you for voting!
Michael
November 4, 2017
Dryer will not tumble
Hi Michael, Thank you for the question.I suggest checking the drum belt or the pulleys. If you wish to resubmit a new question with the model number of the appliance we will be able to verify the correct belt. Look forward to hearing from you!
3 people found this helpful.
Was this helpful?
Thank you for voting!
Nathan
November 22, 2017
Hi, i have a Maytag dryer model number pye2300ayw. My dryer does nothing when i press the start button. I'm suspecting blown fuse, high limit switch kit, etc, but i after closer inspection i could hear a faint hum when i pressed the button. Does this mean it's got to be something else?
For model number PYE2300AYW
Hi Nathan,
Thank you for contacting us. There are some parts that you will need to check to see which one is causing the issue. You will need to check the high limit thermostats, the belt, the door catch, the timer resistor assembly, the door switch, the timer assembly and the door switch. I hope this helps. Thank you and have a great day!
3 people found this helpful.
Was this helpful?
Thank you for voting!
Boyd
January 29, 2018
I suspect the thermal switch is bad. When i was looking at it, i noticed i could push in the back side of the switch. Is that normal ?
For model number PYET344AYW
Hi Boyd,
Thank you for your question. To verify if the switch is bad, you will need to test it with a multimeter. Disconnect the power source to your dryer before you conduct this or any other test. Either unplug the unit from the wall outlet, remove the appropriate fuse from the fuse box, or flip the appropriate breaker in the circuit breaker panel.
Your dryer uses multiple thermostats to regulate its internal temperature. The cycle selected determines which thermostat is used. A cycling thermostat can be found somewhere in the path of air that is leaving the drum. It could be found on the blower wheel housing or inside the venting/exhaust system. Dryer thermostats are usually oval shaped and about an inch and a half in length. Also, there should be two wires leading to each thermostat. Label these wires before you remove them so that you are able to correctly reconnect them later.
The wires leading to the thermostat are connected using metal slip on connectors. Remove the wires by pulling on the connectors, and not the wires themselves. It may be a good idea to use a pair of needle nosed pliers to help you.
Set your multimeter to the R X 1 setting. Take each of your meter's probes and touch one to each terminal. You are testing for continuity, and you should receive a reading of either zero or infinity. At room temperature, testing the thermostat should produce a reading of zero. But if a thermostat is tested when it is heated to its limit, a reading of infinity should be produced. We strongly recommend that you test your thermostat at room temperature. If the test you conduct with your thermostat does not produce these results, then you should replace the component. I hope this helps. Thank you and have a great day!
3 people found this helpful.
Was this helpful?
Thank you for voting!
Jaime
January 28, 2019
I have a german dryer "asko" and no parts exist for this model. I have talked to the asko parts distributor for north america, no parts. Can i replace the thermostat(125f-31f) and thermal fuse (140f-35f) with american parts. How much can i vary from these temperatures and differentials. As i understand it the thermostat can vary from 125-94, 31 being the differential and the same goes for the fuse. Where can i find them where the specs are shown. Most of the sites on show the thermastat specs but not the fuse. Can anyone help. If you want to reply my email is jsanchez1dad@yahoo.Com thanks
For model number TLS752 XX LRR
Hello Jaime, Thank you for contacting us. I am sorry however I am not able to find any concrete information to advise whether or not you are able to interchange the parts, as often different countries have different safety standards. I suggest reaching out to a local technician or Asko directly. Good luck with your repair. Have a wonderful day!
2 people found this helpful.
Was this helpful?
Thank you for voting!
Philip
October 23, 2017
My Amana dryer initial start will heat then after 5 minutes stop heating. what would be the problem. Thank you.
For model number NGD7200TW
Hi Philip,
Thank you for your question. There are a couple of parts that you could check. Your radient flame sensor, your thermistor, thermostats, and your ignitor. You can test all of these parts with a multi meter. Good luck with your repair.
2 people found this helpful.
Was this helpful?
Thank you for voting!
< Prev
1
2
3
Next >
✖
Ask a Question
Ask our experts a question on this part and we'll respond as soon as we can.