Keep searches simple. Use keywords, e.g. "leaking", "pump", "broken" or "fit".
Sorry, we couldn't find any existing reviews that matched. Try using some different or simpler keywords.
★★★★★
★★★★★
James L - March 13, 2024
Verified Purchase
Silly stupid easy.
I couldn't have hired someone to do this quicker or easier. When I got the parts, I had a panic that the belts were the wrong ones, too small. But went and swapped them out, perfect fit, correct size, and it wham Bam great success. Easy and fast shipping. Very happy.
★★★★★
★★★★★
Robert R - January 4, 2024
Verified Purchase
36 year old Maytag washer
Some noise and a smell started and I looked at the belts,they were worn quite badly. I ordered new ones from partselect,it was easy to find,had them in a few days installed them and it works like new.
★★★★★
★★★★★
Bert S - November 19, 2023
Verified Purchase
washing machine belt kit
it arrived quickly, a good price, and now the washing machine runs better than it has in a couple years!
★★★★★
★★★★★
ROBERT H - May 14, 2023
Verified Purchase
Very simple instructions
The parts were perfect,no issues whatsoever. Fast delivery.
★★★★★
★★★★★
David C - January 30, 2023
Verified Purchase
My Maytag Just Keeps on Chugging Along
Yup - part was delivered prompltly and the video showed exactly what to do. I had memories of my Father (an Electrical Engineer) in the '60's fixing our home washer and relying on his knowledge of all things mechanical and electrical to do the fix. Fast forward to the new millenia and I have step by step instructions via a video. But I'm still impressing my sons because they just go ahead and call a rapair service. After all who wants to buy a new washer when the old ones are better anyways.
★★★★★
★★★★★
Dmytro S - October 13, 2022
Verified Purchase
Great repair kit
The old belts were stretched and falling off the pulleys. The repair kit made it working again with no issues.
★★★★★
★★★★★
Eric G - July 22, 2022
Verified Purchase
fast delivery no problems
Part was delivered promptly and the repair was straightforward.
★★★★★
★★★★★
Gilles J - December 15, 2021
Verified Purchase
Belt kit
Fit perfect on my old Maytag washer.Run like a new one.
★★★★★
★★★★★
Jean-Marc A - October 14, 2021
Verified Purchase
Fast delivery, work as expected
Great
★★★★★
★★★★★
Donald L - February 23, 2021
Verified Purchase
good abd simple
Hi quality part, which fit well. It was a simple repair.
< Prev
1
2
3
Next >
Customer Repair Stories
Average Repair Rating: 3.8 / 5.0, 67 reviews.
What's this?
< Prev
1
2
3
Next >
Sort by:
Search filter:
Clear Filter
Your search term must have 3 or more characters.
Keep searches simple. Use keywords, e.g. "leaking", "pump", "broken" or "fit".
Sorry, we couldn't find any existing installation instruction that matched.
Drum would not drain and there was a banging noise when the drum spun
I removed the 2 phillips screws on the bottom of the front panel. Then checked around to find the belts were actually below the floor panel. I pulled the washing machine away from the wall and tilted it bacwards and found the pump belt was off the pully and the drive belt was badly damaged. I replaced the 2 belts which took no tools and about 3 minutes to accomplish then resecured the front panel, pushed back in place and leveled. Complete repair from diagnosis to back in operation took less than 15 minutes.
Other Parts Used:
Charles from Whitman, MA
Difficulty Level:
Really Easy
Total Repair Time:
Less than 15 mins
Tools:
Nutdriver, Screw drivers
568 of 614 peoplefound this instruction helpful.
Was this instruction helpful to you?
Thank you for voting!
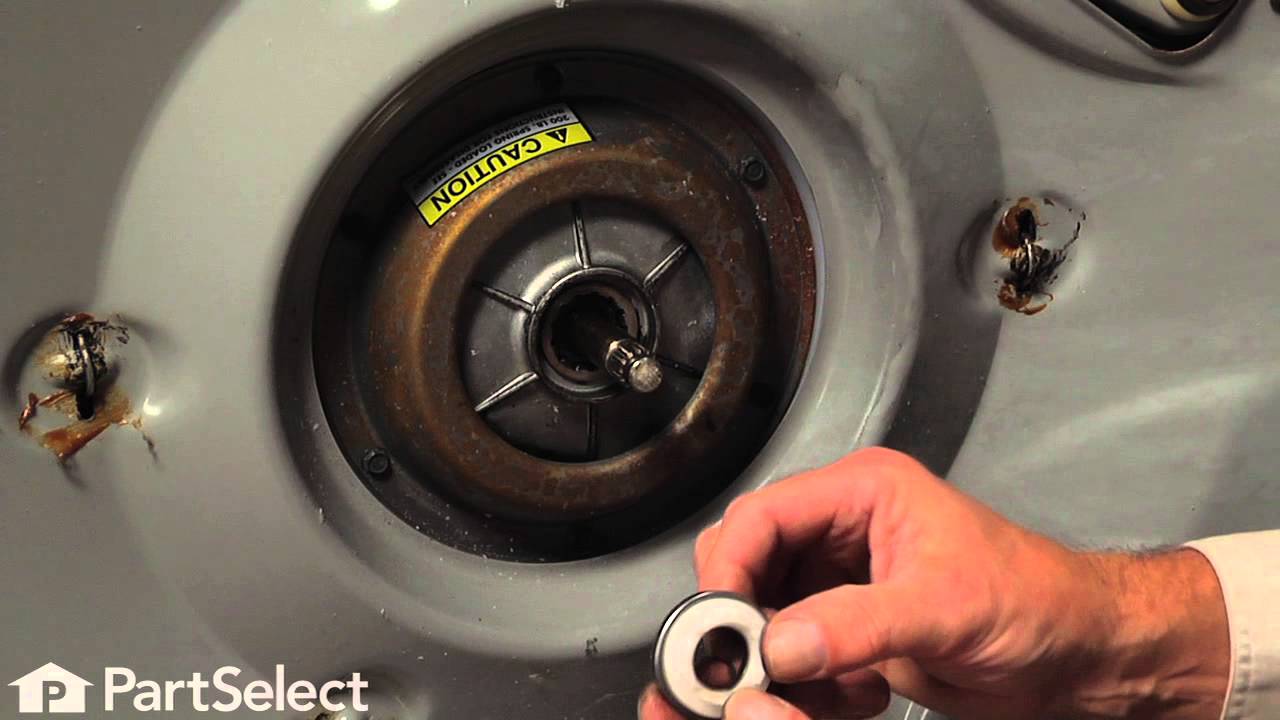
Damper pads wore-out and had metal to metal contact which caused the washer to spin out of balance.
1: Disconnected all water and electrical connections. 2: Removed front panel. 3: Disconnected all wires leading from the control panel and removed the top of the washer. 4: Removed the springs that holds the drum down on the damper pads. 5: Flipped washer upside-down so the drum would hang from the bottom of the wash. This made it easy to clean the area since it was full of dirt and ground metal dust. 6: Glued new pads (per the instructions) to the cone that protrudes up from the bottom of the washer and allowed to dry. 7: Lubricated the pads with the provided grease and added additional silicon grease to insure smooth operation. 8: Replaced drive belt. 9: Flipped the washer back up-right and installed the drum springs. 10: Reconnected all wires and attached the top of the washer. 11: Reconnected all electrical and water lines and tested operation. 12: Replaced the front panel.
Washer now runs as quite and smooth as it did when it was new.
To see if the lid switch was the problem I first jumped it out and tried to start the washer. That was the problem. I removed the main controll so I could get to the lid switch. I made the mistake of removing the screws all the way out and the metal clip fell into the body of the washer, no problem since I was changing the drive beld anyway. I realized that you do not remove the screws all the way out, you just have to loosen them and then slide out the lid switch & then replace it.
Clothes would come out of the spin cycle still wet
First found out where the belts were by tipping the machine backwards and saw that the belts were intact but extremely loose. Ordered two belts (Drive and Pump) . Re-tipped the machine and in less than three minutes, had installed the new belts. I re-hooked the hoses to the back and the machine operated as if new.
Other Parts Used:
William from Cary, IL
Difficulty Level:
Really Easy
Total Repair Time:
Less than 15 mins
128 of 140 peoplefound this instruction helpful.
Was this instruction helpful to you?
Thank you for voting!
washer stopped spinng
I replace the belts - 5 min I tried to replace the glides...I couldn't figure out how to do that..I took out the motor and and the glide mechanism...but I could not get glide braket separate from the motor mount..so i did not do this I replace the springs and added 1 extra sping...3 instead of 2..it worked
My washer stopped spinning, even though I could hear the motor running. I did some research and found out there was two belts, opened mine up and it was broken. I replaced the belt in five minutes, start to finish. Now it's running like new.
Other Parts Used:
Ben from Truro, AL
Difficulty Level:
Easy
Total Repair Time:
Less than 15 mins
Tools:
Screw drivers
81 of 133 peoplefound this instruction helpful.
Was this instruction helpful to you?
Thank you for voting!
Strange noises - drum not always emptying
Found a very stretched, loose pump belt. Was able to pull it off pump pulley and motor pulley easily. Pushed motor assembly toward transmission pulley and removed wider drive belt. Wiped all pulleys clean. There's a double on the motor- one for drive belt, one for pump belt. Removed two hoses from pump using nutdriver. Removed pump. New pump installed. Installed two hoses on new pump. Installed drive new drive belt. Installed pump belt last. Slid pump to near farthest spot in slots. Tested for correct tension by pinching pump belt. Should be able to pinch center so two pump belt sides come within 1/4" of each other just as the spring tensioned motor mount starts to move. Pused washer back into place after external hoses connected. All new hose washers and filters on both hot and cold. Ran, checked for leaks - none! Absolutely perfect. Put front panel back on. No weird noises and drum empties perfectly every time. My wife is so pleased she's doing more loads.
After removing the two screws that hold the front panel in place , I could easily see the areas I needed to work in .Also , I removed the two screws securing the top panel and raised it a few inches . I saw how the damper pads were worn away . I removed the 3 dampering springs by removing the eyebolts and the base mounting nuts . After the dampering springs are removed , the washing drum can be lifted up off the bottom .Just lean the machine towards the rear and place a 4x4 lumber under the big pulley on the bottom and allow the machine to slowly come forward again resting on the lumber .I followed the instructions supplied and cleaned the excess dirt and debris away from the pad mounting areas . I applied the glue as instructed and allowed it to dry . A little dexterity was needed but the new pads easily went into position . After allowing a little more glue time ,I removed the 4x4 lumber from the bottom and lowered the machine .I installed new centering springs and tightened the eyebolts to thier original positions .I secured the top and the front panels and performed a couple test cycles . perfect , no vibration at all. like new . I replaced the two drive belts on the bottom because they had never been replaced and they definitely showed wear . Another test and I was completed in around 2 hours .
Ask our experts a question about this part and we'll get back to you as soon as possible!
29 questions answered by our experts.
< Prev
1
2
3
Next >
Sort by:
Search filter:
Clear Filter
Your search term must have 3 or more characters.
Keep searches simple. Use keywords, e.g. "leaking", "pump", "broken" or "fit".
Sorry, we couldn't find any existing answers that matched.Try using some different or simpler keywords, or submit your new question by using the "Ask a Question" button above!
Carol
August 23, 2017
Maytag washer,how to tell correct drive belt tension?
Hello Carol, thank you for contacting us. We have a how to video on our site, it shows how to install the belt, but at 3 mins into the video Steve explains about the belt tension and how to test it and tighten it. You can click the link below, hope this helps!
http://www.partselect.com/PS2005284-Whirlpool-12112425-Belt-Kit.htm#RepairVideo
57 people found this helpful.
Was this helpful?
Thank you for voting!
Jor
March 15, 2018
My washer fills up n won't agitate but will spin water out
For model number lat7300aav
Hi Jor,
Thank you for your question. If your washer will not agitate, there are some parts that you will need to check to see which ones are causing the issue. You will need to check the belt, the lid check switch, the lid switch assembly, the lid switch, the glide and spring kit, the tension springs, the mounting stem/tub seal and the tub bearing. I hope this helps. Thank you and have a great day!
12 people found this helpful.
Was this helpful?
Thank you for voting!
Dianne
February 10, 2018
My washer makes a squealing sound when the wash cycle begins and barely moves during the agitation. There is also an odor in my laundry room like burning rubber/plastic. From your site it looks like belts but i’ve read it could be the block or bell. I’m hoping it’s belts since that looks easy to repair. Thank you for your help.
For model number Maytag A112
Hello Diane, Thank you for your inquiry. We would definitely recommend checking the belt and pulley first. Hope this helps!
9 people found this helpful.
Was this helpful?
Thank you for voting!
Jackie Conway
April 21, 2018
After the wash is finished.The clothes are still very wet.Its not spinning out all the water.
For model number MVWC200XW2
Hello Jackie, Thank you for your inquiry. We would recommend checking the following parts to fix your issue: drain pump, lid latch assembly, clutch assembly, shift actuator, and make sure the drain hoses are not clogged or cracked. Hope this helps!
6 people found this helpful.
Was this helpful?
Thank you for voting!
Jackie
November 26, 2017
My machine would not agitate with a load of dark cloths but today i did a small load and works ok
For model number LAT2300AAE
Hi Jackie,
Thank you for your inquiry. There are some parts that you will need to check to see which one is causing the issue. You will need to check the belts, the agitator auger and base assembly, the lid switch assembly, the glide and spring kit, the agitator shaft collar and the mounting stem and tub seal. I hope this helps. Thank you and have a great day!
5 people found this helpful.
Was this helpful?
Thank you for voting!
Diane
November 8, 2019
Burning smell, will not agitate
Is it worth it to repair a 25 year old washer?
For model number LAT9314AAE
Hello Diane, thank you for your question. Yes, if the unit works well otherwise, it is worth fixing the issue. That smell could be coming from the belt Belt Kit Part Number: 12112425, Brake AssemblyPart Number: WP6-2011900, Drain Pump Part Number: WP6-2022030, and Drive Motor - One Speed - 120V Part Number: 12002351 first. I hope this helps.
5 people found this helpful.
Was this helpful?
Thank you for voting!
Jerry
February 26, 2020
Changed belts after burning smell. Large pulley on bottom of machine will not turn clockwise. ?
For model number Maytag lat2600aae
Hello and thank you for writing.
For your convenience, we have attached the link to our repair video. We think this might help you. Good luck with your repair.
https://www.youtube.com/watch?v=JE3K3mqlqss
5 people found this helpful.
Was this helpful?
Thank you for voting!
Anthony
January 27, 2018
The agitator has started banging during the wash cycle. I think the bang is when the agitator stops and changes direction. Will new belts help solve or stop the agitator from banging? Thanks.
For model number LAT8214AAL
Hello Anthony, thank you for your question. It could be that the belt has stretched and is causing the banging when the agitator stops to change direction. I would also check the Mounting Stem/Tub Seal Kit part number PS2351899. I hope this helps!
5 people found this helpful.
Was this helpful?
Thank you for voting!
Brian
December 23, 2017
The belts were changed about 2 years ago, what is the time frame for belt changes, is this the problem for intermittent noise & vibration?
For model number la482
Hello Brian, Thank you for your inquiry. There is no recommended time frame for belt changes, it depends on how much the washer is used. The belt is one of the things that could cause the washer to be noisy and shaking. The other things I would check would be the damper pad kit and the glide and spring kit. Hope this helps!
4 people found this helpful.
Was this helpful?
Thank you for voting!
Brian
December 24, 2017
Hello again i checked the bottom pulley on the motor & it's like it's splits in 2 pieces, is it supposed to be a 2 piece pulley
For model number LA482
Hi Brian,
Thank you for your question. The pulley does not split into 2 pieces. I hope this helps. Thank you and have a great day!
3 people found this helpful.
Was this helpful?
Thank you for voting!
< Prev
1
2
3
Next >
✖
Ask a Question
Ask our experts a question on this part and we'll respond as soon as we can.