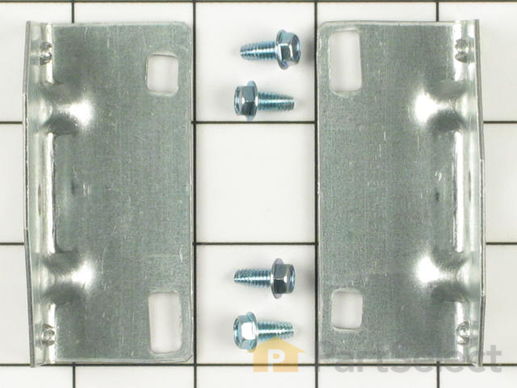
Part Location Diagram of 12002090 Whirlpool Glide Bracket Kit
See part 17 in the diagram
( Grid squares measure 1x1 inch )
Customer Service Representative

Get in touch, we're here to help!

Daily 8am - 9pm EST

customerservice@partselect.ca

Glide Bracket Kit

$96.72
  Special Order
PartSelect Number PS2003560
Manufacturer Part Number 12002090
Manufactured by Whirlpool
Product Description

Glide Bracket Kit Specifications

This kit contains two glide brackets and four screws.
How Buying OEM Parts Can Save You Time and Money

How Buying OEM Parts Can Save You Time and Money

Troubleshooting
This part fixes the following symptoms:
Noisy
This part works with the following products:
Dryer, Washer Dryer Combo.
This part works with the following products:
Speed Queen, Amana, Panasonic.
Part# 12002090 replaces these:
AP4010165, 997951, 12002090, 37001008, 5-1554, 5-5256, 501554, 505256, 510145
Back to Top
Customer Repair Stories
 Average Repair Rating: 3.9 / 5.0, 6 reviews. What's this?
  • 1
Sort by:
Sorry, we couldn't find any existing installation instruction that matched.
Loud banging sound. Worn out roller.
Pulled off the lower panel with 5/16 socket.Pulled off the door assembly by removing the two screws at the bottom of the door assembly. I pulled down a little and then out. be carefull of the wires. Other posts said to remove. The wires were long enough I did not have to remove them. I just leaned it against the wall. I then removed the 4 screws that hold the front piece in.pulled it off replaced brackets , installed self adhesive felt(stuck good) and then glides. Mine were thin but not the problem. I then reached under the drum and released the belt from the tensioner. I then pulled the whole drum out.This is the time to vacum out good. I could get to the rear rollers very easy. The left roller was shot and the shaft half wore into(the problem). I pulled off the two screws holding the roller support. Normally You have to remove the wheel with snap ring pliers first to remove the support. In this case snap ring long gone. Replaced support shaft, installed thrust washers and roller with grease for both sides. The right support shaft was still good. Removed tensioner pulley and inspected. It was just as good as the new one. Cleaned and greased and reinstalled. Put new belt on the tub and slid it back in. Be carefull to get the belt on the proper side of the tensioner. I then installed the front supprt in place to support the tub with the 4 screws. Spun the tub(felt good) then reached under and reinstalled belt to motor and tensioner. Spun again to check for belt alignment. (Check) Reinstalled door an lower panel. Test Quiet Sounds like new. Very easy! I hope this helps someone just as the other post has helped me. Blessings to all.
Other Parts Used:
Idler Pulley Wheel with Bearing Drum Support Roller and Shaft Assembly Multi Rib Belt Drum Glide Drum Support Roller Retaining Ring Single Drum Glide Felt Pad Thrust Washer
  • David from Underwood, IA
  • Difficulty Level:
    Really Easy
  • Total Repair Time:
    15 - 30 mins
  • Tools:
    Socket set
163 of 234 people found this instruction helpful.
Was this instruction helpful to you?
Thank you for voting!
Dryer got very noisy (grinding sound), and would tear up items that got hung between drum and front panel
I removed the lower front panel, which is held in place by two screws at the very bottom. I found pieces of the worn out brackets in the bottom of dryer. I then located damaged brackets bolted under front of drum at about 4&8 oclock. each bracket is held in place by two small bolts from the back side. The bolts for the new brackets go back in from the front, which eliminated the problem of stripped out holes. It is helpful if someone can reach indryer and hold up front of drum while you are starting bolts in brackets, I found that the kid standing closest worked great. The exploded view parts list was great for finding what I needed. My old dryer works great again and it is as quiet as a new one. This was $24.00 that was very well spent.
Other Parts Used:
Drum Glide Single Drum Glide Felt Pad
  • Dwight from Healdton, OK
  • Difficulty Level:
    Really Easy
  • Total Repair Time:
    15 - 30 mins
  • Tools:
    Socket set
15 of 17 people found this instruction helpful.
Was this instruction helpful to you?
Thank you for voting!
grinding noise from dryer, clothes caught around drum
Removed bottom front panel by two screws. glide brackets at about 8 and 4 o'clock positions, with screws coming in from the back. The replacement glide bracket and two drum glide will be needed. I drilled out the screw holes and used the original screws because replacement screws were too short and the screws go in from the front on the replacement glide bracket. You will need to slightly raise the front of the drum to install the glide brackets correctly. the reinstall the front cover.
Other Parts Used:
Drum Glide
  • Alan from Great falls, MT
  • Difficulty Level:
    Easy
  • Total Repair Time:
    15 - 30 mins
  • Tools:
    Nutdriver, Socket set, Wrench set
2 of 2 people found this instruction helpful.
Was this instruction helpful to you?
Thank you for voting!
Dryer was making a grinding sound
I opened new parts and stcuk a felt pad on each glider and put one of my 10 lb. weights on it for about 1/2 hour to help it stay in place.

Then removed top panel and then the front..There are three phillips screws that hold the lint catcher in place inside the barrell. Then remove the 4 total bolts to remove Glide Brackets.

Mine was so worn down that the barrel had rubbed alomost all the way through a bracket.
Once felt pad was firmly set, i attached glider into bracket and installed them.

Put everything back in place and started up..and it was running and sounding like new...i paid 27.00 for parts and saved big time compared to what a service shop would have charged me.

The shipping was super fast and with my wife and i having 9 children in the house it was a life saver for us.
Other Parts Used:
Drum Glide Single Drum Glide Felt Pad
  • Todd from Red Lake, MN
  • Difficulty Level:
    Really Easy
  • Total Repair Time:
    Less than 15 mins
  • Tools:
    Nutdriver
1 person found this instruction helpful.
Was this instruction helpful to you?
Thank you for voting!
Belt was worn - ready to break, Decided to replace the parts that commonly go bad.
I removed the bottom panel, then the larger front panel that includes the door. After that, removed the top 2 screws so that the top would swing up (but not lift off). After that, I removed the front "bulkhead", and the drum. Then it was just a short matter of sweeping everything out, and replacing the parts one by one. Most came off with a socket, or snap ring pliers. Pretty obvious at this point...

Be sure to label any wires - I removed 5 wires all total, and wrote down the colors and where they went.

It's great to have help when working with the drum. BTW, you CAN replace the belt without taking out the drum, but you better have strong fingers to move the belt tensioner and slip the belt on it - all with one hand. I did it, but that was the least "fun" part....
Other Parts Used:
Idler Pulley Wheel with Bearing Idler Pulley Spring Multi Rib Belt Drum Glide Idler Pulley Lever and Shaft Drum Support Roller Single Drum Glide Felt Pad Thrust Washer
  • Larry from Lima, OH
  • Difficulty Level:
    Really Easy
  • Total Repair Time:
    1- 2 hours
  • Tools:
    Screw drivers, Socket set
1 of 2 people found this instruction helpful.
Was this instruction helpful to you?
Thank you for voting!
noise
front cover then lint basket replace brackets and shoes
Other Parts Used:
Drum Glide
  • gregory from warminster, PA
  • Difficulty Level:
    Easy
  • Total Repair Time:
    15 - 30 mins
  • Tools:
    Nutdriver, Pliers, Screw drivers
0 of 2 people found this instruction helpful.
Was this instruction helpful to you?
Thank you for voting!
  • 1
Questions and Answers

Be the first to ask our experts a question about this part!

Related Parts
Model Cross Reference
This part works with the following models:
PartSelect Number: PS2003560
Manufacturer Part Number: 12002090
Brand
Model Number
Description
Speed Queen
ADE30RGS171TW01
Dryer - DRYER
Speed Queen
ADE3LRGS171TW01
Dryer - DRYER
Speed Queen
ADE3SRGS173TW01
Dryer - Dryer
Speed Queen
ADE41FSS171TN01
Dryer - DRYER
Speed Queen
ADE4BFGS171TW01
Dryer - DRYER
Speed Queen
ADE4BRGS171TW01
Dryer - DRYER
Speed Queen
ADG30RGS111TW01
Dryer - DRYER
Speed Queen
ADG3LRGS111TW01
Dryer - DRYER
Speed Queen
ADG41FSS111TN01
Dryer - DRYER
Speed Queen
ADG4BFGS111TW01
Dryer - DRYER
Speed Queen
ADG4BRGS111TW01
Dryer - DRYER
Speed Queen
AEM197
Dryer - Residential, Automatic
Speed Queen
AEM377
Dryer - Residential, Automatic
Speed Queen
AEM397
Dryer - Residential, Automatic
Speed Queen
AEM407L
Dryer - Residential, Automatic
Amana
AEM407L2
Dryer
Speed Queen
AEM407L2-PAEM402L2
Dryer - Speed Queen Dryer Model AEM407L2-PAEM402L2 (AEM407L2PAEM402L2, AEM407L2 PAEM402L2) Parts
Speed Queen
AEM407W
Dryer - Residential, Automatic
Amana
AEM407W2
Dryer
Speed Queen
AEM407W2-PAEM402W2
Dryer - Speed Queen Dryer Model AEM407W2-PAEM402W2 (AEM407W2PAEM402W2, AEM407W2 PAEM402W2) Parts
Amana
AEM427L2
Dryer
Speed Queen
AEM427L2-PAEM427L2
Dryer - Speed Queen Dryer Model AEM427L2-PAEM427L2 (AEM427L2PAEM427L2, AEM427L2 PAEM427L2) Parts
Speed Queen
AEM427W
Dryer - Residential, Automatic
Amana
AEM427W2
Dryer
Speed Queen
AEM427W2-PAEM427W2
Dryer - Speed Queen Dryer Model AEM427W2-PAEM427W2 (AEM427W2PAEM427W2, AEM427W2 PAEM427W2) Parts
Amana
AEM477L2
Dryer
Speed Queen
AEM477L2-PAEM477L2
Dryer - Speed Queen Dryer Model AEM477L2-PAEM477L2 (AEM477L2PAEM477L2, AEM477L2 PAEM477L2) Parts
Speed Queen
AEM477W
Dryer - Residential, Automatic
Amana
AEM477W2
Dryer
Speed Queen
AEM477W2-PAEM477W2
Dryer - Speed Queen Dryer Model AEM477W2-PAEM477W2 (AEM477W2PAEM477W2, AEM477W2 PAEM477W2) Parts
Customer Service Representative

Get in touch, we're here to help!

Daily 8am - 9pm EST

Contact Customer Service