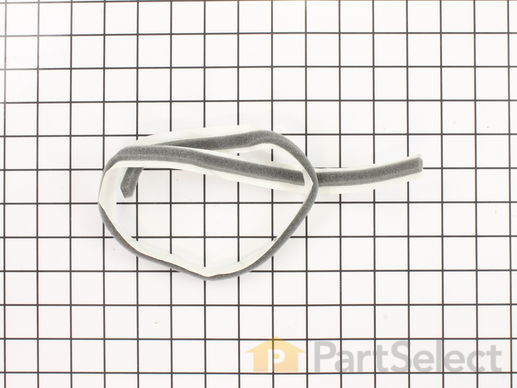
SEAL
$23.27
In Stock
Get this part fast! Average delivery time for in-stock parts via standard shipping: 1.8 days.
PartSelect Number PS12745423
Manufacturer Part Number W11415783
Manufactured by
Whirlpool
Product Description
SEAL Specifications
This seal comes with the adhesive backing.

How Buying OEM Parts Can Save You Time and Money
Troubleshooting
This part fixes the following symptoms:
Noisy
This part works with the following products:
Dryer, Range.
This part works with the following products:
Kenmore, Whirlpool, KitchenAid, Roper.
Part# W11415783 replaces these:
337179, 347139, W11414062, WP347139
Questions and Answers
We're sorry, but our Q&A experts are temporarily unavailable.
Please check back later if you still haven't found the answer you need.
Part Videos
Replacing your Kenmore Dryer SEAL

Customer Repair Stories
Average Repair Rating: 2.9 / 5.0, 10 reviews.
What's this?
- < Prev
- 1
- Next >
Sort by:
Search filter:
Clear Filter
Your search term must have 3 or more characters.
Keep searches simple. Use keywords, e.g. "leaking", "pump", "broken" or "fit".
Sorry, we couldn't find any existing installation instruction that matched.
drum stopped turning on dryer
Great! Spent about $36.00 and I ended up with a overhauled dryer. I ended up cleaning the whole thing out, it's amazing how much stuff accummulates in the frame of a dryer, I also found about $2.00 in change. It's a good idea to clean out a dryer every few years and the broken belt forced me to do it.
But anyway the parts cam very quick and had easy to follow directions.
I would reccomend part select. Matt
But anyway the parts cam very quick and had easy to follow directions.
I would reccomend part select. Matt
Other Parts Used:
-
Matthew from East Islip, NY
-
Difficulty Level:Easy
-
Total Repair Time:30 - 60 mins
-
Tools:Screw drivers, Socket set
62 of 73 people
found this instruction helpful.
Was this instruction helpful to you?
Thank you for voting!
dryer drum not turning and no air circulating
replaced motor and drum rear seal as well as idler wheels, the old rear drum seal was completly worn out, since I had it all apart, I replaced lint chute and trap seals and belt and tensioner. I spent less money on parts than if I would have bought a new dryer. The motor was the main problem as the bearings were shot.
Other Parts Used:
-
Eric from Fort Dodge, IA
-
Difficulty Level:Easy
-
Total Repair Time:1- 2 hours
-
Tools:Nutdriver, Screw drivers, Wrench set
34 of 50 people
found this instruction helpful.
Was this instruction helpful to you?
Thank you for voting!
Motor failure
Used this resource and others' advice -thank you . Make sure to disconnect power first. I had replaced the rollers and tensioner a week earlier due to squeaking, but mine was the rare one where squeaking meant motor failure, so I had to place another parts order. The dryer was 19 years old, and my blower wheel did not simply 'unscrew with reverse threads'. During removal the blower wheel's plastic deformed, so had to do like someone else did and cut the rear shaft with a reciprocating saw. Just be careful not to damage the bulkhead's built-in bracket that anchors the rear of the motor. I think it was a 13/16" wrench that fit the blower wheel and I forget the size for the pulley nut on the front of the motor, but I suggest a deep socket since it held well. My best advice when dealing with a motor replacement is to ensure the blower wheel wheel will separate successfully from the motor before placing your parts order should it be a stubborn removal. Good luck.
Other Parts Used:
-
James from COTTONWOOD, CA
-
Difficulty Level:Really Easy
-
Total Repair Time:1- 2 hours
-
Tools:Nutdriver, Pliers, Socket set, Wrench set
9 of 10 people
found this instruction helpful.
Was this instruction helpful to you?
Thank you for voting!
Dryer would run with no heat
I watched all the videos with Steve. He was very helpful in his presentation of the repairs. Due to the age of the dryer every thing was replaced and was very easy to do. Thank you Steve and PartSelect for making these repairs possible and easy
Other Parts Used:
-
Gary from MOUNDSVILLE, WV
-
Difficulty Level:Very Easy
-
Total Repair Time:More than 2 hours
-
Tools:Nutdriver, Pliers, Screw drivers
7 of 11 people
found this instruction helpful.
Was this instruction helpful to you?
Thank you for voting!
The dryer stopped heating. I removed the back of the dryer to find a fried thermostat and wire.
I went on partsselect.com's web site, punched in the model number and easily found the parts I needed. Parts arrived in two days. Repairs went well, especially when my wife was my tool assistant! I recommend this site as a must for do it yourself repairs that will save you a lot of money.
Other Parts Used:
-
Donald from Lusby, MD
-
Difficulty Level:Easy
-
Total Repair Time:15 - 30 mins
-
Tools:Nutdriver, Pliers, Screw drivers
7 of 16 people
found this instruction helpful.
Was this instruction helpful to you?
Thank you for voting!
flame fadedout after unit got hot; problem turned out to be the solenoid coils
removed frt & rear panels & drum and lint chute for seal replacement replaced these components, problem didn't go away, ordered & replaced both gas valve coils (m series coil kit) problem solved
Other Parts Used:
-
David from Adkins, TX
-
Difficulty Level:Easy
-
Total Repair Time:30 - 60 mins
-
Tools:Nutdriver, Screw drivers
6 of 7 people
found this instruction helpful.
Was this instruction helpful to you?
Thank you for voting!
Poor drying and took excessive amount of time to complete partially dried loads
Took back cover off. Cleaned out the lint that had built up inside the dryer. Replaced the lint trap housing and lint chute seals. Also replaced the drying vent hose. Works great now.
Other Parts Used:
-
Stephen from LOUISVILLE, KY
-
Difficulty Level:Easy
-
Total Repair Time:30 - 60 mins
-
Tools:Screw drivers, Socket set
4 of 4 people
found this instruction helpful.
Was this instruction helpful to you?
Thank you for voting!
Loud noise, metal shreds in lint catcher
I took the long way around and removed the back with the nutdriver (8mm), unscrewed the lint catcher from the top and back (phillips). From there, I reached around and unscrewed the support brackets (9/16"). Once I confirmed the problem, I ordered the parts. There was really nothing wrong with the belt or pulley, but considering its age, I figured it was easier to replace now while I already had it apart.
Once I received the parts (about 3 days), I removed the front of the dryer by popping the top of the cabinet off, and the kick plate at the bottom with a flat screwdriver. Then, I removed the two screws holding up the door at the bottom, and the two holding it from the inside top. Once the front came off, I removed the idler pulley from the bottom, and the drum fell out. I was left with an empty cabinet with the exception of the motor.
I replaced the tri-rings on the support shafts, which was the most time consuming part of the whole ordeal. Those buggers are tight. I ratcheted the support brackets back on , removed the belt from around the drum and replaced it with the new one. I added the idler pulley back in, placed the drum against the back, and hooked the belt back around the motor. I also replaced the lint seal that goes from the drum to the catcher before putting it all back together.
I wish all machines were as easy as this dryer to repair.
Other Parts Used:
-
Mandie from Lewisville, NC
-
Difficulty Level:Easy
-
Total Repair Time:30 - 60 mins
-
Tools:Nutdriver, Screw drivers, Socket set
3 of 7 people
found this instruction helpful.
Was this instruction helpful to you?
Thank you for voting!
chute wore out
I never received my part checked back after said hearing part had been shipped was told part was no longer available have called twice about my refund and not received that either
Other Parts Used:
-
Robert from MACON, GA
-
Difficulty Level:Very Difficult
-
Total Repair Time:30 - 60 mins
2 of 3 people
found this instruction helpful.
Was this instruction helpful to you?
Thank you for voting!
Blower flywheel needed replacement
After watching the U Tube video to replace flywheel, I had a appliance repairman come to my home to install flywheel. There was no way I would have been able to put the dryer back together without some help.
I want to say "Thank You" to the sales representative who assisted me when purchasing my items, she was very patient while running around the house looking for the model number of the dryer.
Other Parts Used:
-
Gary from SAINT LOUIS, MO
-
Difficulty Level:A Bit Difficult
-
Total Repair Time:30 - 60 mins
-
Tools:Screw drivers, Socket set, Wrench (Adjustable)
1 of 2 people
found this instruction helpful.
Was this instruction helpful to you?
Thank you for voting!
- < Prev
- 1
- Next >
Related Parts
Model Cross Reference
This part works with the following models:
PartSelect Number: PS12745423
Manufacturer Part Number: W11415783
Brand
Model Number
Description