Keep searches simple. Use keywords, e.g. "leaking", "pump", "broken" or "fit".
Sorry, we couldn't find any existing reviews that matched. Try using some different or simpler keywords.
★★★★★
★★★★★
Kulbir V - September 1, 2020
Verified Purchase
INFINITE SWITCH FOR JENN AIR COOKTOP
ALL 4 SWITCHES WERE DELIVERED ON TIME AND ARE WORKING WELL. YOUR HELP IS HIGHLY APPRECIATED . KEEP UP GOOD SERVICE
★★★★★
★★★★★
Caroline G - April 14, 2020
Verified Purchase
Easy repair
The part arrived very fast. The part was different from the image but was easy to install and fit perfectly.
★★★★★
★★★★★
Demetrios Y - September 29, 2019
Verified Purchase
Great replacement part.
Pleased with the rapidity we received the part which was a little different from the original but made my Jenn-Air work normaly.
★★★★★
★★★★★
Paul S - July 2, 2019
Verified Purchase
Doesn't fit
The website said this infinity switch would fit my jenn air grill but it's the wrong one. It took a long time to arrive because they sent it by purolator Currier which doesn't deliver to my town. Now I have to return the part and am still looking for the right one. If PartSelect helps me with the return process and finds me the right part I will upgrade my rating.
July 3, 2019
Hello Paul,
Thank you for leaving a review on the part ordered. I have sent you an email in regards to the order. Hope to hear from you!
< Prev
1
Next >
Customer Repair Stories
Average Repair Rating: 4.2 / 5.0, 25 reviews.
What's this?
< Prev
1
2
3
Next >
Sort by:
Search filter:
Clear Filter
Your search term must have 3 or more characters.
Keep searches simple. Use keywords, e.g. "leaking", "pump", "broken" or "fit".
Sorry, we couldn't find any existing installation instruction that matched.
Burner Switch Broke were Knob attached
First I cut off power supply, removed screws that held panel on, pulled the switch up and disconnected wires. Installed new switch, being sure to connect wires in the correct places. Refastened panel to stove top. Turned power back on and tested switch and it Worked.
Other Parts Used:
Malcolm from White House, TN
Difficulty Level:
Really Easy
Total Repair Time:
15 - 30 mins
Tools:
Screw drivers, Wrench set
35 of 42 peoplefound this instruction helpful.
Was this instruction helpful to you?
Thank you for voting!
Infinite switch ran more than one burner
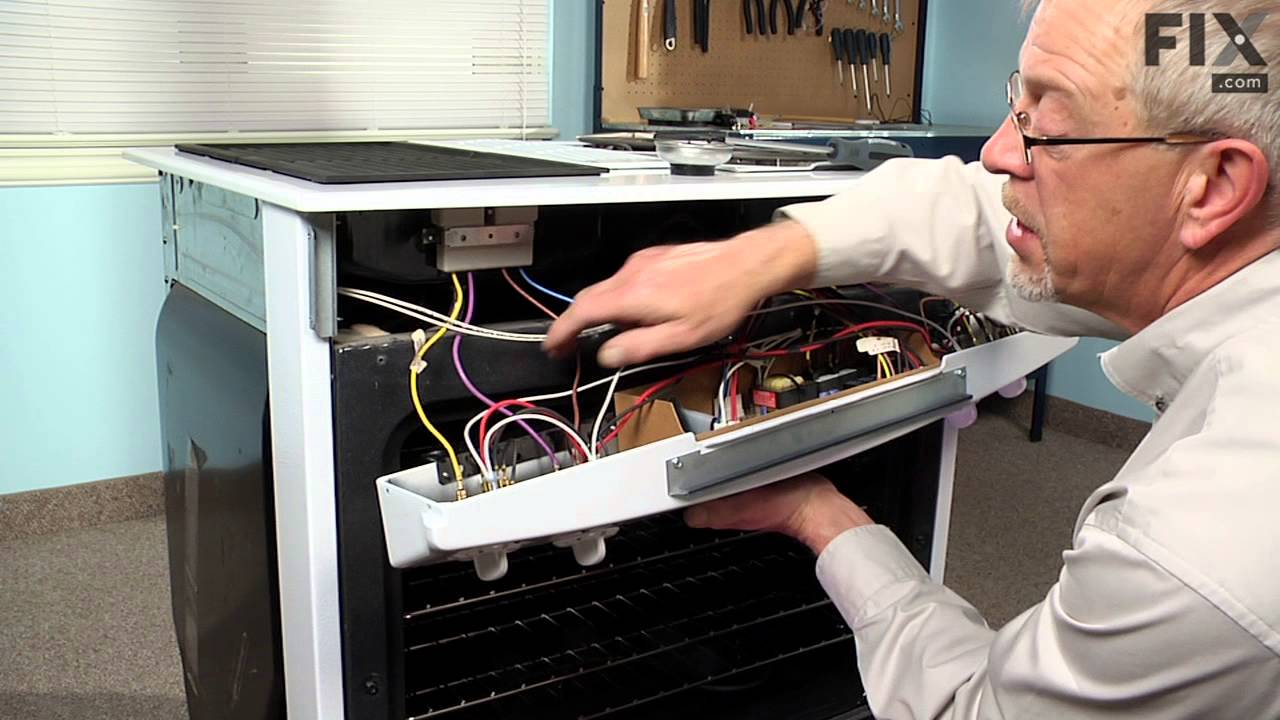
Purchased 1 infinite switch and installed it on the left front burner. problem still there so I used the switch that I replaced on the rear burner and all was ok. The front switch had been sending full heat to the rear burner,but the problem ended up with the rear switch. The switches are interconnected and all are the same part number.Diagrams on partsselect were the key to a successful repair.To access the switch you need only to remove the fan cover, remove the 2 screws holding the switch assembly and move it foreward and then lift to reveal slide on connectors. Power to the unit is off at the main panel during the entire process.
Fan switch stiff and shorted burner control, scratched up escut plate
1st-turned off power to stove top, then removed 2 screws to loosen the control panel. 2nd- I removed the shorted infinite switch by using a pliers to loosen the nut holding the burner in place, undid the electrical connections (noting where each was attached to the old control) and reattached them to the new control. Then I undid the nut holding each of the other 3 burner controls, detached the wires to the old fan switch, reattached the wires to the new fan switch, i removed the red idiot lights (by moving them sideways) from the escut kit. I then reattached everything to the new plate, secured the panel to the stove top, turned the juice on, And it worked as it should, and the new plate made the stove top appear almost new. 30 minutes.
Two heating elements couldn't be controlled - full on
Turned off power.
Removed two screws to free up section of cooktop containing 4 switches - 2 good, 2 damaged. Removed the dials from top of the 2 damaged switches. With an adjustable wrench, loosed nut on stem of switch that fastened switch to assembly. Noted which of the 5 wires on each switch went on which tab. Pulled off 5 wires on one switch, finished removing the nut and removed broken switch. Put in new switch, attached the nut, and replaced 5 wires in exactly the same position, Tightened nut. Replaced dial. Repeated procedure for second switch. Placed section containing the 4 switches back on cooktop and inserted/tighted 2 screws holding it in place.
Turned on power.
Told cleaning people to NEVER put aluminum foil under the burner units again. The foil shorted across the power and damaged the switches.
Other Parts Used:
Lansing from Alamo, CA
Difficulty Level:
Really Easy
Total Repair Time:
15 - 30 mins
Tools:
Screw drivers, Wrench (Adjustable)
14 of 15 peoplefound this instruction helpful.
Was this instruction helpful to you?
Thank you for voting!
dead element; broken switch shafts; light out
This was a piece of cake since the parts were a perfect replacement. I took the element apart and replaced the two receptacles by cutting the old wires and using the included wire nuts to splice the wires. The two switches were easily replaced by carefully connecting the wires like they were hooked up on the old switches. The indicator light was also easily replaced, although snapping the lens into place seemed to take a lot of force (I was afraid that I might break it). All in all, quite easy.
My husband actually did the repair and it went very smootly. He removed the palnuts on all switches even though we were only replacing one switch. Then removed the two screws to the switch cover, and slide the cover up to expose the switches. He then took off one wire at a time from the old switch and replaced it one the appropriate place on the new switch. Exteremely easy repair and thank goodness because I (his wife) was the one who broke the switch. Thanks PartSelect!!
All four of the cooktop switch controls needed replacing since none would control their respective burner.
Turned off the power at the circuit breaker panel. Removed the control knobs from each switch and the four palnuts under each knob. Removed the two screws inside the vent well that hold the escutcheon in place. Pulled each switch up as much as possible to expose the wires attached underneath to each switch blade. Remoced each wire and replaced them on the new switch. Same procedure for all four switches. Reassembled in reverse order. Turned on power and all four burners lit up and were regulated as if new. I saved $244.00 doing the repair myself.
Other Parts Used:
William from Williamsbirg, VA
Difficulty Level:
Really Easy
Total Repair Time:
30 - 60 mins
Tools:
Pliers, Screw drivers, Wrench set
6 of 7 peoplefound this instruction helpful.
Was this instruction helpful to you?
Thank you for voting!
Infinite Switch failed, burner would not heat
Removed two screws holding 4-switch panel, drew a simple diagram to assure placement of wires on correct terminals, removed and replaced switch.
Switch works fine, but original knob does not fit shaft of replacement switch. Will try to order new knob, but it probably won't match the old knobs, so range will have one new knob & three old ones. I wish the order page noted that new knobs must be ordered to fit the new style shaft.
two burners had failed to work properly. Always went to full heat.
I first removed power from the stove at the breaker panel. Next, I used the assembly diagrams provided by the parts select website to determine how to open up the stove panel. I opened the oven door to access the four screws holding the front panel holding the knobs. I removed the screws and was able to tilt up the front panel to allow access to the four burner switches. It was easy to swap out the wires on the old defective switch to the new replacement switches. I replaced both defective switches in 15 minutes and tiled the front panel back down into its normal position and put the four screws back into the panel to secure it. Then I turned on the breaker and did a check to see that the parts I replaced were working properly. They were and the total repair time was around 30 minutes without rushing at all.
Other Parts Used:
Lark from Mill Creek, WA
Difficulty Level:
Really Easy
Total Repair Time:
15 - 30 mins
Tools:
Pliers, Screw drivers, Wrench (Adjustable)
4 of 5 peoplefound this instruction helpful.
Was this instruction helpful to you?
Thank you for voting!
< Prev
1
2
3
Next >
Questions and Answers
Ask our experts a question about this part and we'll get back to you as soon as possible!
15 questions answered by our experts.
< Prev
1
2
Next >
Sort by:
Search filter:
Clear Filter
Your search term must have 3 or more characters.
Keep searches simple. Use keywords, e.g. "leaking", "pump", "broken" or "fit".
Sorry, we couldn't find any existing answers that matched.Try using some different or simpler keywords, or submit your new question by using the "Ask a Question" button above!
Glenn
February 21, 2020
Infinite switch just arrived! Part # w11120795. It is not the same as the switch illustrated in the picture. The original is a 5 terminal one and the newly arrived one is a 6 terminal. Is this a redesigned switch and if so how does it get wired?
For model number C221-C
Hello Glenn,
Thank you for your question. The switch has been redesigned for your model, but the wiring will be the same as the original was wired, the 6th terminal will just be left untouched for the switch to work. We hope this helps.
4 people found this helpful.
Was this helpful?
Thank you for voting!
Hector
January 7, 2020
Infinite switch no ps12347302,does it have a shaft in d-shape for my knobs to fit on it.
For model number C201-C
Hello Hector, Thank you for the question. The PartSelect Number PS12347302 has a Double Flat Shaft. We hope this helps!
2 people found this helpful.
Was this helpful?
Thank you for voting!
Greg
July 12, 2019
Is w11120795 it’s the same part?
For model number 203147
Hello Greg, Thank you for the question Yes, the PartSelect Number PS12347302 is the same as the Manufacturer Part Number W11120795. Hope this helps!
2 people found this helpful.
Was this helpful?
Thank you for voting!
Michael
February 19, 2020
Should i use switch part number ps12347301 or switch part number ps 12347302 to replace the selector switch for my jenn air model c228 cooktop. The shaft for the switch broke when removing the knob
For model number C228
Hello and thank you for writing.
The infinite switch part # PS12347302 is in the list of compatible parts for your model number. We hope this helps. Please contact us anytime if you require further assistance.
2 people found this helpful.
Was this helpful?
Thank you for voting!
Sally
September 27, 2021
Does the infinite switch W11120795 have D shaped shaft or a double flat shaft?
For model number C301
Hello Sally, Thank you for the question. This is a double flat shaft switch. We hope this helps!
1 person found this helpful.
Was this helpful?
Thank you for voting!
Galen
July 19, 2023
INF switch on Jenn Air model s125 went bad (always heats to the max). Have replacement INF switch W11120795. Don't have any guidance to reconnect wires in proper sequence. Need help?
For model number s125 (Jenn air)
Hello Galen, thank you for reaching out. We have included a video that you may reference on how to install the switch. The range in the video may appear different from yours, but it will give you a general idea of how to install the part. We hope this helps with the repair.
1 person found this helpful.
Was this helpful?
Thank you for voting!
Steve
September 3, 2019
Infinite switch failed on right rear (small plate). Replaced with a used switch and now plate heats slowly but barely warms. Front right and both left work normally. Whats the problem?
For model number c203
Hello Steve, Thank you for the question. This sounds like an issue with the used switch. I recommend having it replaced with a new one. Hope this helps!
1 person found this helpful.
Was this helpful?
Thank you for voting!
Hector
January 7, 2020
Is the infinite switch n0 ps12347302, at $58.97 is a push and turn switch.
For model number C 201 c
Hello Hector and thank you for writing.
Yes, it is. You push and then turn. We hope this helps. Please contact us anytime if you require further assistance.
1 person found this helpful.
Was this helpful?
Thank you for voting!
Enrique
January 14, 2020
When i turn on the knob, i do not feel the turning resistance of the infinite switch, the red light does not come on and the coil does not warm up. Is it fair to assume the infinite switch needs changing? When i change the panel to the other side everything works accordingly.
For model number C221-C
Hi Enrique, thank you for your question. Be sure to cut power to your appliance and remove any parts before doing tests. There are a couple of parts that could cause this issue specifically. You will need a multi meter to be able to test the parts. The first part you will want to check is your element. It should be reading between 0 - 50 ohms to be working correctly. The other part to check would be your infinite (or surface burner) switch. When you remove that part from the appliance, connect each probe from your multi meter to the prongs and then turn the switch to an on position. If you get no continuity then the switch is the issue. It could also be your wiring that is the issue but you should see visual damage on that part in most cases. Good luck with your repair.
1 person found this helpful.
Was this helpful?
Thank you for voting!
Dick
February 8, 2024
The replacement switch I was sent, part ID PS12347302 and Part # W11120795 looks like it will fit in fine, and like the switch to be replaced has 6 connectors, but the connector positions do not correspond, so replacing one wire at a time is hopeless. I need a wiring diagram or something to tell me the wiring pattern on the new switch. Any help possible??
For model number C221
Hello Dick, Thank you for reaching out. The switch has been redesigned for your model, but the wiring will be the same as the original was wired, the 6th terminal will just be left untouched for the switch to work. We hope this help!
Was this helpful?
Thank you for voting!
< Prev
1
2
Next >
✖
Ask a Question
Ask our experts a question on this part and we'll respond as soon as we can.