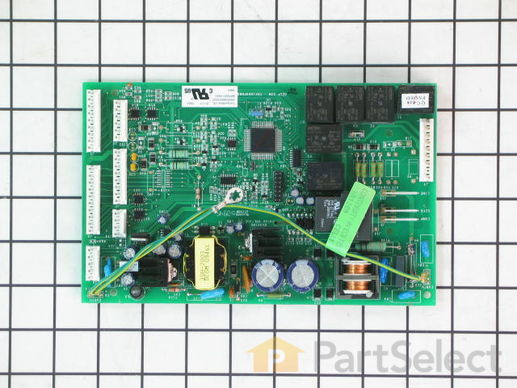
Part Location Diagram of WR55X10942 GE Main Electronic Control Board
See part 801 in the diagram
Replacing your General Electric Refrigerator Main Electronic Control Board
( Grid squares measure 1x1 inch )
Customer Service Representative

Get in touch, we're here to help!

Daily 8am - 9pm EST

customerservice@partselect.ca

Main Electronic Control Board

$526.69
  Special Order
PartSelect Number PS2364946
Manufacturer Part Number WR55X10942
Manufactured by GE
Product Description

Main Electronic Control Board Specifications

This board controls the operation of the unit. Note: This part has been updated by the manufacturer. It may differ in appearance but will function the same as the original.
How Buying OEM Parts Can Save You Time and Money

How Buying OEM Parts Can Save You Time and Money

Part Videos

Replacing your General Electric Refrigerator Main Electronic Control Board

Replacing your General Electric Refrigerator Main Electronic Control Board
Troubleshooting
This part fixes the following symptoms:
Will Not Start | Fridge too warm | Freezer section too warm | Clicking sound
This part works with the following products:
Refrigerator.
This part works with the following products:
General Electric, Hotpoint.
Part# WR55X10942 replaces these:
AP4436216, 1531075, WR55X10942, WR55X10024, WR55X10037, WR55X10045, WR55X10056, WR55X10065, WR55X10079, WR55X10083, WR55X10086, WR55X10090, WR55X10097, WR55X10109, WR55X10110, WR55X10151, WR55X10160, WR55X10171, WR55X10174, WR55X10177 ... Show more , WR55X10187, WR55X10188, WR55X10210, WR55X10228, WR55X10289, WR55X10294, WR55X10297, WR55X10314, WR55X10328, WR55X10333, WR55X10335, WR55X10336, WR55X10339, WR55X10358, WR55X10366, WR55X10372, WR55X10379, WR55X10381, WR55X10385, WR55X10396, WR55X10413, WR55X10416, WR55X10426, WR55X10427, WR55X10432, WR55X10436, WR55X10456, WR55X10473, WR55X10474, WR55X10523, WR55X10524, WR55X10526, WR55X10529, WR55X10543, WR55X10552, WR55X10554, WR55X10558, WR55X10589, WR55X10597, WR55X10603, WR55X10606, WR55X10614, WR55X10616, WR55X10626, WR55X10656, WR55X10659, WR55X10699, WR55X10712, WR55X10715, WR55X10722, WR55X10942P, WR55X11036 Show less
Back to Top
Customer Repair Stories
 Average Repair Rating: 4.0 / 5.0, 143 reviews. What's this?
  • 1
  • 2
  • 3
Sort by:
Sorry, we couldn't find any existing installation instruction that matched.
The refrigerator made continous "whooing" sounds that increased and decreased in pitch. Sounded like a ghost. Would keep us up at night. Also noticed that the heater was not heating under the evaporator coils.
After checking the stories, the consensus of opinion was to change the mother board. I had a tremendous help from Tom Paone at quality@applianceeducator.com. He also told me to change the motherboard but to make sure that the coils were totally defrosted before starting up the refrigerator after changing the board.

Took off three nuts around the board at the back of the unit. Removed the input wires and you have to push in the plastic tabs holding the board in. Then just put the new board in place and push till the tabs click. Re-install the wires and put the cover back on.

Really simple task,

It is now a week since doing this and the unit is working perfectly. No soulds and good nights sleep. The ghost has moved on.
Other Parts Used:
  • John from Holly Springs, NC
  • Difficulty Level:
    Really Easy
  • Total Repair Time:
    Less than 15 mins
  • Tools:
    Nutdriver
556 of 645 people found this instruction helpful.
Was this instruction helpful to you?
Thank you for voting!
Our Ice Damper was warped, which let warm air into the freezer and caused frost to form. Also, our ice and water dispensers stopped working.
Swapping out the ice dispenser damper door was pretty easy- just used a combination of screwdrivers to remove the dispenser assembly, popped the old damper off, put the new damper on. Replacing the control board was only a bit more complicated- unplugged the fridge, removed the control board metal cover (beware the somewhat sharp edges), unhooked all the cables from the board, used needle-nose pliers to pinch each plastic spacer/fastener as to not damage them while removing the old board, mounted the new board where the old board was, and plugged in all the cables (they were all different enough from each other that I didn't have any trouble figuring out where they were supposed to connect). I now have my fridge plugged into a surge protector- hopefully that will protect this new board I've installed. Thanks a bunch,PartSelect.
Other Parts Used:
Dispenser Door Assembly or Flapper
  • ALBERT from RALEIGH, NC
  • Difficulty Level:
    Easy
  • Total Repair Time:
    Less than 15 mins
  • Tools:
    Nutdriver, Pliers, Screw drivers
333 of 410 people found this instruction helpful.
Was this instruction helpful to you?
Thank you for voting!
Refrigerator wouldn't cool, constant clicking noise
Unplug refrigerator. First I removed 3 screws to remove cover for Board ASM Main located on back of refrigerator then loosen Board by pressing on each of 4 plastic pins then unscrew ground wire (green) then transfer all plugs from old Board to new Board, put back new board through pins, screw back ground wire then put back cover then plug back refrigerator, took 5 minutes
Other Parts Used:
  • Alejandro from New York, NY
  • Difficulty Level:
    Really Easy
  • Total Repair Time:
    Less than 15 mins
  • Tools:
    Screw drivers
148 of 176 people found this instruction helpful.
Was this instruction helpful to you?
Thank you for voting!
Water Leak@Spout - Motherboard Lost it's Mind - Broken Ice Auger
Valve wasn't closing completely, replaced ALL valves I'm already in there). Got a pair of valves as spares too. Motherboard went AWOL...as a computer engineer it was a simple diagnosis....replace ..the broken Auger?....that was user error...Housekeeper put an ice pack in the ice drawer...you can just imagine the consequences. How easy was it?.....SO easy little hint....don't bother to wrestle the hoses off the valves...just cut them flush with the valve body....there's plenty of hose to spare. If you're a younger person you can do it in 15 mins
Other Parts Used:
Ice Bucket and Auger Assembly Water Valve and Bracket Assembly Secondary Water Inlet Valve Primary Water Inlet Valve
  • Marci A. from Neptune, NJ
  • Difficulty Level:
    Really Easy
  • Total Repair Time:
    15 - 30 mins
  • Tools:
    Nutdriver, Pliers, Wrench (Adjustable)
101 of 1366 people found this instruction helpful.
Was this instruction helpful to you?
Thank you for voting!
Repeatedly stick in defrost, raising temps in fridge and freezer for hours at a time, some times for days. Repair tech was called out twice to look into this problem, but the temps returned to normal both times before he arrived, therefore, he never could diagnose the problem with a certainity as wh
The main board is easy to get to behind the access plate. You will find seven different wire harness plugs, six which are white, that are impossible to remove without breaking the retaining clips which hold them in place....but that's OK.....you are throwing away the old board anyway, so nothing lost. The plugs will snap back into each of their respective terminal locations without a problem. Be sure to treat the four white, plastic pins that hold the board in place delicately....you will not want to mess those little dudes up!
Other Parts Used:
  • Jerry from Otisco, IN
  • Difficulty Level:
    Easy
  • Total Repair Time:
    Less than 15 mins
  • Tools:
    Screw drivers
96 of 121 people found this instruction helpful.
Was this instruction helpful to you?
Thank you for voting!
Ice dispenser quit working and kept making a clicking sound
All you have to do is replace the circuit board which is really easy. Still kinda mad because the fridge is less than 2 years old. If you hear the clicking noise its coming from the circuit board.
Other Parts Used:
  • Ken from Gibson City, IL
  • Difficulty Level:
    Really Easy
  • Total Repair Time:
    Less than 15 mins
  • Tools:
    Nutdriver, Pliers
86 of 97 people found this instruction helpful.
Was this instruction helpful to you?
Thank you for voting!
Refrigerator stopped freezing and cooling frige
Well, I first had a local service guy look at the frige. only to find out his opinion was to replace the entire unit, because the Mother board cost more than the unit was worth. Me not accepting that answer, decided to look on line for a part and availability as well as price. Surprise, Part Select had what I wanted. Now, on the back of the unit in the upper left hand corner is the access door for the mother board.Find it, but before proceeding disconnect the power supply from the wall receptacle. Remove the surrounding screws on the access door with a nut driver and the correct size METRIC socket. Disconnect the wiring connectors on both sides of the board. Now there are 4 plastic type (mine were white) retaining studs holding the board in place. BE CAREFUL not to break these as you gently pull the board off studs. Replace board with new one, and restore wire connectors in their perspective places. Each connector has a different amount of pins inside so connecting them is easy. I know nothing about refrigeration, and this was a piece of cake. Less than 15 min. Unit cools like never before!!!
Other Parts Used:
  • DAVID R. from BATH, NY
  • Difficulty Level:
    Easy
  • Total Repair Time:
    Less than 15 mins
  • Tools:
    Nutdriver
77 of 85 people found this instruction helpful.
Was this instruction helpful to you?
Thank you for voting!
Refrigerator would not get cold although condensor fan worked. The compressor did not come on.
I replaced the capacitor first but the compressor still did not come on. After trying the new capacitor I removed the old board( marked the connectors just in case) then installed the new board. The major difference on the new board was the grounding wire which was simple to connect. The old board didn't have one. Once installed everything worked fine. The directions were easy to follow. I ordered the parts late Sunday night and I received the parts by Wednesday! That was fast. Thanks for the help, and this was much cheaper than calling the appliance service.
Other Parts Used:
Capacitor
  • Don from Philomath, OR
  • Difficulty Level:
    Easy
  • Total Repair Time:
    30 - 60 mins
  • Tools:
    Nutdriver
75 of 87 people found this instruction helpful.
Was this instruction helpful to you?
Thank you for voting!
Our refrigerator stops delivering ice both crushed and cube. The ice bin was full. I first thought the delivery motor was bad and then the water dispenser in the door stopped delivery. Decided at that point it was either the door panel swith board, cable or the main circuit board on the back of t
After further diagnosis decided the main circuit board was the likely culprit. Ordered a new one from PartSelect. It came in 2 days and took less than 30 minutes to install. Unplugged the refrig. Removed the old board cover with a nut driver. Removed the wiring cables (note their location on the board) and also there were a couple of cable plugs on my refrig that were not not hooked to anything on the board. Snapped the old board out and the new board in. Reinstalled the cables and then the board cover. Plugged the refrig in and back in business. PartSelect is a great website! The speed of delivery and available information just saved me $500 to $600 from a appliance repair shop.
Other Parts Used:
  • david from colleyville, TX
  • Difficulty Level:
    Really Easy
  • Total Repair Time:
    15 - 30 mins
  • Tools:
    Nutdriver
62 of 68 people found this instruction helpful.
Was this instruction helpful to you?
Thank you for voting!
Clicking noice from the motherboard
After advise from the expert, he was adamant the motherboard was the (via symptoms)problem. After receiving the replacement board (via FEDEX), I followed the easy to understand instructions. I did number the electrical plugs and mapped the connections on paper. The key to the rapid fix was to carefully read all of the instructions to verify which (if any) wires needed elimination, which in my case was none. I will definitely use this service in the future as the expense was affordable and after research, I estimate a savings between 55% to 60%.
Other Parts Used:
  • John from Greer, SC
  • Difficulty Level:
    Really Easy
  • Total Repair Time:
    Less than 15 mins
  • Tools:
    Pliers, Screw drivers
56 of 60 people found this instruction helpful.
Was this instruction helpful to you?
Thank you for voting!
  • 1
  • 2
  • 3
Questions and Answers

Ask our experts a question about this part and we'll get back to you as soon as possible!

1 question answered by our experts.
  • 1
Sort by:
Sorry, we couldn't find any existing answers that matched.Try using some different or simpler keywords, or submit your new question by using the "Ask a Question" button above!
Ina
December 30, 2021
Mother board won't light up. Can't get any controls to light up. There is power to the lights and ice maker but not that board. What would we try prior to purchasing such an expensive part?
For model number HSS22GFTWW
PartSelect logo
Hello Ina, Thank you for the question. We suggest checking the wiring first to make sure there is no defects or damage before replacing the Board. We hope this helps!

Was this helpful?
Thank you for voting!
  • 1
Customer Service Representative

Get in touch, we're here to help!

Daily 8am - 9pm EST

Contact Customer Service