Keep searches simple. Use keywords, e.g. "leaking", "pump", "broken" or "fit".
Sorry, we couldn't find any existing reviews that matched. Try using some different or simpler keywords.
★★★★★
★★★★★
Wayne C - March 3, 2022
Verified Purchase
Drier repair.
The part was exactly what was required. The accompanying video demonstrating the replacement process was easy to follow. The repair took about 1/2 hour. Drier is working like new.
★★★★★
★★★★★
John S - March 18, 2019
Verified Purchase
easy repair
My dryer was only two years old, but it started to rip / put holes in some of the clothes, I inspected the old seal and bearing from inside the the drum and also had the top panel off and it didn't seem that worn, did notice a little lump where the bearing felt it attached to the fabric seal, tried to push it back from inside the drum, but didn't want to force it. I ordered the new seal and bearing, when I removed the front panel I can see that the lump was the fabric seal folded forward instead of back to create the lump which, probably caused my problem. I replaced the old seal and bearing, went on easy, I will keep the old part, as I think I can either glue or cut off the area that was folded back, and use it when the new one wears done.
★★★★★
★★★★★
LEONARD F - October 7, 2018
Verified Purchase
Worked Great
Very happy with the part and service very easy install
★★★★★
★★★★★
Irene V - August 26, 2018
Verified Purchase
easy repair
It was easy to find the part that I needed, it was shipped fast, and it works great.
< Prev
1
Next >
Customer Repair Stories
Average Repair Rating: 3.0 / 5.0, 15 reviews.
What's this?
< Prev
1
2
Next >
Sort by:
Search filter:
Clear Filter
Your search term must have 3 or more characters.
Keep searches simple. Use keywords, e.g. "leaking", "pump", "broken" or "fit".
Sorry, we couldn't find any existing installation instruction that matched.
Dryer making loud squealing noise when running
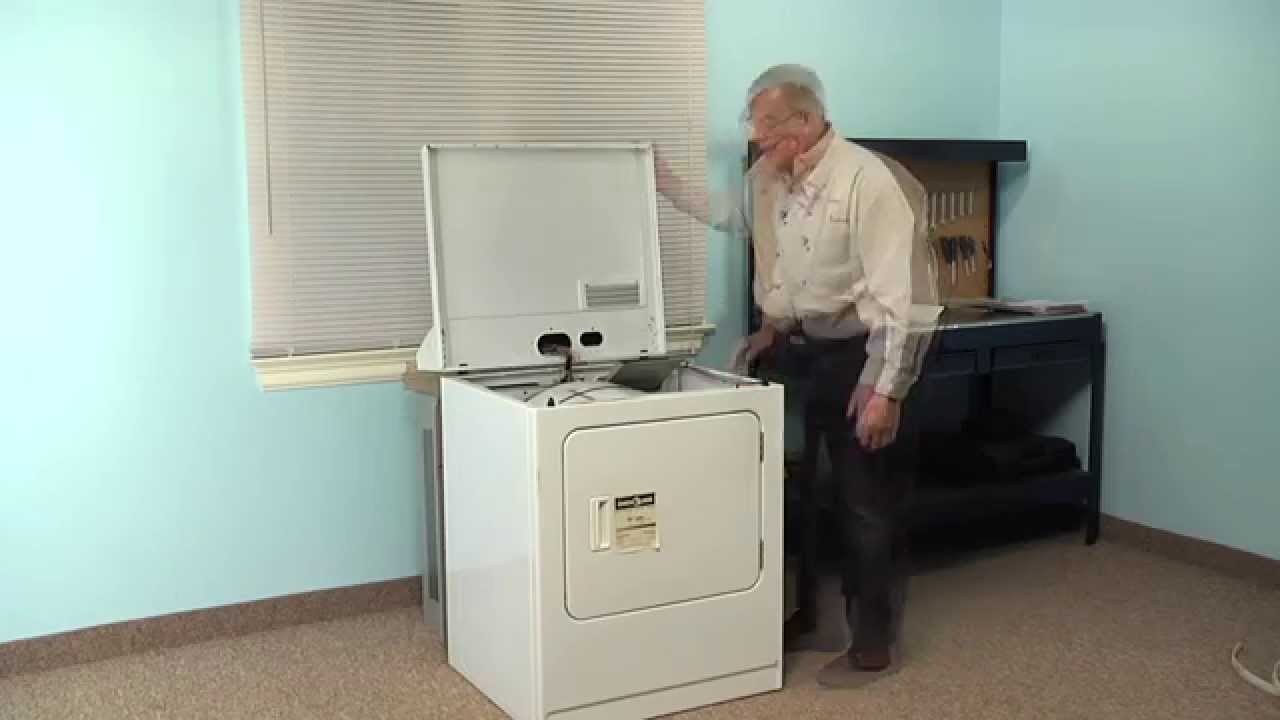
The (front) bearing and seal are not metal parts but a fabric and and mesh like material. It is somewhat like a fabric belt made to hold up a pair of trousers. The belt sits in a channel that goes around the door on the inside of the front panel. To get to the combination bearing/seal you remove two screws that are located under the cover of the lint trap. These have to be removed to lift the top. Then using a putty knife or screw driver you must pop the top (which snaps down on plastic clips) at the front corners. The top lifts up and folds back on hinges. The front is attached to the sides by one screw on each side near the top. A nut driver will remove then easily. Once the 2 screws are removed lift the front panel about 2 inches to disengage the front panel from the clips that hold the front attached to the sides near the bottom. When you remove the front panel the dryer drum will literally fall out so you want to get hold of it before pulling the front panel away so it isn't damaged and and doesn't damage the gas burner assembly which is under the drum to the left side. The drum is very light. I supported it with an empty shoe box while the front was off. Once the front is off you'll see the bearing/seal on the inside of the front panel and it will be obvious how to remove the old one and place the new one. There are three pegs on the front panel that receive the three holes in the fabric bearing/seal. The seal will stay in place while you remove the shoe box and put the front cover back on. The drum fits over the seal like a lid on a jar and just slides on the fabric when the drum rotates. Low tech but the drums slides easily on the bearing material and seems to last a long time.
I also did the rear dryer seal. This is similar to the front. To do this you follow the procedure above but to get to the real seal you will have to remove the drum. It will fall out on its own if the front panel is removed. The drive belt goes around the drum. It is about 3/8th of and wide and just wraps around the drum without any teeth or channels or anything. Let the belt fall to the bottom as you lift the drum forward and out of the cabinet. The drum is light. Just put it on the floor and strip off the old rear seal which is glued on. It too is fabric. Clean up the drum a little and fit the new seal on the drum. Once the seal is on the drum you can lift the edge of the fabric seal and glue the fabric flange to the drum. This becomes pretty obvious once you have the seal on the drum. If you put the glue on the drum first you will make a mess. Put the seal on properly and the lift the edge to apply the adhesive all the way around. The adhesive sets enough in a hour or so. Put the drum back in and replace the front panel. Don't forget the drive belt. It goes around the drive motor that is located on the bottom of the dryer on the right, around or over an idler pulley (my older model does not have a idler wheel but rather a bracket with a "slide" that the belt runs over that keeps sufficient tension on the belt to drive the drum. If your belt falls off the motor and the idler pulley falls out it may be confusing how the belt goes in. My idler bracket is held in slots on the bottom of the cabinet merely by the tension of the belt - no screws or anything. I suggest that you put the belt around the drum first, then the drive motor. You will have slack in the belt and it becomes a little more obvious how the idler pulley (which is mounted on spring steel) goes in and takes up that slack and keeps modest tension on the belt. The rubber side of the belt goes against the drum, the leathery side is the outside.
The rear drum seal was worn and causing streaks on clothes
I new that the drum would need to be removed to perform the seal replacements but it didn't look that difficult. Sure enough, it was a piece of cake. The whole process of installation took less than one hour to complete. The saving to repair vs. replacement of the dryer amounted to the equivilant of 4 - 5 rounds of golf. Yes I would do it again!
First, I unplugged it and pulled it away from the wall. Then I pryed the front of the top up. It is scary to apply that much force, but the clips did not break. It opens like a car hood. Then I removed the two sheet metal screws that hold the front to the sides. Don't forget to unplug and unclip the door switch wires. Then I lifted the front off the bottom clips. Be sure to hold the drum up when you do this. Three hands will make it easier. Then remove the drum and belt. The belt tensioner will fall off, but that is ok.
I thought the problem would turn out to be the motor, but instead it was the front seal for the drum. It is felt and had broken. It folded under itself and was jamming the drum to the point that the motor couldn't turn it.
I replaced the felt seal, which attaches to the front cover with three clips and also replaced the plastic guides, which clip to the drum. Both were easy to do. I had replaced the rear drum seal a few years ago and so it was ok, otherwise I would recommend doing that too.
While I had it apart, I opened up the back and cleaned out all the lint in the fan housing. I had replaced the heater element, thermal switch and fuse a few years ago, so they were fine.
I also replaced the mosture sensor, just because it only cost $11. I bought a new lint filter, because it had holes in it after 20 years. I replaced the belt, because it was only $10. I replaced the lint filter cover and front door handle, because they had yellowed. I will warn you about the front door handle. It was a bear. I finally had to take the door apart to get the little plastic clip to seat correctly.
Then I put it all back together, which again is easier with 3 hands. Holding up the drum and putting the front cover on the lower clips can be a bit tricky alone. Also, be sure to rotate the drum to make sure the rear seal is not folded under and the front seal is seated correclty.
I fired it up and it ran great, except for the constant whistling. I had wondered what the little clear plastic box in the back did. Turns out it is the lint filter is full whistle warning thing. I took the back off again and found a wire was resting on the flapper door of the box and holding it in the wrong postion. By the way, it is a really irritating sound after the first few minutes. I moved the wire and it works great.
I worked slowly and it went well and was not hard.
I watched all the videos with Steve. He was very helpful in his presentation of the repairs. Due to the age of the dryer every thing was replaced and was very easy to do. Thank you Steve and PartSelect for making these repairs possible and easy
Brown "dust" marks appeared on the clothing after drying
First, I slid the top forward to release it and then pivoted it about the clips along the back edge. Second, I removed the open/closed door sensor. Third, I removed two screw on the inside of the front panel and slide the front panel up to release it from the clips near the bottom edge of the panel. Fourth, I removed the dryer drum that fell out as soon as the front panel was removed.
With the drum on the floor (carpeted), I installed the front seal and the back seal after removing the old seals. I then applied the glue supplied with the back seal to the back seal. Next, with my spouse's help, I placed the drum into the dryer frame while positioning the seals, the drum driving belt, and the front panel. This step was the most 'interesting' of the whole repair. I replaced the two screws on the inside of the front panel. I spun the drum to ensure that the seals were in the correct position.
Finally, I replaced the door sensor and dropped the top into place.
First, removed the bottom cover below the dryer door. This is just held on with two clips that can be pushed in with a flat screw driver. Then remove the springs that go from the bottom of the dryer to the inside of the dryer door. We had to remove the entire front of the dryer, so the easiest way we found was to loosen the two screws on the bottom of the front panel, but not remove them. Then pop up the top of the dryer. To lift the top, first remove the two screws under the little door where the lint trap goes. The top is hinged in the back, and it snaps down onto two clips that can easily be popped up with a flat screw driver) With the top opened, there are two screws accessible. When the front of the dryer is removed, there will be nothing to support the drum, so what we found was that if you rotate the drum, you'll find a point where there's a hole in the top of the drum. If you take the springs that you removed from the bottom of the door you can hook them into this hole, and hook the other end into a hole in the back wall of the dryer just behind the drum. The springs are the perfect size for this, and it keeps the drum from falling when you remove the front panel. then just disconnect the three wires going to the switch inside the front panel, and remove the two screws from the top of the front panel. It should then lift right off. The bearing can just be pulled away and the new one installed. Put everything together again in reverse order.
Other Parts Used:
Stephen from Charlotte, NC
Difficulty Level:
Easy
Total Repair Time:
30 - 60 mins
Tools:
Nutdriver, Screw drivers
6 of 6 peoplefound this instruction helpful.
Was this instruction helpful to you?
Thank you for voting!
Brown Lines on Clean Clothes coming out of Dryer
Removed the top and front panel, removed the dryer drum. Removed the worn out rear drum seal. I scraped and sanded the old glue residue from the rear of the drum. I used "0000" steel wool to clean the "brown seal residue" from the rear panel where the new seal on the drum would rub/seal against the rear panel. I used spring clamps to hold the seal in place prior to appling the glue. The glue was applied to the drum/seal and allowed to dry 30-45 min. I replaced the front drum seal (some of the other discussions in your forum had good hints on replacing this seal, better than the printed instructions), also replaced the belt and applied a light amout of lubrication (3 in 1 oil) to the idler pulley and the drum rollers. The dryer runs smoothly and quietly and most importantly no more brown streaks on clean clothes.
Step one: UNPLUG THE 220V LINE! Removed the 2 screws on top under the lint door then flipped up the top. Next I unclipped the wire harness at the front and disconnected the 2 wires to the door switch and flipped the harness out of the way. Then I popped off the kick panel. Next, I removed the (4) 9mm screws holding the front panel on. The 2 lower screws only need to be loosened and the panel lifted off. Note the location of the door springs at the bottom. These springs can be reinstalled easily through the kick panel after you reinstall the front panel. Next I removed the remnants of the old seal from the front panel but left the 3 plastic clips in place. The seal wraps around the perimeter of the panel and is held in place by the lip of the opening. The extra flap is then folded back so that the folded edge is toward the dryer drum and away from the front of the panel. The sketch in the instructions is not helpful! Next, reinstall the front panel. As you set it onto the lower screws, you may need to lift the drum slightly to fit the panel into the drum opening. Tighten the 4 screws then reattach the 2 door springs. Test the operation by turning the drum counterclockwise by hand. Check to make sure the rear seal has not been displaced or damaged. That seal is actually glued into place. If it turns smoothly, snap the kick panel back on and reinstall the wire harness. Flip down the top and reinstall the 2 screws at the lint tray on top. Plug it in and give it a spin!. Note, While you have it open, you'll want to use your shop vac and clean all the lint and pocket change out of the machine. You might as well take off the back panel and clean up in there and in the vent pipe too. I didn't know if I needed a new belt but ordered one anyway. The old one turned out to be pretty well shot. After I had the front panel removed, replacing the belt is very simple. There is an idler pulley underneath that is under tension. Just push on the idler until the belt is loose. Switch the new one into place and you are done.
My old dryer drum had become noisy and loose and prone to getting stuck while running.
I replaced the front seal and bearing, split ring bearing and rear seal. It was technically pretty easy. The thing to do is watch the videos provided by PartsSelect AND go to Youtube and watch a couple of others. Once you see several guys do the job and look over your own machine, it all becomes obvious. Some tips: Work cleanly, you will be dealing with dryer dust and shredded gasket material. Use a vacuum and put down newspaper or a drop cloth. While you have it apart, clean the inside of the machine, and check the other moving parts (eg, rear bearing and drive belt). The glue for the rear drum seal is runny and dries fast so work reasonably quickly. I held the seal on with clothes pins and binder clips and glued about a foot of seal at a time. Everything else goes on easily. They dryer is like a new machine-good for another 30 years.
Ask our experts a question about this part and we'll get back to you as soon as possible!
7 questions answered by our experts.
< Prev
1
Next >
Sort by:
Search filter:
Clear Filter
Your search term must have 3 or more characters.
Keep searches simple. Use keywords, e.g. "leaking", "pump", "broken" or "fit".
Sorry, we couldn't find any existing answers that matched.Try using some different or simpler keywords, or submit your new question by using the "Ask a Question" button above!
Cheryl
June 20, 2019
The seal on my dryer is coming apart, however it looks different than this one and i don't believe it is attached with screws... it is silver and it seems as though it was affixed with glue or something. i am worried if i order this replacement part, first i may not be able to easily remove the old seal, and second that i will not be able to attach the new part.
thanks.
For model number WGD4815EW1
Hello Cheryl, thank you for writing. This is the correct replacement for your model. Replacement parts are sometimes updated by the manufacturer and may be different in appearance but will have the same functionality. We hope this helps.
3 people found this helpful.
Was this helpful?
Thank you for voting!
David
September 21, 2021
I don't just need the clips, I need the whole plastic retainer is this available?
For model number LGR5636PQ1
Hello David, Thank you for the question. Checking the parts list and the How to Video, there is no Plastic Retainer listed for this Seal and Bearing kit. If you are referring to the Two-Piece Split Ring Bearing, you will need the PartSelect Number PS334199. We hope this helps!
I want to replace the front felt drum seal on my Kenmore dryer (circa '80s), but the seal on my dryer is different than the one offered by partselect. My seal appears to be felt around the entire circumference, whereas the replacement part is only felt on the upper portion and fabric on the lower portion. Will the replacement part work on my dryer?
For model number Kenmore Dryer 110.86873100
Hello Jon, thank you for inquiring. Replacement parts are usually updated by the manufacturer and may appear different than the originals but have the same functionality. This Seal and Bearing part PS11773177 is the correct replacement for your model.
2 people found this helpful.
Was this helpful?
Thank you for voting!
Jack
August 12, 2019
Dryer starting to squeak off and on when running,what part would you recommend to address this problem !
For model number WGD4800XQ5
Hi Jack, thank you for your question. There are a number of parts that you should check. You should check your bearings, your felt seal, belt, rollers, and pulley to see if they need to be replaced at all. Those parts can wear down over time. If those parts are fine then it might be your motor that is the issue. Good luck with your repair.
1 person found this helpful.
Was this helpful?
Thank you for voting!
David
September 20, 2021
Are the front seal/bearing plastic retainers available? If so what is the p/n?
For model number LGR5636PQ1
Hello David, Thank you for your inquiry. We show that the plastic clips are only available as part of the retainer clip kit, part# PS334162. Hope this helps.
The silver seal on the front door has frayed. What is our replacement part number?
For model number WED4850HW0
Hello Delores, Thank you for your inquiry. We have researched the model number you have provided, and the seal on the front door is part# PS11766744. We hope this helps.
Was this helpful?
Thank you for voting!
Derek
January 21, 2023
States that it is the front bearing seal, is there a different seal for the rear or can I just buy for both front and rear?
For model number WED49STBW0
Hello Derek, Thank you for your inquiry. Researching the model number that you have provided, we show the rear drum seal is part# PS8691753. We hope this helps, good luck with this repair!
This seal kit for large capacity gas and electric clothes dryers includes a seal, an adhesive, and an instructions sheet. This felt seal for the back of the drum is sewn with red thread.
This is a replacement bearing ring kit for your dryer. The bearing rings are found on the top and bottom lips of the dryer drum. If your dryer is unusually noisy, or the drum will not turn during operation, or if there a...