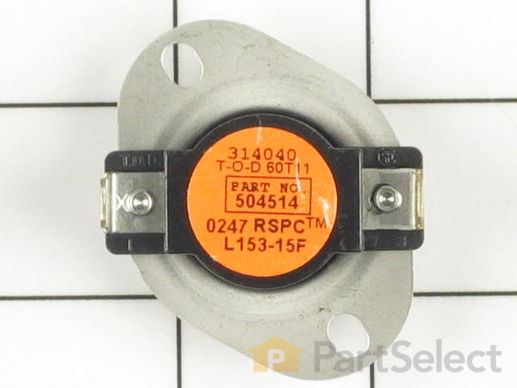
Part Location Diagram of WPY504514 Whirlpool Cycling Thermostat (Limit: 153-15)
See part 24 in the diagram
( Grid squares measure 1x1 inch )
Customer Service Representative

Get in touch, we're here to help!

Daily 8am - 9pm EST

customerservice@partselect.ca

Cycling Thermostat (Limit: 153-15)

$92.34
  Special Order
PartSelect Number PS11757551
Manufacturer Part Number WPY504514
Manufactured by Whirlpool
Product Description

Cycling Thermostat (Limit: 153-15) Specifications

This cycling thermostat has a limit of 153 degrees Fahrenheit and a differential of 15 degrees. This means that with this thermostat, your dryer's heating element will cut out at 153 degrees Fahrenheit and cycle back on when the dryer's internal temperature drops by 15 degrees.
How Buying OEM Parts Can Save You Time and Money

How Buying OEM Parts Can Save You Time and Money

Troubleshooting
This part works with the following products:
Dryer.
This part works with the following products:
Amana, Speed Queen.
Part# WPY504514 replaces these:
5-4514, 504514, Y504514
Back to Top
Customer Repair Stories
 Average Repair Rating: 2.7 / 5.0, 6 reviews. What's this?
  • 1
Sort by:
Sorry, we couldn't find any existing installation instruction that matched.
Timer won't advance for auto-sensing cycles. Low Heat.
First I unplugged the dryer from the wall outlet. Then, removed the access panel in the lower front (held on by 2 screws near the floor). Then, I removed the black plastic air duct (held by 3 screws) in front of the blower. Then, with a Sharpie marker, next to each wire terminal lug, I labeled on the chassis the COLOR of each wire where it plugs on to a terminal lug (for proper wiring re-assembly later). Then, thru the lower front, I reached into the lower left rear of the dryer to remove the heating element assembly from its metal duct (held by 3 or 4 screws) - it slides down a bit, then it is easily removable. I layed the element on the floor in front of the dryer - all wiring still intact. Then, using the NEW HEATING ELEMENT and SENSORS ordered, I assembled them to match the original, re-using screws off of the old unit - and moving the wiring one-by-one from the original to the new assembly. I then installed the new heating element assembly into the duct at the lower rear of the dryer. I then replaced the 2 sensors on the front metal panel of blower housing, with new parts from my order, re-using the original wiring and screws. Then I re-installed the black plastic duct onto the front of the blower. Then, on the top of the dryer, I dissassembled the control panel from the rear, by removing 5 screws. I then found the resistor mounted on the back of the timer, and replaced it with the new one. Since the new resistor did not come with terminal lugs crimped on its wires, I had to cut the terminal lugs off of the original resistor and solder them onto the new resistor. I then reassembled the control panel. I then plugged the dryer back into the wall outlet and did a test run with no clothes. IT WORKED !! Then I reinstalled the lower front access panel and ran the dryer with wet clothes. IT WORKED !!
Other Parts Used:
Limit Thermostat Heating Element (Orange Dot) Light Bulb - 7W Resistor High Limit Thermal Fuse
  • Mark from West Chester, PA
  • Difficulty Level:
    Really Easy
  • Total Repair Time:
    30 - 60 mins
  • Tools:
    Nutdriver
109 of 143 people found this instruction helpful.
Was this instruction helpful to you?
Thank you for voting!
Dryer would not heat
This dryer required complete take apart to get to heating element, including removal of drum. Multimeter indicated thermal fuse blown. I replaced it and it blew again. I replaced fuse(again), heating element, limit thermostat, and cycling thermostat to eliminate all potential causes. Dryer works like new. Cycling thermostat had been bad for years, but I never knew it, just had to run dryer two cycles all the time.
Other Parts Used:
Heating Element (Orange Dot) Limit Thermostat High Limit Thermal Fuse
  • Bryant from Waycross, GA
  • Difficulty Level:
    A Bit Difficult
  • Total Repair Time:
    1- 2 hours
  • Tools:
    Socket set
19 of 25 people found this instruction helpful.
Was this instruction helpful to you?
Thank you for voting!
taking to much time to dry
took off lower front panel was able to reach all parts ...all parts i ordered were perfect matches........
Other Parts Used:
Limit Thermostat Thermostat Boosting Heater High Limit Thermal Fuse
  • Deanne from Visalia, CA
  • Difficulty Level:
    Easy
  • Total Repair Time:
    30 - 60 mins
  • Tools:
    Nutdriver
18 of 34 people found this instruction helpful.
Was this instruction helpful to you?
Thank you for voting!
Dryer taking too long to dry
Determined that the 2 completely worn off front & rear drum seals were causing dryer to take too long to dry clothes.
Removed the front bottom panel first, then the middle panel and then the top panel. After removing the belt from the drum, it came out easily. Replaced both thermostats and fuse
just so they would be new in the unit.
Reglued the seals in place and waited til glue dried. Then reassembled everything back. Also lubricated the drum wheels. Everything worked and was quiet!
Other Parts Used:
High Limit Thermal Fuse Cylinder Felt Seal
  • Daniel from Phoenix, AZ
  • Difficulty Level:
    Easy
  • Total Repair Time:
    30 - 60 mins
  • Tools:
    Nutdriver
6 of 7 people found this instruction helpful.
Was this instruction helpful to you?
Thank you for voting!
Initially taking 3 cycles to dry completely, then no power at all.
In my case I had no idea initially what was wrong so I tore the entire dryer apart. Took the control panel apart, the front kick plate off, the door assemly off, then took the entire dryer housing off the base so I could get to everything. It was at this point I decided to try to seriously repair it myself. I found PartsSelect, read through the appropriate repair stories and determined the only real possible parts. I ordered the parts, received them promptly, and replaced 4 of the 5. The parts were easy to replace, just unplug the wires, used a socket set to remove the bolts holding them and replaced. I also unplugged the two wires to the element, unbolted it, cleaned it out and replaced it. The 5th part, the roller shaft did not have to be replaced. The original was in fine condition, it had simply loosened and was wobbly from 12 years of use. The bearing was still perfect with no slack in the shaft at all. After hooking up what I needed to for a test run, all was well. I then took about 2 hours to put everything back together. The dryer now works perfectly........dries loads completely in approx. 30 minutes and runs whisper quiet.
Other Parts Used:
Limit Thermostat Thermostat Boosting Heater High Limit Thermal Fuse
  • Walter from Cairo, GA
  • Difficulty Level:
    A Bit Difficult
  • Total Repair Time:
    More than 2 hours
  • Tools:
    Nutdriver, Screw drivers, Socket set, Wrench set
3 of 10 people found this instruction helpful.
Was this instruction helpful to you?
Thank you for voting!
Dryer-off and on heat then no heat.
Most of the issue was in trying to determine why the dryer had heat then no heat off and on. The timer was running thru all the cycles, so for the time being dismissed that as the problem. Began to test the various thermostats and thermal fuse and the heating element with ohm meter for continuity. Also, gave the heating element a close visual exam for any breaks in the coils. Confusingly, all these parts tested as OK. Re-installed the heating element, cycling thermostat and high limit thermal fuse. After re-connecting power plug, ran dryer and had heat for 3 loads. Then heat went out again. After 'educating myself' some more on this site , decided to purchase a new timer (had to buy elsewhere), Cycling Thermostat, High LImit Thermal Fuse even though the original parts tested Ok, because the fact remained the dryer was still not heating all the time. The cost of all these parts was very minimal versus calling out a repairman (labor cost), and the repair video's has for each part simplifies the tear down and re-install. In the meantime, also ordered a new belt from this site after discovering this one was cracked in several places. The new parts arrived in a day and half after ordering. Installed all the new parts, then finally the new timer last. Dryer now working perfectly! I found this website to be Very user friendly. They make it simple to find your parts and help you make a diagnosis as to what parts need replacing. Could not have done it without them!
Other Parts Used:
High Limit Thermal Fuse
  • Gary from YUKON, OK
  • Difficulty Level:
    A Bit Difficult
  • Total Repair Time:
    30 - 60 mins
  • Tools:
    Nutdriver, Pliers
2 of 2 people found this instruction helpful.
Was this instruction helpful to you?
Thank you for voting!
  • 1
Questions and Answers

Ask our experts a question about this part and we'll get back to you as soon as possible!

1 question answered by our experts.
  • 1
Sort by:
Sorry, we couldn't find any existing answers that matched.Try using some different or simpler keywords, or submit your new question by using the "Ask a Question" button above!
Joseph
July 18, 2019
I just purchased and replaced the thermal fuse, heating element, and limit thermostats. It seems like the heating element is still shutting down and not restarting when on times dry. The permanent press and other settings seem to be a bit more resilient and make it through a few cycles of element coming on and off. What else do you recommend i try?
For model number Lea30aw Amana dryer
PartSelect logo
Hello Joseph, thank you for inquiring. This could be an issue due to a faulty Motor Assembly, part PS11739459 for your model. You may also want to consider the Multi Rib Belt part PS11742271 for your model. We hope this helps!

Was this helpful?
Thank you for voting!
  • 1
Related Parts
Model Cross Reference
This part works with the following models:
PartSelect Number: PS11757551
Manufacturer Part Number: WPY504514
Brand
Model Number
Description
Amana
LEA10AW
Dryer - Electric
Amana
LEA20AL
Dryer - Electric
Amana
LEA20AW
Dryer - Electric
Amana
LEA30AL
Dryer - Electric
Amana
LEA30AW
Dryer - Electric
Amana
LEA50AL
Dryer - Electric
Amana
LEA50AW
Dryer - Electric
Amana
LEA60AL
Dryer - Electric
Amana
LEA60AW
Dryer - Electric
Amana
LEC10AW
Dryer - Electric
Amana
LEC20AW
Dryer - Electric
Amana
LEC30AW
Dryer - Electric
Amana
LEC32AW
Dryer - Electric
Amana
LEC50AW
Dryer - Electric
Amana
LEC60AW
Dryer - Electric
Amana
LED20AW
Dryer - Electric
Amana
LED32AW
Dryer - Electric
Amana
LED57AW
Dryer - Electric
Amana
LES10AW
Dryer
Speed Queen
LES10AW-PLES10AW
Dryer - Speed Queen Dryer Model LES10AW-PLES10AW (LES10AWPLES10AW, LES10AW PLES10AW) Parts
Speed Queen
LES19AW
Dryer - Gas
Speed Queen
LES33AW
Dryer - Gas
Amana
LES34AW
Dryer
Speed Queen
LES34AW-PLES34AW
Dryer - Speed Queen Dryer Model LES34AW-PLES34AW (LES34AWPLES34AW, LES34AW PLES34AW) Parts
Customer Service Representative

Get in touch, we're here to help!

Daily 8am - 9pm EST

Contact Customer Service