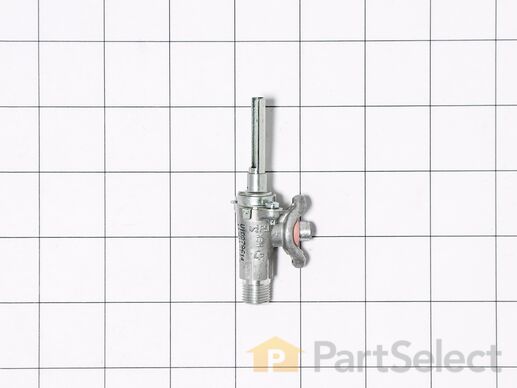
Part Location Diagram of WPW10279614 Whirlpool Burner Valve - 9.5K - Left Rear - Left Front - Right Front
See part 8 in the diagram
( Grid squares measure 1x1 inch )
Customer Service Representative

Get in touch, we're here to help!

Daily 8am - 9pm EST

customerservice@partselect.ca

Burner Valve - 9.5K - Left Rear - Left Front - Right Front

$183.03
  In Stock

Get this part fast! Average delivery time for in-stock parts via standard shipping: 1.8 days.

PartSelect Number PS11751788
Manufacturer Part Number WPW10279614
Manufactured by Whirlpool
Troubleshooting
This part works with the following products:
Range.
This part works with the following products:
Whirlpool, Maytag, Amana, KitchenAid.
Part# WPW10279614 replaces these:
AP6018486, W10279614
Back to Top
Customer Repair Stories
 Average Repair Rating: 3.8 / 5.0, 1 reviews. What's this?
  • 1
Sort by:
Sorry, we couldn't find any existing installation instruction that matched.
Valve stem broke off the right control burner valve so the knob for burner could not go on the stem to light the burner.
I first shut off gas to stove and unplugged the stove. I then opened the oven door and used a phillips screw driver to remove the three screws under the cover plate that sits behind the gas control knobs . I then removed the cover plate. I then took off the grates on stove top and proceeded to remove the two screws on each burner head with a phililps screwdriver. Some where tight so I used a drill driver on low speed to turn the screws out. After removing the burner heads I had to remove two screws on each corner in the front under the cook top of the stove to remove the cook top off the stove. But before that I had to release the two wires from a clip under the cook top for the ignitor switches before I could lift the cook top off the stove. These should be on the right hand side. Now I had access to remove the burner valve that had the broken stem that the knob is attached too. For this I used adjustable wrench to remove the nut for the gas tube that goes from the burner head to the control valve. Then I had to release the ignitor switch by pulling it off the control valve stem or gently pry it off with a flat head screw driver. Then used 1/4 in socket wrench to remove the top bolt to release the old burner valve off the gas plenum where all the burner valves are attached too. Then pull the old control valve off from underneath the gas plenum. Then i put in the new burner valve making sure it had a rubber seal around it where it goes up through the hole underneath the gas plenum. Then while holding control valve in place put the screw back in the top of the gas plenum through the other hole on top of the gas plenum and screw it in the burner valve making sure it also has a seal under the bottom of head of the bolt that you are screwing in to the control valve. This is so that no gas can leak from the plenum where the control valve is attached to. The control valve threads should be lined up with the bolt since both holes on the bottom and top of the gas rail (plenum) are lined up Use a 1/4 in socket to tighten down the bolt with the seal but don't over tighten. Then reattach the tube that goes from the burner head to the control valve with adjustable wrench and make sure not to over tighten. Then grab the stove cook top that you took off and replace it back on top of stove.After in place make sure to put those two wires back into clip that is under the cook top so wires are not touching the oven. You have to put part of your arm under the cook top and use your hand to try to push the wires back into the clip that's under the stove top. These wires will be on the right hand side. This is kinds tricky to do. Then tighten cook top back down with two screws and reattach the ignitor switch back through the valve stem of new control valve . It should clip in around the valve stem. Then reattach the cover plate over the valves stems with the remaining three screws and attach the control knobs.
Other Parts Used:
  • Douglas from BETTENDORF, IA
  • Difficulty Level:
    Really Easy
  • Total Repair Time:
    30 - 60 mins
  • Tools:
    Screw drivers, Socket set, Wrench (Adjustable)
1 person found this instruction helpful.
Was this instruction helpful to you?
Thank you for voting!
  • 1
Questions and Answers

Be the first to ask our experts a question about this part!

Model Cross Reference
This part works with the following models:
PartSelect Number: PS11751788
Manufacturer Part Number: WPW10279614
Brand
Model Number
Description
Amana
AGR5630BDB0
Range - GAS RANGE
Amana
AGR5630BDB1
Range - GAS RANGE
Amana
AGR5630BDB2
Range - GAS RANGE
Amana
AGR5630BDS0
Range - GAS RANGE
Amana
AGR5630BDS1
Range - GAS RANGE
Amana
AGR5630BDS2
Range - GAS RANGE
Amana
AGR5630BDW0
Range - GAS RANGE
Amana
AGR5630BDW1
Range - GAS RANGE
Amana
AGR5630BDW2
Range - GAS RANGE
Amana
AGR5844VDB2
Range - 30" GAS FREESTANDING RANGE
Amana
AGR5844VDB3
Range - 30" GAS FREESTANDING RANGE
Amana
AGR5844VDB4
Range - 30" GAS FREESTANDING RANGE
Whirlpool
AGR5844VDB5
Range
Amana
AGR5844VDD2
Range - 30" GAS FREESTANDING RANGE
Amana
AGR5844VDD3
Range - 30" GAS FREESTANDING RANGE
Amana
AGR5844VDD4
Range - 30" GAS FREESTANDING RANGE
Whirlpool
AGR5844VDD5
Range
Amana
AGR5844VDS2
Range - 30" GAS FREESTANDING RANGE
Amana
AGR5844VDS3
Range - 30" GAS FREESTANDING RANGE
Amana
AGR5844VDS4
Range - 30" GAS FREESTANDING RANGE
Whirlpool
AGR5844VDS5
Range
Amana
AGR5844VDW2
Range - 30" GAS FREESTANDING RANGE
Amana
AGR5844VDW3
Range - 30" GAS FREESTANDING RANGE
Amana
AGR5844VDW4
Range - 30" GAS FREESTANDING RANGE
Whirlpool
AGR5844VDW5
Range
Amana
AGR6011VDB2
Range - 30" GAS FREESTANDING RANGE
Amana
AGR6011VDB3
Range - 30" GAS FREESTANDING RANGE
Amana
AGR6011VDS2
Range - 30" GAS FREESTANDING RANGE
Amana
AGR6011VDS3
Range - 30" GAS FREESTANDING RANGE
Amana
AGR6011VDW2
Range - 30" GAS FREESTANDING RANGE
Customer Service Representative

Get in touch, we're here to help!

Daily 8am - 9pm EST

Contact Customer Service