This thermostat may differ in appearance, but functions the same as the original part. This part controls the temperature of the inside of the dryer drum and prevents the dryer from overheating.
How Buying OEM Parts Can Save You Time and Money
Part Videos
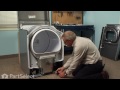
Replacing your Whirlpool Dryer Thermostat, Internal-Bias
Troubleshooting
This part fixes the following symptoms:
Too hot | Not Heating | Touchpad does not respond | Won’t Start
Keep searches simple. Use keywords, e.g. "leaking", "pump", "broken" or "fit".
Sorry, we couldn't find any existing reviews that matched. Try using some different or simpler keywords.
★★★★★
★★★★★
Claude G - October 2, 2023
Verified Purchase
solved my problem
The ordering was fast so was shipping. Great service .Thanks
★★★★★
★★★★★
MARCEL L - August 19, 2021
Verified Purchase
reparation très facile, lire mon diagnostique
la reparation ces très bien executer, la fusible étais bruler mais la cause que je suspecte ces les penture de la porte étais usée le contact de la porte se fessais pas bien sa crée des micro glitch se qui a fais bruler la fusible, j ai commander la mauvaise piece au debut(thermistor) quand j ai remarquer mon erreur j ai commander la bonne car c`etais la fusible qui étais bruler, j ai économiser 3000.00$ car changer une laveuse/sécheuse pour conserver le meme set ces pas donner, la piece est de très bonne qualité la meme que OEM je recommander ce site pour les prochaine achat, merci PARTSELECT. la livraison a été très rapide.
★★★★★
★★★★★
Roxanne K - July 28, 2021
Verified Purchase
Easy repair. Results are as expected.
The part arrived quickly and my whirlpool duet dryer is working like new! ??
★★★★★
★★★★★
Walter H - March 18, 2021
Verified Purchase
lot less time to install then the "we will be there sometime between 9 & 5"
Ordered late afternoon, part was at my door by 1:30pm next day and installed and drying by 2pm.
★★★★★
★★★★★
Joe F - October 1, 2020
Verified Purchase
Dryer Repair
Part fit perfect,and no more problems
★★★★★
★★★★★
MEHRAN A - September 25, 2020
Verified Purchase
Installation video very helpful
Shutting off at higher temperature setting . Problem solved after installation.
★★★★★
★★★★★
Dawn V - June 9, 2020
Verified Purchase
Worked as expected.
The part was what was expected and came very quickly. Great service.
★★★★★
★★★★★
Donna C - April 16, 2020
Verified Purchase
DIY Repairs
The part came quickly and well packaged for protection. I watched their great video which made replacement quick and easy.
★★★★★
★★★★★
Norm S - August 23, 2019
Verified Purchase
Easy repair
Quick shipping but this part was not what was wrong with my dryer. They did offer a full refund, which I declined but did help me find the right part on the net for cheaper than they sell theirs. Great costumer service!!
★★★★★
★★★★★
Colin S - June 11, 2019
Verified Purchase
Part worked fine
Was in perfect condition and worked as expected; unfortunately did not solve the problem. I have ordered a few parts from Partselect and they are always in perfect order. Shipping times are a little to be desired
< Prev
1
2
Next >
Customer Repair Stories
Average Repair Rating: 3.0 / 5.0, 30 reviews.
What's this?
< Prev
1
2
3
Next >
Sort by:
Search filter:
Clear Filter
Your search term must have 3 or more characters.
Keep searches simple. Use keywords, e.g. "leaking", "pump", "broken" or "fit".
Sorry, we couldn't find any existing installation instruction that matched.
Dryer overheated, blew out thermal fuse
I started to repair this and got busy and ended up calling a repair service -- that was the first time. They repaired it for over $200 and said the cause was bad venting. I fixed the vent before using the fixed dryer but it blew again. So I ordered these parts and replaced them myself for a lot of savings. However, the dryer still overheated. Through lots of testing I found the root cause the repairman missed: The heating element had gotten so hot that the assembly holding it warped, hitting the element and shorting it. So a new element is on order. I still needed the parts I ordered here but the overall repair ended up more complicated and expensive. I was disappointed a paid repair person left without further diagnosis. If he had unplugged the vent and checked the heat on the exhaust vent (as I ended up doing) it would have been obvious more than a new thermal fuse/thermistor was necessary. Instead I wasted over $200 on his visit. So my advice is if you're at all handy, repair this yourself. The dryer has a service manual inside the front toe board that walks you through most diagnostics and tests. However, it took a little more than that for me to discover the heating element problem. This was a very dangerous situation that could have easily led to a fire, yet not found by a trained technician!
Unit would shut down in the middle of cycle and flash E1 trouble code
Had to remove the back of unit to access the area of subject part by removeing 12 to 14 screws also the gas line had to be removed. Two screws held the part in place. Unit now runs normal.Saved alot on repair costs!!!!!
Other Parts Used:
Jim from Tucson, AZ
Difficulty Level:
A Bit Difficult
Total Repair Time:
15 - 30 mins
Tools:
Nutdriver, Screw drivers, Socket set
30 of 40 peoplefound this instruction helpful.
Was this instruction helpful to you?
Thank you for voting!
Dryer shuts off on any cycle except "air only"
I read in the forums that thermistor replacement fixed this issue 56% of the time. I replaced the thermistor and then ran three loads of clothes through a one-hour dring cycle at the highest temperature and the dryer did not shut off.
I tried to follow directions followed by others on this site after diagnosing the problem via suggestions provided by users. I have a Whirlpool Duet dryer from 2002. We've had problems since moving about 3 years ago. I removed the front panel (lower) by unscrewing the two bottom screws (1/4" sheet metal screws). Then I took out the lint screen and the metal tube/contraption immediately beneath to get access to the area where thermistor is located. See the drawing/chart to help you locate this. It's really easier than it seems. Make sure you have the chart/drawing for your model - it makes difference! The thermistor came out pretty easily with a nutdriver that has a swivel offset shaft. Ask your hardware store tool dept. about that one. Put everything back in reverse order of course and test either with/without the front panel re-attached. In my case it fixed at least part of the problem. I was able to get clothes almost dry with most settings but I have yet to install the moisture sensor to see if that helps in addition to the internal-bias thermistor. I am the kind of person that does one thing at a time so at least I now know the thermistor was bad. Good luck and hang in there with your own repair. It's a lot cheaper even if it takes you longer to do than a pro.
Other Parts Used:
Dixon from Santa Fe, NM
Difficulty Level:
Easy
Total Repair Time:
30 - 60 mins
Tools:
Nutdriver
19 of 21 peoplefound this instruction helpful.
Was this instruction helpful to you?
Thank you for voting!
When using the dryer the cycle would stop and display E1 as the reason
Unscrewed the bottom panelof the dryer and located the thermistor through the schematic for my machine. Removed the old one and put the new one in the same way. No more E1 problems and all cycles now complete themselves.
Other Parts Used:
Joyce from Holbrook, NY
Difficulty Level:
Really Easy
Total Repair Time:
15 - 30 mins
Tools:
Screw drivers
12 of 17 peoplefound this instruction helpful.
Was this instruction helpful to you?
Thank you for voting!
Switch broke and would not light the refrig compart
The repair descripition was accurate. The difficult part was getting the old switch out. It has a release clip that is hard to reach. It took several tries and a bit of force to get the old part to release from the cabinet.
In stalling the new part was easer that the instructions explaned. There was no need to split the original plug. I unplugged the old switch, plugged in the new and snapped it into place. 30 seconds after I started the reinstall it was in the cabinet and working
Dryer would run 1 min then stop running with some heat in drum
Videos are excellent to open and access internal parts. It turned out a rat was killed in the blower fan when we first encountered the problem. This prevented the blower from turning which interfered with motor function.
This required removing drum & belt, disconnecting motor clips, blower belt, and blower housing. The blower housing needed to be disassembled. Having a 5/16” & 1/8” ratcheting nut driver makes this process much easier. Don’t try this with a wrench.
After getting rid of the rat and decomposition, we sanitized the entire housing with soap & chlorine bleach.
Reassembly was uneventful and relatively easy. We ended up replacing 4 rollers, 2 belts (drum belt & blower belt), the thermistor which was damaged as a result of the blocked blower.
Ask our experts a question about this part and we'll get back to you as soon as possible!
119 questions answered by our experts.
< Prev
1
2
3
Next >
Sort by:
Search filter:
Clear Filter
Your search term must have 3 or more characters.
Keep searches simple. Use keywords, e.g. "leaking", "pump", "broken" or "fit".
Sorry, we couldn't find any existing answers that matched.Try using some different or simpler keywords, or submit your new question by using the "Ask a Question" button above!
Grace
November 25, 2017
Our dryer won't heat. We think it might be part 42 that is the issue, since every thing else is normal. What should the resistance be on the internal bias thermostat? We have 11.4 kilohms.
For model number MEDX500XW0
Hi Grace,
Thank you for your inquiry. The reading for the internal bias thermostat should read zero. If it is not zero then you will have to replace the thermostat. I hope this helps. Thank you and have a great day!
30 people found this helpful.
Was this helpful?
Thank you for voting!
CARL
January 5, 2018
When i push start button on my dryer it does not start but it beeps and says "sensing" got a diagnosis and fix for this?
For model number WED6400SB0
Hello Carl, Thank you for your inquiry. We would recommend checking the following parts to fix your issue: thermal cut out kit, internal bias thermostat, heating element, and main control board. You can test the parts with a multimeter. If you are unfamiliar with how a multimeter functions, there are YouTube videos available to assist you. Hope this helps!
25 people found this helpful.
Was this helpful?
Thank you for voting!
John
October 2, 2017
Have replaced thermal fuse-thermostat- and thermal cutoff.Checked vent lines.Moving ton of air.Does one load-clothes come out extremely hot and thermal fuse is out again.Any ideas?Thanks
For model number WED8300sw1
Hi John, Thank you for the question, I recommend replacing the Internal-Bias Thermostat,PartSelect Number PS11746740. This part controls the temperature of the inside of the dryer drum and prevents the dryer from overheating. Hope this helps!
24 people found this helpful.
Was this helpful?
Thank you for voting!
Shaun
September 29, 2017
My dryer has no heat, I have replaced the heating element and the thermal fuse, what else can I check or replace to fix the no heat problem?Everything else on the dryer works fine.
For model number WED7300XW0
Hi Shaun, Thank you for the question, I would recommend replacing the Internal-Bias Thermostat, PartSelect Number PS11746740.This part controls the temperature of the inside of the dryer drum and prevents the dryer from overheating.When defective you may not have heat inside the drum. Hope this helps!
13 people found this helpful.
Was this helpful?
Thank you for voting!
Todd
December 31, 2017
My dryer has no heat at all. What would you replace first? Heating element or thermal fuse...
For model number WDE9500TW3
Hello Todd, Thank you for your inquiry. I would try replacing both the thermal fuse and high limit thermostat first. Hope this helps!
8 people found this helpful.
Was this helpful?
Thank you for voting!
Ann-Marie
November 11, 2017
When your dryer won't start, how do you test to determine which part you need?
For model number MED6400TBO
Hi Ann-Marie,
Thank you for your inquiry. To verify what part is causing the issue, you will need to use a multimeter to check the continuity of each part. If you need help using one, there are videos on YouTube that you may reference. I hope this helps. Thank you and have a great day!
7 people found this helpful.
Was this helpful?
Thank you for voting!
JOHN
August 1, 2018
What should my ohm meter read when checking this part
For model number CED9050AW0
Hello John, thank you for your question. The bias thermostat should read around 10,000 ohms at room temperature. Good luck with your repair!
6 people found this helpful.
Was this helpful?
Thank you for voting!
Rick
December 6, 2017
I have a Maytag dryer model mgdx600xw0, i have no heat. I replaced the igniter assembly and sensor pt# wp338906. I still have no heat. Can you help me?
For model number MGDX600XW0
Hi Rick, Thank you for the question.Sounds like the 'M' Series New Style Coil Kit, PartSelect Number PS334310 needs to be replaced.When the igniter reaches a high enough temperature, these coils work together to let the gas enter the dryer. The coils open the gas valve; if the valve does not open the heating element will not ignite. Hope this helps!
Timing is off will dry for 10 min then jump to 48 min does not turn off
For model number Wed6600vwd
Hi Joan, Thank you for the question. This sounds like an issue with the control board, PartSelect Number: PS11748076. The timer is built into the board so the board will need to be replaced. Hope this helps!
4 people found this helpful.
Was this helpful?
Thank you for voting!
Art
August 16, 2017
Hello, with the timer set on towels the unit has started to add time to this default setting. Other settings the timer works correctly. Thank you
For model number WED7600XW0
Hi Art,
Thank you for your inquiry. That is a fairly tricky issue unfortunately. I would suggest testing your control board, this part, and your sensor as well. It could be that any one of these parts is causing that issue. I have listed those parts in two links below for you. If you find that they are all working fine, you might have to contact a repair technician to come and service your appliance. Good luck with your repair.