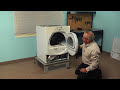
Replacing your Whirlpool Dryer Dryer Heater Element
Troubleshooting
This part fixes the following symptoms:
Not Heating | Too hot
This part works with the following products:
Dryer.
This part works with the following products:
Whirlpool, Maytag, Kenmore, Amana.
Part# WP8544771 replaces these:
AP6013115, 8544771, W10836011, WP8544771VP
Customer Reviews
Average Rating:
★★★★★
★★★★★
35 Reviews
4.9
Filter By Rating:
5 Stars
32
4 Stars
3
3 Stars
0
2 Stars
0
1 Star
0
< Prev
1
2
3
Next >
Sort by:
Search filter:
Clear Filter
Your search term must have 3 or more characters.
Keep searches simple. Use keywords, e.g. "leaking", "pump", "broken" or "fit".
Sorry, we couldn't find any existing reviews that matched. Try using some different or simpler keywords.
★★★★★
★★★★★
Dominic M - November 22, 2023
Verified Purchase
Good parts, user error
This is our second heating element within a year or so. Best to use an electric leaf blower (110V or a cordless high power unit) to clear out the duct before utilizing the new heating element as severely reduced airflow tends to do a number on these elements. This part works as advertised and it was a factory drop-in replacement.
★★★★★
★★★★★
François S - January 27, 2023
Verified Purchase
Dryer repair
A bit expensive but it work!
★★★★★
★★★★★
Sunnyside C - December 2, 2022
Verified Purchase
Everything is running good.
Dryer is running good . easy repair.
★★★★★
★★★★★
E V - November 3, 2022
Verified Purchase
Easy repair part fit!!
Part came quickly and was the right one
★★★★★
★★★★★
Peter F - July 20, 2022
Verified Purchase
Whirlpool dryer heating element repair
The part arrived very quickly (less than 30 hours after I ordered it) and was in good condition. The installation was very easy - BUT - it would have been helpful to know that the entire repair could have been done from the front of the dryer and that there was no need to pull it away from the wall (reconnecting the vent was a PITA). Anyhow, its all fine now.
★★★★★
★★★★★
Jason H - May 10, 2022
Verified Purchase
Easy Repair, Worked Great!
I can say I'm one of the least handy people in the entire world. I was the kid who was relegated to holding the lamp by dad. I can't hang a single thing level. If it's not computer's generally I can't do it. But my dad was busy. He told me what it probably would be, I watched a tear down video on Youtube, and sure enough, clear break in the element, ordered the part, put her back together, and was rewarded with the sweetest cherry red glow. I've never felt so accomplished! Now my dryer works better than it's ever worked while I've rented this place. Thanks PartSelect!
★★★★★
★★★★★
Steve B - April 22, 2022
Verified Purchase
Great part, works as intended
The part arrived so fast, I was able to get the dryer up and working in record time
★★★★★
★★★★★
Dominic M - December 9, 2021
Verified Purchase
Element replacement
easy to check with a multimeter before ordering. after removing bottom panel below door, set multimeter to resistance and put probes on both heater connections - if there’s continuity it’s probably okay, if resistance is infinity… order a new element. The drum had to be pulled out to access screws for removal and reinstall of element.
★★★★★
★★★★★
Dylan P - December 3, 2021
Verified Purchase
Successful repair
Thanks to your online guide to repair, and a bit of diagnosis on my part to make sure I had the issue narrowed down, my dryer once again is hot. Thank you for being a helpful bunch to do business with
★★★★★
★★★★★
Daniel Z - November 20, 2021
Verified Purchase
Exactly what I needed. Part Select really nailed down the website.
So easy to find exactly what I needed.
< Prev
1
2
3
Next >
Customer Repair Stories
Average Repair Rating: 2.9 / 5.0, 17 reviews.
What's this?
< Prev
1
2
Next >
Sort by:
Search filter:
Clear Filter
Your search term must have 3 or more characters.
Keep searches simple. Use keywords, e.g. "leaking", "pump", "broken" or "fit".
Sorry, we couldn't find any existing installation instruction that matched.
My Dryer Was Not Heating Up.
I asked for advise, looked around and priced heating elements and thermostats. This was the best combo offered for the price given. It was shipped and received it very quick. Installed it and 5 minutes later, she was running like a champ!
Found this website and reviewed videos and comments prior to purchasing the heater element and high limit thermostat and thermal fuse kit. We had recently put our Whirlpool duet washer and dryer on pedestals and after that, the dryer would come on and run, but would not heat up. Installation of the parts we ordered was simple...and we would be considered novice installers....really great website and easy to understand. Customer service was excellent as well. After installation of the parts, still no heat and heating element was registering only 120v. We checked everything again and found that the dryer plug was not all the way in the socket. Probably came loose with the move to the petestal.....plugged it in securely and it works great now. Should have checked that first, but because it was running we just didn't think of checking it. Good lesson learned and so glad we found this website. We will definately be using this site again and telling everyone we know about how great you guys are! And at least we won't have to worry about the dryer for a while and we now know we can fix a dryer that won't heat up!
Remove bottom panel was able to remove the element from the bottom without taking off the whole front and removing the drum simply remove the panel remove the two wires connected to the coil unbolted the bracket that was held on by two small bolts then removed the 4 bolts holding the bracket together was able to remove the heating element and then put everything back together did not have to remove the drum the top or the back panel To complete the repair I am not an appliance repair technician just a homeowner but I was still able to repair this myself and it’s working just fine
Other Parts Used:
Carter from NORFOLK, MA
Difficulty Level:
Easy
Total Repair Time:
30 - 60 mins
Tools:
Pliers, Socket set
15 of 15 peoplefound this instruction helpful.
Was this instruction helpful to you?
Thank you for voting!
Dryer would not heat, also had thumping sound as drum turned.
Viewed a video provided on this site for disassembly etc. It was not my exact same model, but the instructions were pretty much spot on. The main issues we had were just that it was bulky etc. and somewhat heavy. We could not really work on it in place, so we had to drag it to the kitchen area. I found the existing heater element to be open upon inspection. Changed it out with the one I purchased which was an exact replacement. The drum rollers, motor pulley, and belt did not really look bad, but since I ordered the repair kit, I went ahead and replaced all of them. I was glad I did because it is much quieter now. The only thing I did differently was I cut off the existing plastic triangle keepers for the rollers with my diagonal cutters instead of work them off with a small screwdriver like in the video, which saved some time and frustration. New ones were provided in the kit I purchased anyway. I also would recommend marking the front of the drum somehow so there is no confusion which way it goes when you put it back together. Works as good as new now, good for another 10 years (I hope).
Followed video step by step. Perfect instructions. I’d only add that you should get and wear mechanics gloves. My hands got torn up by the sharp metal edges taking apart and putting it back together. Ouch!! So happy with Partselect though. Super fast shipping and a perfect instructional video. Thanks!!
P.S. Wear gloves!!!
Other Parts Used:
Christian from JOHNSTON, IA
Difficulty Level:
A Bit Difficult
Total Repair Time:
1- 2 hours
Tools:
Nutdriver, Pliers, Screw drivers
7 of 8 peoplefound this instruction helpful.
Was this instruction helpful to you?
Thank you for voting!
No heat
I don't have instructions ,I watched the link provided by parts select. I just wanted to say I have never been a wiz at home repairs.it took so long because I am 62 with autheritis in my hands and the dryer had to be taken down to a motor and a base but I took the time to clean every inch of the dryer scary to see so much dryer lint inside the dryer.i am just going to say if I can do it anybody could fix their own dryer ,just take your time ,let your hands take a break. And keep the repair instructions close by
Other Parts Used:
Rick from LANESVILLE, IN
Difficulty Level:
Really Easy
Total Repair Time:
30 - 60 mins
Tools:
Nutdriver, Pliers, Screw drivers, Socket set
6 of 6 peoplefound this instruction helpful.
Was this instruction helpful to you?
Thank you for voting!
No heat in the dryer
Went to Kenmore website, got parts diagram, watched You Tube videos on dryer repair for this model, ordered parts. When parts arrived (in 4 days, great job!), re-watched You Tube videos, installed parts, dryer works great. Took longer than industry standards because I had to suction out/vacuum a great deal of lint/hair. as I went along.
I watched your instruction video, which by the way, 1. was not for my model dryer and 2. was totally opposite of what you showed. I was able to remove the back and replace it from there versus going in from the front and removing the drum, etc etc
Other Parts Used:
Chris from CANON CITY, CO
Difficulty Level:
A Bit Difficult
Total Repair Time:
30 - 60 mins
Tools:
Nutdriver, Screw drivers, Socket set
5 of 5 peoplefound this instruction helpful.
Was this instruction helpful to you?
Thank you for voting!
dryer blowing cold air
replaced heating element
Other Parts Used:
Arpad from LOVELAND, CO
Difficulty Level:
Easy
Total Repair Time:
More than 2 hours
Tools:
Screw drivers, Socket set
3 of 3 peoplefound this instruction helpful.
Was this instruction helpful to you?
Thank you for voting!
Replace heating element and belt
Replaced heating element and went ahead and replaced the belt since the dryer was coming apart and belt taken off also. I used the parts select video and paused the video through each step to complete each step. There videos are great for this and as long as you pause and do each step per the video it is quite easy. I Highly recommend doing each step one at a time as I did not have a problem. Thanks for great repair videos.
Ask our experts a question about this part and we'll get back to you as soon as possible!
20 questions answered by our experts.
< Prev
1
2
Next >
Sort by:
Search filter:
Clear Filter
Your search term must have 3 or more characters.
Keep searches simple. Use keywords, e.g. "leaking", "pump", "broken" or "fit".
Sorry, we couldn't find any existing answers that matched.Try using some different or simpler keywords, or submit your new question by using the "Ask a Question" button above!
Kathy
October 11, 2017
Where is the heating element located.I have the back off.I see a silver pan on the left.It has 2 screws.After you take the screws out the pan wont come off.How do i take the pan off.
For model number WED7600XW0
Hi Kathy,
Thank you for your question. Here is an installation video that will show you how to get to your element: https://youtu.be/YPpI266xawY . Good luck with your repair.
19 people found this helpful.
Was this helpful?
Thank you for voting!
Gene
November 8, 2018
Where is the heating element located on my dryer. Can you send instructions on how to get at it?
For model number MEDB8550WR0
Hi Gene, thank you for your question. We have an installation video above in the part information that will show you where the part is located and how to install it. Here is a direct link: https://youtu.be/YPpI266xawY. I hope that helps. Good luck with your repair.
6 people found this helpful.
Was this helpful?
Thank you for voting!
Bob Murphy
November 15, 2018
What would cause the heating element connection wire to overheat
For model number WED9600TAO
Hello Bob, thank you for your question. The heating element may have been allowed to get too hot before being cycled off. I would suggest testing the thermostats part number PS991443 and PS11746386, and PS11746740. It may have been a one off occurrence but testing the thermostat will tell you if one or more has failed. You should also clean the unit well, especially around the blower housing and heating element as a build up of lint can cause the unit to overheat. I hope this helps!
6 people found this helpful.
Was this helpful?
Thank you for voting!
Alma
February 12, 2019
I purchased the drive belt cause it was obvious that it needed. Replaced installed it thanks to the video here. It is running well but it does not heat. I just let run for 3 minutes and found out it does not heat. What do i do next? I have read that if it does not heat it could be the heating element but how can i be sure?
For model number 11087721700
Hello Alma, Thank you for your question. You can test the parts with a multimeter. If you are unfamiliar with how a multimeter functions, we have videos available to assist you.
3 people found this helpful.
Was this helpful?
Thank you for voting!
Kathy
October 11, 2017
Cabrio dryers element is not on the right side.There is no connections.There is connections on the left.Where is the element.
For model number WED7600XW0
Hi Kathy,
Thank you for getting back to us. There is an installation video of the heating element listed with the part on our website that you may reference. From reviewing the video you will need to access the element from the front of the dryer. If the position of the element is reversed on your dryer the video is a good reference on how to install it. The video shows that the element is inside the housing and the video shows how to access the element inside the housing. I hope this helps. Thank you and have a great day!
3 people found this helpful.
Was this helpful?
Thank you for voting!
Ed
December 6, 2019
Where is the heating element located on the Maytag bravox xl electronic dryer.Part # is wp8544771
For model number MEDB725BWO
Hi Ed, to find this information we would need your full model number, this is usually a complete series of numbers and/or letters. We do however have a video you can view that may be helpful in finding this part on your model: https://www.youtube.com/watch?v=YPpI266xawY&feature=emb_title. Thank you for your question and good luck with your repair!
3 people found this helpful.
Was this helpful?
Thank you for voting!
Ed
December 6, 2019
Looking to find out where the heating element is located on my Maytag bravos xl electric dryer. Part # wp8544771. Serial #m33710047.
For model number MEDB725BWO
Hello Ed,
Thank you for your question. It is located below the drum assembly inside of a heater box housing. You would still have to remove the front panel and drum in order to access the housing and heater. Hope this helps!
3 people found this helpful.
Was this helpful?
Thank you for voting!
Jerry
March 11, 2018
Where is element located. I have the cabrio. Controls are on top back.
For model number Wed7300xwo
Hello Jerry, Thank you for your inquiry. It is located below the drum assembly inside of a heater box housing. You would still have to remove the front panel and drum in order to access the housing and heater. Hope this helps!
3 people found this helpful.
Was this helpful?
Thank you for voting!
Kathy
October 11, 2017
Where is the element located on a Whirlpool cabrio dryer wed7600xw0
For model number wed7600xw0
Hi Kathy, Thank you for the question. Here is a link to a video on how to install this element and it will show the location. Hope this helps!
https://www.youtube.com/watch?v=YPpI266xawY
3 people found this helpful.
Was this helpful?
Thank you for voting!
Alma
February 12, 2019
Thanks for the previous response to check the heating element with a multimeter. Where do i get this meter? I dont own one. In trying to save money by do it yourself but im not anymore. Please help.
For model number 11087721700
Hello Alma, Thank you for writing. You can obtain a multimeter from a local home supply store. It is actually a good invest as it is something you can find yourself in need of frequently as a home owner. Good luck with your repair!
2 people found this helpful.
Was this helpful?
Thank you for voting!
< Prev
1
2
Next >
✖
Ask a Question
Ask our experts a question on this part and we'll respond as soon as we can.