Keep searches simple. Use keywords, e.g. "leaking", "pump", "broken" or "fit".
Sorry, we couldn't find any existing reviews that matched. Try using some different or simpler keywords.
★★★★★
★★★★★
Rene L - 23 days ago
Verified Purchase
Grenat parts
Fait shipping
★★★★★
★★★★★
Rebecca K - May 26, 2022
Verified Purchase
Great part, easy repair
Part works great, saved me from having to spend a ridiculous amount of money on a new dryer. Relatively easy to install.
★★★★★
★★★★★
Ronald K H - January 21, 2022
Verified Purchase
Competitive price and fast delivery.
I received my part in only a few days, had it in and running in 15 minutes. Happy Happy
★★★★★
★★★★★
Kathryn C - July 4, 2020
Verified Purchase
Old Dryer, New Part
I was very pleased that it was the correct part for a 40 year old dryer! It arrived quickly and as shown. Installation was simple.
★★★★★
★★★★★
Grace F - March 26, 2019
Verified Purchase
Great !!
It was delivered in two days. Easy to fix and the dryer is now back to the condition
★★★★★
★★★★★
Phil E - August 15, 2018
Verified Purchase
Yes!
Perfect!
★★★★★
★★★★★
YVES D - August 14, 2018
Verified Purchase
easy repair, great quality part
the part was in great condition in my dryer is back twork as usual
< Prev
1
Next >
Customer Repair Stories
Average Repair Rating: 4.4 / 5.0, 34 reviews.
What's this?
< Prev
1
2
3
Next >
Sort by:
Search filter:
Clear Filter
Your search term must have 3 or more characters.
Keep searches simple. Use keywords, e.g. "leaking", "pump", "broken" or "fit".
Sorry, we couldn't find any existing installation instruction that matched.
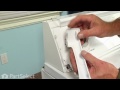
door switch actuator spring broken
-unplugged appliance -removed lint trap -removed 2 lint trap shute screws with phillips screwdriver -popped open top of appliance with standard screwdriver by applying pressure at each front corner so that it could be tilted up to access actuator switch on right side of door -removed 2 actuator switch screws, located on upper right side of laundry door, with phillips screwdriver (screws are accessed from outside of door frame not through appliance top). -discarded broken actuator spring (accessed from open appliance top) -replaced new actuator spring -replaced 2 actuator switch screws -closed top -replaced 2 lint trap shute screws -replaced lint trap -plugged in appliance -tested for operation -kissed by happy wife
Other Parts Used:
Paul from Vero Beach, FL
Difficulty Level:
Really Easy
Total Repair Time:
Less than 15 mins
Tools:
Screw drivers
92 of 100 peoplefound this instruction helpful.
Was this instruction helpful to you?
Thank you for voting!
The Dryer would not start
First and most important was to unplug the unit. I removed the 2 screws that hold the lint screen shoot to the top cover and then simply popped the top of the machine open using 2 screw drivers and gently prying it up. I raised the top cover about 8 inches and supported it with a block of wood. I opened the front loading door and removed the 2 screws that hold the door actuator switch while holding the switch on the inside so that nothing would fall down into no mans land. Once the switch was loose I pulled it into view and could see that the actuator spring was broken. I used the search at the Part Select Web site and found the placement part very easy. I was amazed that the part was shipped and delivered to my house the very next day. The actuator spring simply snaps into place and I assembled it in the reverse order of removal, I removed the block of wood and snapped the top back into location and reinstalled the 2 screws for the lint screen shoot . I plugged the dryer in and it work perfect. I can't say enough about how well the experiance with Parts Select went, I will recommend them to others.
Other Parts Used:
Dennis from Redondo Beach, CA
Difficulty Level:
Really Easy
Total Repair Time:
Less than 15 mins
Tools:
Screw drivers
17 of 18 peoplefound this instruction helpful.
Was this instruction helpful to you?
Thank you for voting!
The Door Switch Actuator Spring had broken
I took the dryer apart by visually looking at it and removing screws, etc. until I had the top off and the front off. I took the dryer apart so I could get the part out and use it visually ascertain I was ordering the same part.
I bought the replacement part and only then did I have the instructions to take the dryer apart. It was further apart than the instructions said. I had to take the front off to retrieve the broken part which had fallen inside the front of the dryer.
I put the front back on the dryer and installed the new part, which, fortunately could only be installed one way. Once I had the two screws tightened into the part, the remainder was to simply follow the instructions that came from your web site and put the link filter and top of the dryer back on. Of course, I plugged in the dryer and checked to see that it ran before completing this.
I am amazed that I was able to find this part for a 30 year old dryer. The part hasn't changed at all. I guess, if you have a good part, there's no need to modify it.
Other Parts Used:
Norman from Allen, TX
Difficulty Level:
Easy
Total Repair Time:
30 - 60 mins
Tools:
Screw drivers, Wrench (Adjustable)
8 of 10 peoplefound this instruction helpful.
Was this instruction helpful to you?
Thank you for voting!
Dryer wouldn't run
Extremely easy repair! Unplug the dryer. Remove the lint trap screen. Take the two screws out of the lint trap chute, pry up the top of the dryer, insert wood or have someone hold top up, remove two screws holding the switch in place while holding the switch so the old spring doesn't fall. Remove old spring and replace with new one. Re-attach switch to dryer with two screws. Plug in and test run. Lower top and push firmly to engages clips. Re-install two scres in lint trap chute followed by the lint trap screen and you are finished!
Repair took about five minutes and saved approximately $70!
Other Parts Used:
Edward from Richlands, NC
Difficulty Level:
Really Easy
Total Repair Time:
Less than 15 mins
Tools:
Screw drivers
6 of 6 peoplefound this instruction helpful.
Was this instruction helpful to you?
Thank you for voting!
dryer would not turn on
Found the switch part on the floor and after I figured out where it came from it was minutes before it took to find the web site and order the part, I then watched the installation video which helped with a few pointers and days later it was installed and fixed for 10 dollars with shipping,AMAZING!!!
I disconnected the dryer from the electric. I removed the lid to the dryer by first removing the lint door screws and prying the lid off properly. Disconnected the wires to the door switch. Removed the screws from inside the door and carefully removed teh actuator. Seperated the actuator from the switch and replaced the broken actuator. Reinstalled the actuator and switch and screwed the assembly back in place. Reconnected the wires, lowered the dryer lid and screwed the lint door screws back in place. It Worked perfectly.
Other Parts Used:
Mark from Clarksburg, MD
Difficulty Level:
Really Easy
Total Repair Time:
Less than 15 mins
Tools:
Pliers, Screw drivers
3 of 4 peoplefound this instruction helpful.
Was this instruction helpful to you?
Thank you for voting!
door switch lever/latch broke
You can buy the switch AND lever/latch, but partselect had lever by itself which is all I needed. Pay attention to orienation of lever around switch when you take old latch off and attach new. Also, be careful to not drop new lever behind/beneath clothes dryer drum. Took my wife and I a while to fish it out. I have replaced heating element, and other parts. At some point it will be time for a new dryer...
Other Parts Used:
Ed from Charlottesville, VA
Difficulty Level:
Easy
Total Repair Time:
Less than 15 mins
Tools:
Screw drivers
3 of 4 peoplefound this instruction helpful.
Was this instruction helpful to you?
Thank you for voting!
Dryer would not start.
Did not hear the "clicking noise of the door switch when the dryer door was shut. First I unplugged the dryer from the socket. Next I removed the two screws that hold the lint filter receptacle. Next I pried the top of the dryer open with a screwdriver. Next I removed the two screws that held the switch actuator spring in place located just inside the top of the door. Then I removed the old spring from the door switch and replaced with the new. Not too difficult once the problem was diagnosed.
Other Parts Used:
Wayne from Rosenberg, TX
Difficulty Level:
Easy
Total Repair Time:
15 - 30 mins
Tools:
Screw drivers
3 of 4 peoplefound this instruction helpful.
Was this instruction helpful to you?
Thank you for voting!
metal spring in door broke the peice that allows the drum to spin
This was rather easy to fix. I had never opened the dryer before but had a serviceman come out so I knew that you can pop the top of the dryer off by putting a flat edge screwdriver in between the top and bottom and popping up. You must remove the screws from the lint dryer before so the top comes off. The piece to replace had two screws and that was it. To get a repairmen from Sxxrs where we purchased it 15 years ago they charge a flat fee of $75 just to come out. That does not include the repair just a fee to come and tell you how much more it would cost to fix it. I ordered the part for less than $5 and $12 more for 2-3 day delivery! What a bargin! I was back drying clothes 15 minutes after the part arrived! Very happy that the part is still being made!
Other Parts Used:
katherine from Salem, OR
Difficulty Level:
Easy
Total Repair Time:
15 - 30 mins
Tools:
Screw drivers
2 of 3 peoplefound this instruction helpful.
Was this instruction helpful to you?
Thank you for voting!
Dryer wouldn't restart when start button pressed
Before beginning, unplugged dryer. 1) Used putty knife at each front corner of top to pop lid loose from clips. 2) Removed hex screws at back of control panel to allow lid to tip open. 3) With lid opened, removed hex screw from inside-top of each side to allow front to pull open from side panels and access door switch easily. 4) Removed clip that holds retaining wires from top. 5) Pulled wire from each side of door switch. 6) Removed switch assembly using Phillips screwdriver to remove two screws mounting switch at top of door opening. 7) Removed broken actuator spring and replaced. 8) Reversed process to reassemble.
Other Parts Used:
Charles from Cape Girardeau, MO
Difficulty Level:
A Bit Difficult
Total Repair Time:
30 - 60 mins
Tools:
Nutdriver, Screw drivers
2 of 3 peoplefound this instruction helpful.
Was this instruction helpful to you?
Thank you for voting!
< Prev
1
2
3
Next >
Questions and Answers
Ask our experts a question about this part and we'll get back to you as soon as possible!
3 questions answered by our experts.
< Prev
1
Next >
Sort by:
Search filter:
Clear Filter
Your search term must have 3 or more characters.
Keep searches simple. Use keywords, e.g. "leaking", "pump", "broken" or "fit".
Sorry, we couldn't find any existing answers that matched.Try using some different or simpler keywords, or submit your new question by using the "Ask a Question" button above!
Cheryl
November 7, 2017
How does this part attach to my Roper (Whirlpool) dryer. The video I was sent the dryer in the video isn't the type of dryer I have. The instructions I was sent does it apply to my dryer as well.
For model number REP3422AW0
Hi Cheryl, Thank you for the question. Here are some steps to install the actuator Switch. First unplugged appliance, next,removed lint filter and removed 2 screws from the lint filter chute.Open the top of appliance with a flat head screwdriver by applying pressure at each front corner and tilt up to access actuator switch on right side of door. Removed 2 screws from the actuator switch.Remove the actuator spring and then reverse the steps. Hope this helps!
3 people found this helpful.
Was this helpful?
Thank you for voting!
Thomas
October 15, 2017
Dryer shuts off during operation. Seems the door is loose.
For model number LG5801XMW0
Hi Thomas, Thank you for the question. If the door is lose you will need to check the hinges to see if they need to be tightened or replaced. You can also replace the Door Catch Kit, Part Number: PS334230.These two parts work together to keep your dryer door closed. Hope this helps!
2 people found this helpful.
Was this helpful?
Thank you for voting!
Rossc
February 27, 2022
Need dryer door switch Kenmore
For model number 11086581100
Hello Rossc, Thank you for contacting us. We have researched the model you have provided and have found the part you are looking for is PartSelect Number PS11723153. If you need help placing an order, customer service is open 7 days a week. Please feel free to give us a call. We look forward to hearing from you!