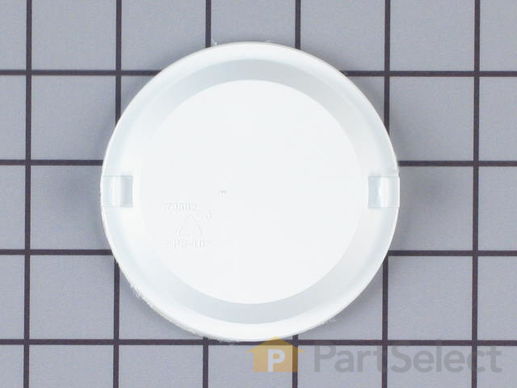
Part Location Diagram of WP61005883 Whirlpool Ice Door Assembly
See part 7 in the diagram
( Grid squares measure 1x1 inch )
Customer Service Representative

Get in touch, we're here to help!

Daily 8am - 9pm EST

customerservice@partselect.ca

Ice Door Assembly

★★★★★
★★★★★
1 Review
$35.32
  In Stock

Get this part fast! Average delivery time for in-stock parts via standard shipping: 1.8 days.

PartSelect Number PS11743244
Manufacturer Part Number WP61005883
Manufactured by Whirlpool
Product Description

Ice Door Assembly Specifications

This ice door assembly is a little over three inches in diameter. It is all white in color and it is made entirely of plastic.
How Buying OEM Parts Can Save You Time and Money

How Buying OEM Parts Can Save You Time and Money

Troubleshooting
This part fixes the following symptoms:
Ice maker won’t dispense ice | Door won’t open or close | Leaking | Door Sweating
This part works with the following products:
Refrigerator.
This part works with the following products:
Maytag, Jenn-Air, Admiral.
Part# WP61005883 replaces these:
AP6010068, 61005883
Back to Top
Customer Reviews
Average Rating:
★★★★★
★★★★★
1 Review
5.0
Filter By Rating:
  • 5 Stars
    1
  • 4 Stars
    0
  • 3 Stars
    0
  • 2 Stars
    0
  • 1 Star
    0
  • 1
Sort by:
Sorry, we couldn't find any existing reviews that matched. Try using some different or simpler keywords.
  • 1
Customer Repair Stories
 Average Repair Rating: 3.9 / 5.0, 44 reviews. What's this?
  • 1
  • 2
  • 3
Sort by:
Sorry, we couldn't find any existing installation instruction that matched.
Ice dispenser cover flap was broken.
First I unpluged the refrigerator, then I removed the drip shelf (slides out). Then removed the two screws hidden by the drip shelf. Then I removed the control panel by pulling out on the bottom then lifting slightly to to expose the ribbon cable. The circuit boards you see at this point will deliver an electrical shock if the refrigerator is plugged in. I disconnected the ribbon cable form the control (front) panel. Next I removed three screws that hold the chute assembly in place and worked the chute away from the door. Pay attention to the placement of the water line before you remove the chute. The bad flap fell out at this point but it is easy to fiqure out how to place the new one. When putting the chute back in place make sure the arm holding the flap is aligned in the groove of the solenoid plunger and not just setting on top. (I had to do this twice because the chute would not open the first time I put it back together). About a 30 min job because I took it apart the first time to see what was broken. I only needed the flap, the arm it mounts to an the solenoid were not broken. Easy to do and only cost about $16.00 with shipping for the part.
Other Parts Used:
  • Philip from Plantation, FL
  • Difficulty Level:
    Really Easy
  • Total Repair Time:
    Less than 15 mins
  • Tools:
    Screw drivers
78 of 80 people found this instruction helpful.
Was this instruction helpful to you?
Thank you for voting!
The flap/door to the ice maker was broke.
First let me start out by saying Parts Select was by far the best pricing and had SUPER FAST SHIPPING! Literally had the product within 2 days (regular shipping). Matter-of-fact only needed the round white piece for the ice maker door and they sold just the piece without having to buy the kit. Everyone else even Maytag would only sell me the whole kit. Anyway...as if you couldn't tell I am a woman (28) who fixes nothing. Would much rather pay someone to do it : ) However I took it upon myself to try and fix this after bugging my husband for a year. Needless to say I Did it and it took maybe 5 minutes. You do need a torch screwdriver (star shape) and yes it was in my purple girlie tool bag! Just a matter of taking out 5 screws taking the old door/flap off and replacing it! Take the time to clean while everything is already apart too. Very easy , if I can do it anyone can!
Other Parts Used:
Light Bulb - 7W
  • Heather from Sudlersville, MD
  • Difficulty Level:
    Really Easy
  • Total Repair Time:
    Less than 15 mins
19 of 20 people found this instruction helpful.
Was this instruction helpful to you?
Thank you for voting!
door broke on ice maker
removed 4 screws and removed the unit from the DOor. replace the broken part. Then relace unit back into the door. Iwas very please how quick I received the part.
Other Parts Used:
  • Edward K. from Meansville, GA
  • Difficulty Level:
    Really Easy
  • Total Repair Time:
    15 - 30 mins
  • Tools:
    Screw drivers
19 of 644 people found this instruction helpful.
Was this instruction helpful to you?
Thank you for voting!
Ice Door Assembly
Ice door flap was broken and warm air was getting into the freezer. I removed a total of 4 screws to get to the flap. Total time was less than 15 minutes and very easy. Partselect customer service was very helpful and friendly. If you have any questions, do not hesitate to call them. They were very helpful! I have this site bookmarked!
Other Parts Used:
  • Robin from Knox, IN
  • Difficulty Level:
    Really Easy
  • Total Repair Time:
    Less than 15 mins
  • Tools:
    Screw drivers
15 of 15 people found this instruction helpful.
Was this instruction helpful to you?
Thank you for voting!
Ice door plastic wing on one side broke off, keeping ice shut open.
I first removed the tray at the bottom of the Ice/water compartment, 2nd, removed the 2 star headed screws that are visible and 1 star screw near the water hose. removed front pannel. 3rd removed 4 star screws holding ice/water assembly, let this hang down and was able to reach in and removed the round broken shut door. replaced with new door, Difficult to get new door in but I was lucky and got both side wings in the proper slots. Did everything from above in reverse. New Ice doot works great. I just wish you had sent some type of instructions! Very happy with your company. Other web sites wanted me to buy a complete kit just to get the door assembly. you saved me $30. Thanks
Other Parts Used:
  • Frank from Fort Pierce, FL
  • Difficulty Level:
    Easy
  • Total Repair Time:
    15 - 30 mins
10 of 10 people found this instruction helpful.
Was this instruction helpful to you?
Thank you for voting!
Icen maker door broken
Step 1 :I had to remove the ice drip tray just pull it out.
Step 2 remove the 4 or 5 screws holidung in the control module (push button display pad)
step 3: pull the plug from the diaplay panel
Step 4: remove broken door from slot and slide new one in. Be carfull not to let the brass plug fall out of it does it just slides back in.
Reverse all steps your done about 20- minutes..I am a building engineer by trade. I think the average person 30 to 60 minutes..
Other Parts Used:
  • GLENN from ORLANDO, FL
  • Difficulty Level:
    Easy
  • Total Repair Time:
    15 - 30 mins
8 of 8 people found this instruction helpful.
Was this instruction helpful to you?
Thank you for voting!
Ice chute flap broke
removed the ice chute door, unhooked the computer board replaced the flap. The only problem was the spring loaded part of the ice chute door come up and the little plunger came loose. It only took a few minutes to replace the plunger back in the holder and replaced the ice chute door. The best part of the whole job was that I ordered the part on Monday afternoon and the part was at my door Wednesday. The Parts did an excellent job of getting the part to me quickly.
Other Parts Used:
  • John from Crothersville, IN
  • Difficulty Level:
    Easy
  • Total Repair Time:
    15 - 30 mins
  • Tools:
    Screw drivers
8 of 9 people found this instruction helpful.
Was this instruction helpful to you?
Thank you for voting!
Ice jammed, water sprayed wrong place
Discovered ice door tab was broken. Ice door out of position.
Disassembled door dispenser, pretty easy, two torx screws on bottom, two on upper part of unit. Slid unit up slightly, it sets over two studs on the top. Unplugged wire connector, set aside unit. Looked on internet for a replacement part. These folks had the easiest to use web site. Found the part, ordered the part, received it next day, but only ordered the least expensive delivery method, since we are both in Florida it worked out well.
I did not know when I ordered this part I would get it this quickly. Because cold air was pouring out of the hole left by the removal of the ice door, I put wide painters tape over the hole on the inside of the freezer door. This greatly reduced the flow of cold air.
After I received the part, I clipped it in place and reassembled the unit, it did not work. The solenoid that moves the door just hummed like it was jammed. I took it back apart and realized that I did not get the bracket that moves the ice door reattached properly. After I made sure the bracket was properly attached, i reassembled the unit and it worked great. It actually took longer to type this description than it did to do the job.
Good Luck, Mike
Other Parts Used:
  • Michael from Leesburg, FL
  • Difficulty Level:
    Really Easy
  • Total Repair Time:
    15 - 30 mins
6 of 7 people found this instruction helpful.
Was this instruction helpful to you?
Thank you for voting!
Ice Delivery Door would not close or open
Removed the door assembly with 4 Torx screws, replaced the broken door with the new one. The assembly is spring closed, so had to be pivoted into place. Then the door didn't open when the ice button was pushed, but made a loud snapping noise. After removal again, it was determined that the solenoid was not attached properly to the arm. After this was done and the whole assembly was put back on the door, everything worked fine.

Watch out for the circuit board at the front of the assembly, it carries a pretty good bite!
Other Parts Used:
  • Neale from Murrieta, CA
  • Difficulty Level:
    Easy
  • Total Repair Time:
    15 - 30 mins
4 of 4 people found this instruction helpful.
Was this instruction helpful to you?
Thank you for voting!
flap door broken
disassemble the front panel removed two screws and panel fell forward took old part out cliped in new one and reassembled very easy job
Other Parts Used:
  • Ralph from Wheeling, WY
  • Difficulty Level:
    Easy
  • Total Repair Time:
    15 - 30 mins
  • Tools:
    Screw drivers
4 of 7 people found this instruction helpful.
Was this instruction helpful to you?
Thank you for voting!
  • 1
  • 2
  • 3
Questions and Answers

Be the first to ask our experts a question about this part!

Related Parts
Model Cross Reference
This part works with the following models:
PartSelect Number: PS11743244
Manufacturer Part Number: WP61005883
Brand
Model Number
Description
Maytag
AS2125CIHW
Refrigerator
Maytag
AS2125SIHW
Refrigerator
Maytag
AS2728GIHB
Refrigerator
Maytag
AS2728GIHW
Refrigerator
Maytag
AZ2727GIHB
Refrigerator
Maytag
AZ2727GIHW
Refrigerator
Maytag
GC2227CDFB
Refrigerator
Maytag
GC2227CDFW
Refrigerator
Admiral
GC2227EEDW
Refrigerator - Admiral Refrigerator Model GC2227EEDW Parts
Maytag
GS2125CEEW
Refrigerator
Maytag
GS2127CAHB
Refrigerator - Side-by-side
Maytag
GS2127CAHW
Refrigerator - Side-by-side
Maytag
GS2327GEHW
Refrigerator
Maytag
GS2726CEHQ
Refrigerator
Maytag
GS2728GEHQ
Refrigerator
Maytag
GS2788GKHQ
Refrigerator
Maytag
GZ2727GEHQ
Refrigerator
Jenn-Air
JSD2789HEB
Refrigerator - Side-by-side
Jenn-Air
JSD2789HES
Refrigerator - Side-by-side
Jenn-Air
JSD2789HEW
Refrigerator - Side-by-side
Maytag
MSD2422GRQ
Refrigerator - Side-by-side
Maytag
MSD2422GRW
Refrigerator - Side-by-side
Maytag
MSD2432GRQ
Refrigerator - Side-by-side
Maytag
MSD2432GRW
Refrigerator - Side-by-side
Maytag
MSD2433HEW
Refrigerator - Side-by-side
Maytag
MSD2434GEQ
Refrigerator - Side-by-side
Maytag
MSD2434GEW
Refrigerator - Side-by-side
Maytag
MSD2436GRQ
Refrigerator - Side-by-side
Maytag
MSD2436GRW
Refrigerator - Side-by-side
Maytag
MSD2722GRQ
Refrigerator - Side-by-side
Customer Service Representative

Get in touch, we're here to help!

Daily 8am - 9pm EST

Contact Customer Service