Product Description
Dryer High Limit Thermostat Specifications
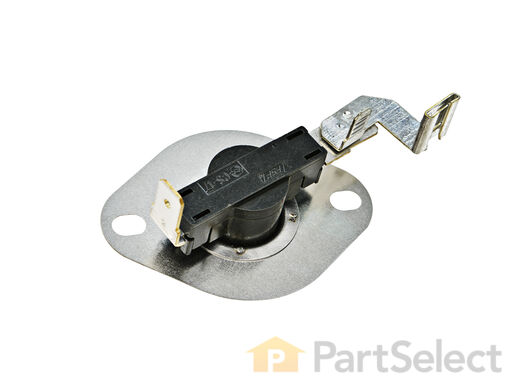
This high-limit thermostat with Terminal Extension Arm acts as as safety mechanism that keeps the dryer from overheating. Once the dryer temperature reaches 221 degrees Fahrenheit, this piece will shut down power to the heating element until it drops by 80 degrees Fahrenheit.

How Buying OEM Parts Can Save You Time and Money
Part Videos
Replacing your Whirlpool Dryer Dryer High Limit Thermostat

Troubleshooting
This part fixes the following symptoms:
Too hot | Not Heating
This part works with the following products:
Dryer.
This part works with the following products:
Whirlpool, Kenmore, Maytag, Roper.
Part# WP3977767 replaces these:
AP6009043, 3399693, 3977767, WP3977767VP
Customer Reviews
Filter By Rating:
- < Prev
- 1
- Next >
Sort by:
Search filter:
Clear Filter
Your search term must have 3 or more characters.
Keep searches simple. Use keywords, e.g. "leaking", "pump", "broken" or "fit".
Sorry, we couldn't find any existing reviews that matched. Try using some different or simpler keywords.
Melanie S - December 11, 2020
Verified Purchase
easy to install
this part arrived quickly. it was easy to replace. it did not, however, solve my heat issue :(
Alexsey Z - December 1, 2020
Verified Purchase
Renew the drier!
Fits strait forward. Has to replace the wire with Staineless Steel terminals. Also has to remove/ install filter housing. It was packed by a cloth fibers and restricted air flow. Ones in the year I would recommend to do so!
Madeleine B - April 23, 2019
Verified Purchase
Easy repair
First, the thermostat arrived much sooner than expected which I was grateful for. And it worked great!
Analyn V - December 25, 2018
Verified Purchase
Easy repair
It's in great condition. My dryer works well now. My husband could easily install it.
- < Prev
- 1
- Next >
Customer Repair Stories
Average Repair Rating: 3.8 / 5.0, 71 reviews.
What's this?
- < Prev
- 1
- 2
- 3
- Next >
Sort by:
Search filter:
Clear Filter
Your search term must have 3 or more characters.
Keep searches simple. Use keywords, e.g. "leaking", "pump", "broken" or "fit".
Sorry, we couldn't find any existing installation instruction that matched.
Dryer would take forever to dry clothes, even on high setting
I ordered all the thermal sensors for the dryer. They arrived two days later and they were the correct parts. It took me about 1/2 hour to replace all three sensors and now the dryer works like new again. My wife was very pleased, so was I.
Other Parts Used:
-
John from Indianapolis, IN
-
Difficulty Level:Really Easy
-
Total Repair Time:15 - 30 mins
-
Tools:Nutdriver
650 of 833 people
found this instruction helpful.
Was this instruction helpful to you?
Thank you for voting!
Heat in dryer very low, would take an hour and half to dry a load
First I called an appliance repair place. They charged me $40 to come out and said "the air vent might be clogged". I snaked it out and really wasn't anything in there. So I started thinking it might be a thermostat. After reading the reviews that others posted here, I said, "how hard can it be"? Thanks to PartsSelect putting a diagram (schematic) of the parts, I could see what I was looking for when I removed the back panel. So I took my nutdrivers out, disconnected the vent hose and removed the 10 or so nuts off the back panel & got it out of the way. Took out the vacuum cleaner and sucked all the lint out. Removed the housing where the heating element was and marked on both thermostats and housing where each wires went. As cheap as PartsSelect had the thermostats priced, I figured why not remove the guesswork by buying the highlimit and cycling thermostats and a new heating element too. One screw in each thermostat and out they came. Swapped wires with new thermostats and put them back. With the heating element...it was all one piece, so no fighting to get the element into an old housing. Just swapped them. Put the back panel on and reconnected the vent hose. Cost to repair: about $100. Time for parts to get to me: 2 days. Time to install new parts: about 10 minutes. Knowing that I have a dryer that runs like new AND saving a TON of money on electric bill....THAT is priceless. Thanks PartsSelect!
Other Parts Used:
-
Michael from Parker, FL
-
Difficulty Level:Really Easy
-
Total Repair Time:15 - 30 mins
-
Tools:Nutdriver
181 of 197 people
found this instruction helpful.
Was this instruction helpful to you?
Thank you for voting!
No heat,thumping when running
Removed front panel, drum,replaced belt,tensioner and worn rollers. Then removed rear panel and replaced heating element and high limit thermostat. While I was there completely cleaned inside of dryer. Repair and replacement of parts was quite easy. Just take your time and don't hurry it.
Other Parts Used:
-
Herbert from Holley, NY
-
Difficulty Level:Really Easy
-
Total Repair Time:30 - 60 mins
-
Tools:Pliers, Socket set
88 of 111 people
found this instruction helpful.
Was this instruction helpful to you?
Thank you for voting!
dryer did not heat anymore
My husband removed the old (2) thermostats..then installed the new ones...he said the only thing he needed was his battery run screwdriver, and it was really needed!
we are happy with the ordering, delivery, and the ease of replacement of our new parts. Thanks.
we are happy with the ordering, delivery, and the ease of replacement of our new parts. Thanks.
Other Parts Used:
-
Derwin from Waleska, AL
-
Difficulty Level:Easy
-
Total Repair Time:30 - 60 mins
-
Tools:Screw drivers
31 of 39 people
found this instruction helpful.
Was this instruction helpful to you?
Thank you for voting!
No heat, drum would turn, fan would run.
Ordered all of the thermostats and fuses. Unplugged appliance. Removed back panel. Replaced all items, still did not heat. I removed the 2 screws from the filter housing, and lifted the top. I disconnected the door sensor. I removed the 2 5/16" retaining bolts and removed the front cover, supported the drum and discovered a loose connection on the harness that connects to the drum motor. (Engineered not to heat up unless everything else is functional, including drum rotation.) I reestablished a good connection and buttonned her back up. Now i have spare thermostats.
Other Parts Used:
-
David from Ravenel, SC
-
Difficulty Level:Easy
-
Total Repair Time:30 - 60 mins
-
Tools:Nutdriver, Screw drivers
30 of 631 people
found this instruction helpful.
Was this instruction helpful to you?
Thank you for voting!
Blowing cool air only.
Removed & Replaced heating element, thermostat, thermal fuse, and walla, it's done. Just Three bolts to remove. Less than fifteen minutes work!! Works great!!
Other Parts Used:
-
Lucio from North Miami Beach, FL
-
Difficulty Level:Really Easy
-
Total Repair Time:Less than 15 mins
-
Tools:Nutdriver, Screw drivers
27 of 625 people
found this instruction helpful.
Was this instruction helpful to you?
Thank you for voting!
Running but no heat
I read the repair stories on PartSelect.com and decided to buy the thermostat, fuse, and heating element so I was sure to fix whatever the problem was on the first try. I replaced the thermostat fuse and hi-heat thermostat before finding the heating element was broken. I replaced it and even with my 4 and 6 year old helpers, was finished in 20 minutes. Thanks to the PartSelect schematic, I knew what I was looking for and it was as easy as in the picture. I saved time and money thanks to PartSelect.com and other user comments on the site.
Other Parts Used:
-
Wilford from Colonial Heights, VA
-
Difficulty Level:Really Easy
-
Total Repair Time:15 - 30 mins
-
Tools:Nutdriver, Pliers
26 of 615 people
found this instruction helpful.
Was this instruction helpful to you?
Thank you for voting!
Dryer not starting
Read the info' about the possible causes, checked out the Thermal fuse with a multimeter found it had blown. Cleared out debris from the blower wheel and ducting, replaced the themostats and fuse. Dryer started up....should be good for another 5 years!
Other Parts Used:
-
Dave from Hudson, WI
-
Difficulty Level:Easy
-
Total Repair Time:30 - 60 mins
25 of 616 people
found this instruction helpful.
Was this instruction helpful to you?
Thank you for voting!
too long to dry
First I removed the two screws that hold the element in place. I then pulled the element out about 3 inches and disconnected the two wires, then connect the two wires into new element, and put the element back in place, and put the back cover, now it getting really hot, and save me a lot of time and money on energy too.
Other Parts Used:
-
Victor from San Antonio, TX
-
Difficulty Level:Really Easy
-
Total Repair Time:Less than 15 mins
-
Tools:Nutdriver
20 of 21 people
found this instruction helpful.
Was this instruction helpful to you?
Thank you for voting!
The Dryer was working normally, just no heat
Very Very Easy all you need is a 1/4 inch nutdriver. 1st remove the screws from the back of the dryer. 2nd you will see a shaft like duct work. remove the 2 screws from this shaftway, lift out the old heating element and replace with the new element. Part select was right on target and fast. 2 days to recieve my order. I expected to have to buy a new appliance. Partselect made it possible to fix it like new for around $80.00
Other Parts Used:
-
Andrew from Roslyn Heights, NY
-
Difficulty Level:Really Easy
-
Total Repair Time:Less than 15 mins
-
Tools:Nutdriver, Pliers
19 of 22 people
found this instruction helpful.
Was this instruction helpful to you?
Thank you for voting!
- < Prev
- 1
- 2
- 3
- Next >
Questions and Answers
Ask our experts a question about this part and we'll get back to you as soon as possible!
- < Prev
- 1
- 2
- 3
- Next >
Sort by:
Search filter:
Clear Filter
Your search term must have 3 or more characters.
Keep searches simple. Use keywords, e.g. "leaking", "pump", "broken" or "fit".
Sorry, we couldn't find any existing answers that matched.Try using some different or simpler keywords, or submit your new question by using the "Ask a Question" button above!
Gillis
July 20, 2017
How do I remove the old hi-limit thermostat and replace it with this one?

Hello Gillis, one side of the hi-limit goes onto the heater terminal and the other connects to the wire. Replace the old one on the heater leg with the new one. Best of luck with this repair.
26 people found this helpful.
Was this helpful?
Thank you for voting!
Ed
July 20, 2017
Can I test this with a multi-meter? If so how will I know if it is still in good condition?

Hi Ed, yes, this high-limit thermostat can be tested with a multi-meter tool, and should read closed for continuity. Please let us know if you have any further questions.
21 people found this helpful.
Was this helpful?
Thank you for voting!
Jessica
November 29, 2017
Based on my model number (len2000pw1) i need part number 3977767 but the one i took off my dryer is is 3977393 which only has two terminals, therefore, there are only two wires coming out of there. Which part do i need to replace this?
For model number LEN2000PW1

Hi Jessica,
Thank you for your question. The part you removed from your dryer, part number 3977393, is part of a thermal cut-off kit. The thermal cut-off turns off the heating component when the dryer overheats, ensuring there is a consistent level of heat at all times. This dryer thermal cut-off kit includes one high-limit thermostat with a limit of 250 degrees Fahrenheit, and one thermal cut-off fuse (309 degrees). This kit also includes flat heaters with jumper wires. If your dryer is not starting properly, shutting off too soon or is taking too long to dry your clothes it could be because it has blown and needs to be replaced. This would be the part you would need to replace and you would replace both parts at the same time. I hope this helps. Thank you and have a great day!
10 people found this helpful.
Was this helpful?
Thank you for voting!
Hongwei
November 9, 2017
Not heating. Drum can spin. I changed thermostat, fuse. Did not change high limit thermostat. I used test pencil to test the high limit thermostat, both poles are light on. Is the heating element broken?
For model number LEQ5000KQ1

Hi Hongwei, Thank you for the question. There is a Thermal Fuse and a thermal cut-off fuse. The thermal cut-off fuse is included with a kit with the high-limit thermostat,PartSelect Number PS334299. I suggest testing this fuse. Hope this helps!
9 people found this helpful.
Was this helpful?
Thank you for voting!
SUE
November 12, 2017
We have replaced the heating element and the thermostate and still no heat . Please help
For model number NED4600YQ0

Hi Sue,
Thank you for your inquiry. If your dryer is not getting enough heat, there are some parts that you will need to check to see which one is causing the issue. You will need to check the thermal cut off kit., the internal bias thermostat, the heating element connection wires, the belt and the door switch. I hope this helps. Thank you and have a great day!
9 people found this helpful.
Was this helpful?
Thank you for voting!
Aaron
July 20, 2017
My dryer is not working properly when I have it on “auto dry” but every other setting seems to work. You recommended first to check the vents and the blower but those are all in good condition and no clogging, where should I go to next? Would it be the hi-limit thermo?

Hello Aaron, the most likely reason for the dryer to not have heat, would be a damaged contact in the timer. I hope this helps!
8 people found this helpful.
Was this helpful?
Thank you for voting!
Mike
April 12, 2018
I checked my high limit switch with a multimeter and had no toner
For model number MED5870TW0

Hi Mike, Thank you for the question. The High Limit Thermostat should read closed for continuity. Hope this helps!
6 people found this helpful.
Was this helpful?
Thank you for voting!
Ryan
February 3, 2020
What is the difference between this part an the thermal cut off
For model number Teds740jq1

Hello Ryan, Thank you for the question. The Thermal Cut-Off Kit PartSelect Number PS334299 includes the Thermal Cut Off Fuse and the High-Limit Thermostat. The PartSelect Number PS11742185 Dryer High Limit Thermostat is just the Thermostat on its own. We recommend replacing the fuse and Thermostat together. We hope this helps.
6 people found this helpful.
Was this helpful?
Thank you for voting!
Related Parts:
Thomas Stockett
February 27, 2018
I have cleaned all exhausts, from the roof down to inside dryer. Took off rear side, cleaned very little lint anywhere. I have heat, but inside drum (dryer) humid, like there's no circulation. Turned on fan, it works,blows air out the exhaust. It take 2-3 hrs to dry clothes,but the are always most.Out.
For model number MEDX655DWO

Hello Thomas, thank you for your question. There are a couple of parts you will want to check in relation to this issue. The Thermal Cut-Off Kit Part Number: 279816. The thermal cut-off turns off the heating component when the dryer overheats, ensuring there is a consistent level of heat at all times. This dryer thermal cut-off kit includes one high-limit thermostat with a limit of 250 degrees Fahrenheit, and one thermal cut-off fuse (309 degrees), so it cycles the heat in the unit. Also, you will want to check the Internal-Bias Thermostat Part Number WP8318268. This thermostat has an internal heater L155-25F. This thermostat controls the internal drying temperature. These parts can be tested with a multimeter to determine if they have continuity. I hope this helps!
5 people found this helpful.
Was this helpful?
Thank you for voting!
Bob
March 31, 2018
My Kenmore dryer is about 5yrs old,was working fine until last week.Now when i turn it on it will blow heat for about 3 to 5 min and then will just blow out air.Takes about an hour to dry,would this part fix the problem? Bob
For model number 110.61202011

Hello Bob, Thank you for your inquiry. This is one of the parts that could fix this issue, we would also recommend checking the thermal fuse, internal bias thermostat, thermal cut off kit and heating assembly. You can test the parts with a multimeter. Hope this helps!
3 people found this helpful.
Was this helpful?
Thank you for voting!
- < Prev
- 1
- 2
- 3
- Next >
✖
Ask a Question
Ask our experts a question on this part and we'll respond as soon as we can.
Sorry, we couldn't find a match for "".
Here's a guide for finding your model number.
Something went wrong. Please try again later.
Your Question Has Been Submitted!
Our experts will send you an email as soon as your question has been answered.
Related Parts
Model Cross Reference
This part works with the following models:
PartSelect Number: PS11742185
Manufacturer Part Number: WP3977767
Manufacturer Part Number: WP3977767
Brand
Model Number
Description


