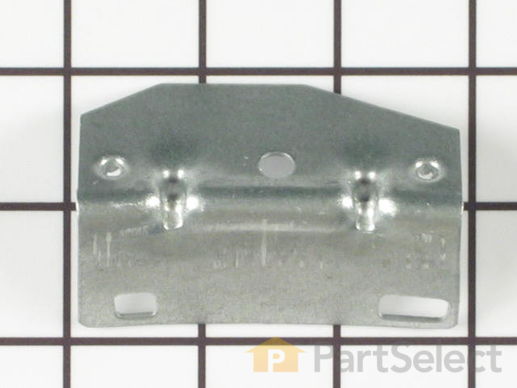
Part Location Diagram of WP37001036 Whirlpool Cylinder Glide Bracket
See part 4 in the diagram
Replacing your Amana Dryer Cylinder Glide Bracket
( Grid squares measure 1x1 inch )
Customer Service Representative

Get in touch, we're here to help!

Daily 8am - 9pm EST

customerservice@partselect.ca

Cylinder Glide Bracket

$77.45
  In Stock

Get this part fast! Average delivery time for in-stock parts via standard shipping: 1.8 days.

PartSelect Number PS11741912
Manufacturer Part Number WP37001036
Manufactured by Whirlpool
Product Description

Cylinder Glide Bracket Specifications

These brackets support each side of the tub. Order quantity needed.
How Buying OEM Parts Can Save You Time and Money

How Buying OEM Parts Can Save You Time and Money

Part Videos

Replacing your Amana Dryer Cylinder Glide Bracket

Replacing your Amana Dryer Cylinder Glide Bracket
Troubleshooting
This part fixes the following symptoms:
Noisy | Marks left on clothes
This part works with the following products:
Dryer.
This part works with the following products:
Amana, Maytag, Crosley, Magic Chef.
Part# WP37001036 replaces these:
AP6008772, 37001036
Back to Top
Customer Repair Stories
 Average Repair Rating: 3.1 / 5.0, 14 reviews. What's this?
  • 1
  • 2
Sort by:
Sorry, we couldn't find any existing installation instruction that matched.
Noisy - Clothes getting stuck between drum and bulkhead
1) Removed lower panel
2) Removed door
3) Removed Front Panel - removed connectors from switch and marked connections
4) Removed Front Bulkhead
5) Glides and Felt pads were missing, and brackets were nearly worn through
6) Removed and Replaced old brackets
7) Attached self-adhesive felt pads
8) Attached Drum Glides
9) Removed old felt seal
10) Glued new felt seal in place with 5-min epoxy
11) Allowed Epoxy to set and stop stinking
12) Re-attached front bulkhead
13) Re-attached remaining parts

Dryer works great, is quiet again, and no longer eats clothes!!!!!!
Other Parts Used:
Single Felt Pad Drum Glide Cylinder Felt Seal
  • Jeffrey from Medina, OH
  • Difficulty Level:
    Easy
  • Total Repair Time:
    30 - 60 mins
  • Tools:
    Nutdriver
81 of 93 people found this instruction helpful.
Was this instruction helpful to you?
Thank you for voting!
Dryer made marks, then noise, then more noise
Thanks to this website we were able to not only find the parts, but a video that told us how to take the dryer apart. Unfortunately, between the time we diagnosed the problem, ordered the parts, and they arrived, the drum had worn into the front bulkhead. We were able to file the sharp parts dull and install the brackets, felt pads, and drum glides along with the felt seal, but ended up breaking the dryer door switch. Once that came in, it has been working. I'm not sure how long the repair will last, but it was much better than buying a new one.
Other Parts Used:
High Temperature Adhesive - 2oz. Single Felt Pad Drum Glide Cylinder Felt Seal
  • Chad from Caldwell, ID
  • Difficulty Level:
    A Bit Difficult
  • Total Repair Time:
    1- 2 hours
  • Tools:
    Nutdriver, Pliers, Screw drivers, Socket set
19 of 502 people found this instruction helpful.
Was this instruction helpful to you?
Thank you for voting!
lots of noises
disassembled found bunch of worn out parts . I went to website wich was very helpful found all . my worn out parts online. dryer is very quiet now I wish i would have done it sooner.P.S. going to fix my dads dryer next. thank you
Other Parts Used:
Single Felt Pad Drum Glide Cylinder Felt Seal Drum Support Roller
  • joe from johnsburg, IL
  • Difficulty Level:
    Really Easy
  • Total Repair Time:
    1- 2 hours
  • Tools:
    Nutdriver, Screw drivers
18 of 644 people found this instruction helpful.
Was this instruction helpful to you?
Thank you for voting!
Dryer banging and clothes getting stuck between tub and felt pad while tumbling.
Very easy repair. I took off the bottom fromt panel with a nut driver. Then I took off the face/door panel. Take note of the wires that need to come off by marking them with a sharpie or tape. The top of the dryer can be stood up to allow access to the ductwork that has the felt pad on it. The felt pad was worn through in spots, the drum glide was completely gone and both cylinder glide brackets were almost completely worn through. I just replaced the brackets and the pads. The old felt came off fairly easily. I scraped the old glue for the felt off with a knife and cleaned and dried the surface before applying the hi temp adhesive. I waited 1 minute while the glue became tacky (be careful, the glue starts out thin and tends to run) and the felt pad was easily put back in place with my wife's help. Everything was very simple and it cost $87.00 for parts and shipping. I felt that this should be a good investment since I have had no other problems with this dryer and this is normal wear and tear. Better than paying $600+ for a new dryer. The video for changing the felt pad was very detailed and easy to follow as well.
Other Parts Used:
High Temperature Adhesive - 2oz. Drum Glide Cylinder Felt Seal Single Drum Glide Felt Pad
  • christopher from sycamore, IL
  • Difficulty Level:
    Really Easy
  • Total Repair Time:
    30 - 60 mins
  • Tools:
    Nutdriver, Socket set
12 of 382 people found this instruction helpful.
Was this instruction helpful to you?
Thank you for voting!
Was not drying properly. Making a rubbing noise metal to metal sound.
First had to remove the front panel after lifting the top up on its hinges and supporting it. Diconnected wires to the front panel after marking them where they go. Saw where drum was rubbing above the impeller housing for the fan. Removed the drum slides and replaced them with new slides and brackets. Removed the belt and replaced it. It is a little tricky with the belt on the tensioner so pay close attention on how you remove it, it will make putting the new one on easier.Replaced the felt gasket with high temp glue. Cleaned inside and outside of cabinet. Put the panel back on,hooked up the wires and it looks and runs like new again.
Other Parts Used:
High Temperature Adhesive - 2oz. Multi Rib Belt Drum Glide Cylinder Felt Seal
  • David from Pasadena, MD
  • Difficulty Level:
    A Bit Difficult
  • Total Repair Time:
    1- 2 hours
  • Tools:
    Nutdriver, Screw drivers
9 of 9 people found this instruction helpful.
Was this instruction helpful to you?
Thank you for voting!
Felt pad on cylinder glide bracket came off.
First, leaned dryer back and removed 2 screws at bottom front panel.
Then removed 2 screws at bottom of door assembly.
Pulled bottom door assembly forward and down.
Disconnected "can't go wrong" wiring connectors.
Then removed old cylinder glide rivets at bottom of cylinder using drill motor with 1/4" drill.
I installed new felt pads on new cylinder glides. Then installed glides with rivet gun.
Reconnected wire harness.
Installed door assembly and lower panel assembly.
BACK IN BUSINESS! THANK YOU!!!!!!!!!!
Other Parts Used:
Drum Glide Cylinder Felt Seal Single Felt Pad
  • Billy from Woodsboro, TX
  • Difficulty Level:
    Really Easy
  • Total Repair Time:
    15 - 30 mins
  • Tools:
    Nutdriver, Screw drivers
8 of 12 people found this instruction helpful.
Was this instruction helpful to you?
Thank you for voting!
Cylinder glide brackets broke, cylinder seal damage
After removing the front of the dryer, I took out the front assembly where the seal and glide brackets attatch. I replaced the bad cylinder glide by drilling the old rivets out and re-riveting the new glide in place from the back side. I then replaced the felt pads and glides on the glide brackets and glued a new cylinder seal around the front assembly. I reccomend having 4 hands for placing the cylinder seal around the assembly with fresh glue.
Other Parts Used:
Drum Glide Cylinder Felt Seal Single Felt Pad
  • Troy from Reading, PA
  • Difficulty Level:
    A Bit Difficult
  • Total Repair Time:
    30 - 60 mins
  • Tools:
    Nutdriver
7 of 9 people found this instruction helpful.
Was this instruction helpful to you?
Thank you for voting!
the glide bracket had been warn nearly in half
1. I removed the lower front panel.
2. Carful remove the front door making not of which wires whent were of the switch
3. Removed the front bulkhead.
4. Drilled out the rivits that held the bracket in place.
5 Use a pop rivit gun and 1/8 in pop rivit and washer.
6 Installed the felt pad and the drum guide.
7 Put the whole thing back together.

I love your web site the exploded diagrams make fixing my dryer quite easy. I do it. so for under $50 my dryer is almost like new.
Other Parts Used:
Drum Glide Single Felt Pad
  • Rita from brewster, WA
  • Difficulty Level:
    A Bit Difficult
  • Total Repair Time:
    30 - 60 mins
  • Tools:
    Socket set
7 of 8 people found this instruction helpful.
Was this instruction helpful to you?
Thank you for voting!
When the dryer was on it would still tumble, but made an aweful sound
My son n law took the fron off the dryer, whilw I looked on the inertnet to locate whatever part we would find to be in need of. He pulled the front panel off and the drum out to dicover it was the bracket and glide. They were easily replaced by popping the bracket out and snapping th new one in then placing the guide on it proper spot.
Other Parts Used:
Drum Glide
  • Vicky from Browns Mills, NJ
  • Difficulty Level:
    Really Easy
  • Total Repair Time:
    15 - 30 mins
  • Tools:
    Pliers, Screw drivers
2 of 3 people found this instruction helpful.
Was this instruction helpful to you?
Thank you for voting!
the brackets that support the front side of the tub were worn out and one of them was worn in two
I started at the bottom and removed the two nut screws that support the bottom section of the front of the dryer. Then I removed the two nut screws that supports the next section and disconnected the two wires ( making note of wich terminals each wire went to). Then I removed the lint trap housing( three phillips head screws hold it in place from the inside). Next ,I removed the face plate( held in place by 4 nut screws and two metal tabs at the bottom). Then I took the old tub brackets and felt seal off of the face plate . Next ,spray adheisive arond the ring of the face plate and install the new felt seal, then the new brackets and dryer glides and felt pads. Last, re-install all components.
Other Parts Used:
Drum Glide Cylinder Felt Seal Single Felt Pad
  • Doug from Corning, AR
  • Difficulty Level:
    Really Easy
  • Total Repair Time:
    15 - 30 mins
  • Tools:
    Nutdriver, Screw drivers
2 of 3 people found this instruction helpful.
Was this instruction helpful to you?
Thank you for voting!
  • 1
  • 2
Questions and Answers

Be the first to ask our experts a question about this part!

Related Parts
Model Cross Reference
This part works with the following models:
PartSelect Number: PS11741912
Manufacturer Part Number: WP37001036
Brand
Model Number
Description
Admiral
ADE7005AKW
Dryer - Residential
Admiral
ADE7005AYW
Dryer - Residential
Admiral
ADE9005AGW
Dryer - Residential
Admiral
ADG7005AWW
Dryer - Residential
Amana
ALE120RAW
Dryer - Electric
Amana
ALE230RAW
Dryer - Residential
Amana
ALE230RCW
Dryer - Residential
Amana
ALE331RAC
Dryer - Residential
Amana
ALE331RAW
Dryer - Residential
Amana
ALE331RCW
Dryer - Residential
Amana
ALE443RAC
Dryer - Residential
Amana
ALE443RAW
Dryer - Residential
Amana
ALE443RCW
Dryer - Residential
Amana
ALE565SAC
Dryer - Electric
Amana
ALE565SAW
Dryer - Electric
Amana
ALE643RAC
Dryer - Electric
Amana
ALE643RAW
Dryer - Electric
Amana
ALE643RBC
Dryer - Residential
Amana
ALE643RBW
Dryer - Residential
Amana
ALE643RCW
Dryer - Residential
Amana
ALE665SAC
Dryer - Electric
Amana
ALE665SAW
Dryer - Electric
Amana
ALE866SAC
Dryer - Electric
Amana
ALE866SAW
Dryer - Electric
Amana
ALE866SBC
Dryer - Residential
Amana
ALE866SBW
Dryer - Residential
Amana
ALE866SCW
Dryer - Residential
Amana
ALE868QAW
Dryer - Electric
Amana
ALE956EAC
Dryer - Electric
Amana
ALE956EAW
Dryer - Electric
Customer Service Representative

Get in touch, we're here to help!

Daily 8am - 9pm EST

Contact Customer Service