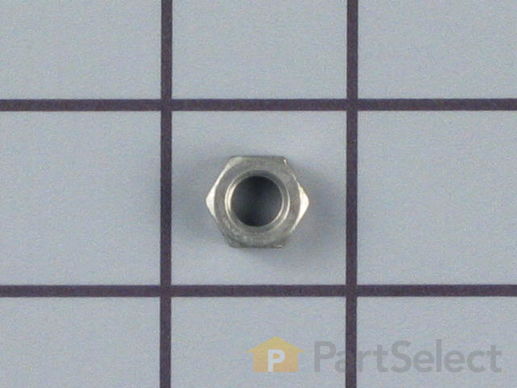
Part Location Diagram of WP33001443 Whirlpool Roller Shaft Hex Nut
See part 4 in the diagram
Replacing your Maytag Dryer Roller Shaft Hex Nut
( Grid squares measure 1x1 inch )
Customer Service Representative

Get in touch, we're here to help!

Monday to Saturday
8am - 9pm EST

customerservice@partselect.ca

Roller Shaft Hex Nut

$6.83
  In Stock
PartSelect Number PS11741054
Manufacturer Part Number WP33001443
Manufactured by Whirlpool
Product Description

Roller Shaft Hex Nut Specifications

This roller shaft hex nut measures well under an inch long. It is made of metal and is used for Maytag brand clothes dryers.
How Buying OEM Parts Can Save You Time and Money

How Buying OEM Parts Can Save You Time and Money

Part Videos

Replacing your Maytag Dryer Roller Shaft Hex Nut

Replacing your Maytag Dryer Roller Shaft Hex Nut
Troubleshooting
This part works with the following products:
Dryer, Washer Dryer Combo, Refrigerator, Dishwasher.
This part works with the following products:
Maytag, International, Jenn-Air, Crosley.
Part# WP33001443 replaces these:
AP6007928, 3-12538, 312538, 33001443, 3400522
Back to Top
Customer Repair Stories
 Average Repair Rating: 3.1 / 5.0, 10 reviews. What's this?
  • 1
Sort by:
Sorry, we couldn't find any existing installation instruction that matched.
dryer squeeking
removed front panel,lifted top, removed drum and drive belt,remove old rollers and acc and instlled new and reinstalled dryer parts.
Other Parts Used:
SHAFT, TUMBLER ROLLER Drum Roller Shaft Washer Drum Support Roller Kit Retaining Ring
  • gerald from park city, MT
  • Difficulty Level:
    Easy
  • Total Repair Time:
    1- 2 hours
  • Tools:
    Pliers, Screw drivers, Socket set, Wrench set
513 of 552 people found this instruction helpful.
Was this instruction helpful to you?
Thank you for voting!
dryer was noisy, tumbler rollers and shafts wore out
disassembled dryer and removed and replaced rollers and shafts and installed new belt while i was at it. very easy fix, ordered parts from PARTS ELECT.COM , excellent website with great views of my machine made it east to order correct parts.very fast delivery , will use partselect again! HIGHLY RECOMMEND
Other Parts Used:
Idler Arm and Shaft Roller Shaft Idler Pulley Shaft Washer Retaining Ring Idler Shaft Retaining Ring Multi Rib Belt - 91-5/8 Inches Idler Pulley Wheel and Bearing Drum Roller Shaft Washer Drum Support Roller Kit
  • jim from chesaning, MI
  • Difficulty Level:
    Easy
  • Total Repair Time:
    1- 2 hours
  • Tools:
    Pliers, Screw drivers, Socket set, Wrench set
47 of 1405 people found this instruction helpful.
Was this instruction helpful to you?
Thank you for voting!
Very loud intermittent squeeling when running
Remove top two front cover screws. Disconnect wiring. Set aside front cover - door assembly.

Remove two screws at top of the vertical riser cover to expose entire dryer interior. Remove filter. Remove screws to blower cover plate. Remove 4 screws that fasten front drum guide assembly. Remove drum. remove and replace 2 drum support rollers . Replace one rusted drum roller shaft. Replace both drum rollers and non-metalic washers.

Drill out 4 rivets holding two front drum glides. Replace and rerivet new drum glides.

Pry back slighty the many retention points around the front drum assembly which hold the front drum felt seal. Refit the new front drum felt, pressing the retaining clips back in place with a screwdriver.

Replace tumbler motor belt.

Install Drum. Install front drum retention assembly. Install new blower seal with reassembly of blower cover.

Total time - about 1 hour
Other Parts Used:
Tumbler and Motor Belt Roller Shaft Dryer Blower Housing Seal Front or Rear Drum Felt Seal Drum Roller Shaft Washer Front Glide Kit Drum Support Roller Kit
  • Tom from Blue Bell, PA
  • Difficulty Level:
    Easy
  • Total Repair Time:
    30 - 60 mins
  • Tools:
    Nutdriver, Screw drivers, Socket set
26 of 29 people found this instruction helpful.
Was this instruction helpful to you?
Thank you for voting!
Dryer tub rollers making loud noise. Dryer would not dry on automatic cycle.
Disconnected dryer, took off front, took off screen housing, took belt off pulley and lifted out tub. Removed snap rings from roller shaft and removed rollers. Then removed roller shafts. Reversed procedure and added new shafts, rollers, washers, nuts and snap rings. Put tub in and put belt on pulley. Replaced auto dry sensor before replacing lint screen housing and connected wiring. Put front on and connented dryer. Be very careful when working with roller shafts. My wrench slipped and I ended up with 8 stitches in my right hand. The sheetmetal is sharp!
Other Parts Used:
Roller Shaft Drum Roller Shaft Washer Automatic Dry Sensor with Mounting Screws Drum Support Roller Kit Retaining Ring
  • Nat from Baton Rouge, LA
  • Difficulty Level:
    Easy
  • Total Repair Time:
    1- 2 hours
  • Tools:
    Nutdriver, Screw drivers, Wrench set
24 of 710 people found this instruction helpful.
Was this instruction helpful to you?
Thank you for voting!
drum support roller was squeaking
My 11 year old grandson and I did the repair together. He had a blast and I did too. First we removed a bunch of screws that got us no closer to getting the machine apart than when we started. Then I remembered from the last time I had the machine apart that there are two screws just below the door, angled as not to be visable unless you know where to look. Once we removed those the from came off. We removed the wires for the door light and heat sensor, remembering the order of the wires for later reinstallation. Then we undid the bolts holding down the top. Once the top was removed we took off the belt and removed the drum. We used the retainer pliers to remove the retainer ring from the first roller. We removed the roller and also the shaft as this roller was the noise maker and the shaft was not in reusable condition. We installed a new shaft, roller washer, roller, another roller washer and then the retainer ring. We repeated the same process on the other roller, although we did not replace the shaft as it was in good condition. It turned out I did not need to order the shaft washers as the rollers came with washers. Oh well, its not a good job unless you have parts left over when you are done. Once we replaced the rollers we commenced reinstallation. But first we had to google for diagram of the proper belt installation, which we found and that got the drum and belt installed properly. Thankd god for the internet. Once we had the drum installed we put the machine back together in the opposite order we took it apart. An operational test showed we did the job right, no more squeaking. The only injury was my grandson cut his thumb right after I gave him the speech about watching where your hand is going to end up when that bolt breaks free. It broke loose and into the metal bracket went his thumb. Oh well it was a good lesson and it was not a bad cut. All in all a good repair.
Other Parts Used:
Roller Shaft Retaining Ring Drum Roller Shaft Washer Drum Support Roller Kit
  • Kevin from San Diego, CA
  • Difficulty Level:
    Easy
  • Total Repair Time:
    1- 2 hours
  • Tools:
    Nutdriver, Screw drivers, Socket set
12 of 14 people found this instruction helpful.
Was this instruction helpful to you?
Thank you for voting!
drum support roller need replacing
Just took it apart and put new one in.
Other Parts Used:
Roller Shaft Drum Roller Shaft Washer Drum Support Roller Kit Retaining Ring
  • Sharon from Ava, MO
  • Difficulty Level:
    Easy
  • Total Repair Time:
    15 - 30 mins
  • Tools:
    Screw drivers, Wrench set
1 of 2 people found this instruction helpful.
Was this instruction helpful to you?
Thank you for voting!
worn roller shafts, were screaming loud.
First, take off the door. That lets you take off the front panel. Remove three screws on each side and take out front panel that holds the drum in place. Be care full there are wires in the lower right corner. Reach your left hand in under the drum and undo the belt off the pulley. pull the drum strait out.A 7/16 wrench behind the roller shaft will remove shafts.I'm not a rocket scientist and it only took me an hour and fifteen min. PS The rollers are not bearings, so I could have let them scream for probably months, before I fixed it, . Good luck
Other Parts Used:
Roller Shaft Drum Roller Shaft Washer Drum Support Roller Kit
  • Brian from Grafton, MA
  • Difficulty Level:
    Easy
  • Total Repair Time:
    1- 2 hours
  • Tools:
    Pliers, Screw drivers, Socket set, Wrench set
1 of 188 people found this instruction helpful.
Was this instruction helpful to you?
Thank you for voting!
the dryer started sqealing really badly, did not know how long it would last. has been doing this for several months.
Took the dryer front panel off, loosened the drum, but not all the way out. Removed and checked the old rollers and shafts. Then put all the new shafts and rollers in. Put the drum back in place and front panel. Now it drys without a sound and this is a 25+ year old dryer.
Other Parts Used:
Roller Shaft Front or Rear Drum Felt Seal Drum Roller Shaft Washer Drum Support Roller Kit
  • Cassandra from Salem, IA
  • Difficulty Level:
    Easy
  • Total Repair Time:
    30 - 60 mins
  • Tools:
    Pliers, Screw drivers, Socket set, Wrench set
0 of 1 people found this instruction helpful.
Was this instruction helpful to you?
Thank you for voting!
on start up of the dryer there was a grinding kind of noise.
remove front of dryer by unscrewing 2 screws and disconnected 2 wires.took small access panel off back of dryer . supported dryer drum from underneath and r & r old parts.

ps before you put it all back together connect 2 wires from front door and turn dryer on to see if dryer is quiet.if so reassemble dryer in reverse order
Other Parts Used:
Roller Shaft Drum Support Roller Kit
  • JOHN from SLATE HILL, NY
  • Difficulty Level:
    Easy
  • Total Repair Time:
    15 - 30 mins
  • Tools:
    Socket set, Wrench (Adjustable)
0 of 1 people found this instruction helpful.
Was this instruction helpful to you?
Thank you for voting!
dryer bearing shaft was worn.
It was nickle and dime. 2 screws off came the front cover. Turned the mechine around unbolted the shaft, installed the new one, done.
Other Parts Used:
Roller Shaft Retaining Ring Drum Roller Shaft Washer Drum Support Roller Kit
  • Joe from Marylille, TN
  • Difficulty Level:
    Really Easy
  • Total Repair Time:
    15 - 30 mins
  • Tools:
    Socket set, Wrench (Adjustable)
0 of 4 people found this instruction helpful.
Was this instruction helpful to you?
Thank you for voting!
  • 1
Questions and Answers

Ask our experts a question about this part and we'll get back to you as soon as possible!

1 question answered by our experts.
  • 1
Sort by:
Sorry, we couldn't find any existing answers that matched.Try using some different or simpler keywords, or submit your new question by using the "Ask a Question" button above!
Dawn
August 14, 2017
On the back of the motor is a part that the belt goes on what is the name of this part.
For model number Mde5500ayw
PartSelect logo
Hi Dawn, Thank you for your inquiry. That would be your motor pulley. Unfortunately that part is only available with the entire motor. I hope this helps.

1 person found this helpful.

Was this helpful?
Thank you for voting!
Related Parts:
  • 1
Related Parts
Model Cross Reference
This part works with the following models:
PartSelect Number: PS11741054
Manufacturer Part Number: WP33001443
Brand
Model Number
Description
Crosley
CDE4205AYJ
Dryer - Residential
Crosley
CDE4205AYW
Dryer - Residential
Crosley
CDE4205AZJ
Dryer - Residential
Crosley
CDE4205AZW
Dryer - Residential
Crosley
CDG4205AWJ
Dryer - Residential
Crosley
CDG4205AWW
Dryer - Residential
Maytag
DE106
Dryer - Electric
Maytag
DE107
Dryer - Electric
Maytag
DE110
Dryer - Electric
Maytag
DE18CA
Dryer - Electric
Maytag
DE18CM
Dryer - Electric
Maytag
DE18CS
Dryer - Electric
Maytag
DE18CT
Dryer - Electric
Maytag
DE19CA
Dryer - Electric
Maytag
DE19CD
Dryer - Electric
Maytag
DE19CS
Dryer - Electric
Maytag
DE19CT
Dryer - Electric
Maytag
DE210
Dryer - Electric
Maytag
DE212
Dryer - Residential
Maytag
DE21CA
Dryer - Electric
Maytag
DE21CM
Dryer - Electric
Maytag
DE21CS
Dryer - Electric
Maytag
DE21CT
Dryer - Electric
Maytag
DE22CA
Dryer - Electric
Maytag
DE22CS
Dryer - Electric
Maytag
DE22CT
Dryer - Electric
Maytag
DE23CD
Dryer - Electric
Maytag
DE24CA
Dryer - Electric
Maytag
DE24CM
Dryer - Electric
Maytag
DE24CS
Dryer - Electric
Customer Service Representative

Get in touch, we're here to help!

Monday to Saturday
8am - 9pm EST

Contact Customer Service