Surface Burner Element Switch, Large Burner Specifications
This control switch controls the stove top 8" surface burner. 8.9- 11.0 amp. This surface burner element switch is for an 8-inch surface burner on an oven, stove, or range. The element switch controls the heat of the surface burner. Disconnect power to your range before completing this repair because you will be working closely with electrical circuits. Remove the screws from back panel and the console, and remove the console to expose the switch. It is recommended to check for overheating or arcing on the wiring harness in case they need to be replaced as well. The harness that connects to the switch features a slip-on terminal for easy installation.
How Buying OEM Parts Can Save You Time and Money
Part Videos
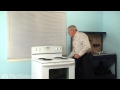
Replacing your Whirlpool Range Surface Burner Element Switch, Large Burner
Troubleshooting
This part fixes the following symptoms:
Element will not heat | Oven is too hot | Will Not Start | Will not program
Keep searches simple. Use keywords, e.g. "leaking", "pump", "broken" or "fit".
Sorry, we couldn't find any existing reviews that matched. Try using some different or simpler keywords.
★★★★★
★★★★★
Sharon M - December 16, 2023
Verified Purchase
Easy repair.
The part arrived the next day and I installed it with the help of the video you sent.
★★★★★
★★★★★
Don L - December 7, 2023
Verified Purchase
No more worries
Burner had to always be watched closely or it would suddenly go to high heat and boil over or burn dinner. Part was easy to install with help from video and problem solved. Returned a level of safety to my home.
★★★★★
★★★★★
Anneliese P - October 27, 2023
Verified Purchase
Infinite switch for stove surface element
The part arrived fast, was easy to install, and my stove works again like new. Thank you!
★★★★★
★★★★★
Ron B - July 27, 2023
Verified Purchase
Easy repair .... Just what the doctor ordered
Service from time of order to receiving was exceptional
★★★★★
★★★★★
Aalia K - August 25, 2022
Verified Purchase
Easy installation, works great
This is my second order with partselect.ca. I am satisfied with the customer service. They are super helpful. This part was delivered fast and the installation took a few minutes. The video was quite helpful. I was skeptical about the size mentioned with the part but still ordered it. This part works okay with burners sized 8 inches and up.
★★★★★
★★★★★
DANY D - March 2, 2022
Verified Purchase
Wright parts
Tks fast shiping
★★★★★
★★★★★
Fred A - September 19, 2021
Verified Purchase
perfect replacement
Not only perfect replacement but arrived much sooner than expected. The place to go for parts.
★★★★★
★★★★★
Lenny G - September 18, 2021
Verified Purchase
Fast shipping
Right part and easy repair!
★★★★★
★★★★★
Al M - September 8, 2021
Verified Purchase
Awesome Service
Received the part very quickly, installed easily in less than 10 minutes and burner is back working as it should. Thanks PartSelect!
★★★★★
★★★★★
Bao H - September 3, 2021
Verified Purchase
Easy to install. Fits and works perfectly.
The website was very helpful in helping me select the right part for my appliance. The part arrived on time as promised. Installation was a breeze, thanks to the instruction video. I’m one happy customer. I definitely will purchase parts from PartSelect again in the future.
< Prev
1
2
3
Next >
Customer Repair Stories
Average Repair Rating: 4.1 / 5.0, 25 reviews.
What's this?
< Prev
1
2
3
Next >
Sort by:
Search filter:
Clear Filter
Your search term must have 3 or more characters.
Keep searches simple. Use keywords, e.g. "leaking", "pump", "broken" or "fit".
Sorry, we couldn't find any existing installation instruction that matched.
the element did not turn compleatly off, the on light stayed on.
removed the screws holding the back metal panel, this exposed the wires to the switch. tested the wires to find that they were live when the switch was in the off position. ordered a new switch. UNPLUGED THE STOVE. removed the knob on the front of the stove. this exposed 2 screws, removed screws and the switch came away from the stove. removed each wire from the old switch and replaced them in the same position on the new switch. inserted new switch into the stove and attached the 2 screws. replaced back panel and pluged in stove. all tested well
Other Parts Used:
chaz from fairplay, CO
Difficulty Level:
Easy
Total Repair Time:
15 - 30 mins
Tools:
Screw drivers
83 of 100 peoplefound this instruction helpful.
Was this instruction helpful to you?
Thank you for voting!
Burner would go high without warning
We felt the only possible problem could be the switch assembly. I removed the switch panel, removed the wires from the old switch, one at a time, removed the old switch assembly and installed the new switch assembly. The extended stem did have to be snapped off (per your instructions) and that too was a very simple task.
Other Parts Used:
John from Clinton, CT
Difficulty Level:
Easy
Total Repair Time:
15 - 30 mins
Tools:
Pliers, Screw drivers
53 of 56 peoplefound this instruction helpful.
Was this instruction helpful to you?
Thank you for voting!
Left front burner would not adjust heat downward
Pull unit away from wall. Unplug power remove topmost four screws from rear metal cover Pull knob off switch shaft. Remove two screws holding switch to panel. Break off shaft of new switch to correct length. Remove each wire from old switch and attach to Corresponding lug on new switch. Reattach the new switch to the panel and reverse the first four instructions.
Other Parts Used:
ALTON from ROUND ROCK, TX
Difficulty Level:
Easy
Total Repair Time:
15 - 30 mins
Tools:
Screw drivers
35 of 40 peoplefound this instruction helpful.
Was this instruction helpful to you?
Thank you for voting!
8" Burner element intermittent, unable to control.
Easy.... UNPLUG THE STOVE FROM THE 240 VOLT OUTLET & READ THE DIRECTIONS THAT COME WITH THE NEW PART !! Removed upper rear cover panel 8 screws & removed panel, removed knob & 2 screws from front of control unit (on the control panel), pulled the control off the panel from the rear, removed the wires on the rear of control & connected them to the SAME terminals on the new control (one at a time). Then installed the new control by reversing the procedure above. Took about 15 minutes. IMPORTANT HINTS: 1) Make sure you save the little black pressure clip from the control stem on the new control, if you need to break-off the little part at the end of the stem. You will need to push the clip back into the recess on the new stem, in order for the knob to stay on the stem when you put it back on; 2) Use a needle-nose plier to pull the wire clips from the old control terminals & push them onto the same terminals on the new control, one at a time so the wiring is correct.
Other Parts Used:
Charles from Enfield, CT
Difficulty Level:
Really Easy
Total Repair Time:
Less than 15 mins
Tools:
Screw drivers
25 of 29 peoplefound this instruction helpful.
Was this instruction helpful to you?
Thank you for voting!
Burner would go red hot once and awhile
removed drawer below oven, reached under stove and unplugged from outlet, pulled stove out from between cabinets, removed the 8 screws with 5/16 nutdriver from back panel and removed the panel, removed knob from switch , measured length of stem on old switch and compared it to the new switch ( my old switch stems was shorter than the new one so using a pair of pliers I shortened stem per instructions that came with new switch, this was very easy to do ), removed the two screws holding switch to stove and removed the old switch, then I transfered one wire at a time from the old switch to the new one until I had all the wires connected to the new one, used same two screws holding old switch to the stove to mount the new switch to the stove and put knob from old switch onto the new one, installed back panel to stove using the same 8 screws, pushed stove back into place between the cabinets and plugged the stove into the outlet, put drawer back in place below oven door, reset clock and tried out the new switch, so far so good only time well tell if I fixed my problem because it only happens once in awhile
Other Parts Used:
Phillip from Pekin, IL
Difficulty Level:
Really Easy
Total Repair Time:
15 - 30 mins
Tools:
Nutdriver, Pliers, Screw drivers
15 of 16 peoplefound this instruction helpful.
Was this instruction helpful to you?
Thank you for voting!
Burner control indicator light
Shut down breaker; remove stove back cover plate (8 screws); remove the control knob; remove knob screws (2); simply remove one wire at a time and replace the coresponding wire to the new control unit; remove the snap ring on the knob bar and snap off to fit the proper length; place the control unit in position and reinstall the 2 screws; reinstall the back panel; position stove and turn throw the stove breaker on; test the burner control.
Other Parts Used:
George from Fredericksburg, PA
Difficulty Level:
Easy
Total Repair Time:
Less than 15 mins
Tools:
Pliers, Screw drivers
10 of 15 peoplefound this instruction helpful.
Was this instruction helpful to you?
Thank you for voting!
Element wasn't being controlled by the switch it would stay on high
Ordered a new switch and replaced the old one with it.
Other Parts Used:
George from FRANKLIN, KY
Difficulty Level:
Very Easy
Total Repair Time:
15 - 30 mins
Tools:
Screw drivers
5 of 5 peoplefound this instruction helpful.
Was this instruction helpful to you?
Thank you for voting!
Top burner would not turn off at any time.
Unpluged range for safety (power earlier removed by circuit breaker turnoff). Removed two screws from front switch cover. Removed knob from effected switch and removed the wires on the back of the switch. Removed two screws holding switch and removed switch. Reversed the process to install new switch. The entire project took about ten minutes.
Other Parts Used:
Donald from Byron, MI
Difficulty Level:
Really Easy
Total Repair Time:
Less than 15 mins
Tools:
Pliers, Screw drivers
5 of 8 peoplefound this instruction helpful.
Was this instruction helpful to you?
Thank you for voting!
Microwave grill vent broken plastic tabs, range switch defective
Removed old grill from microwave and replace with new part. Range removed old switch and replaced with new part. No problems. I was pleased with the way the parts were expedited to me.
2nd 8 inch burner switch in a little over a year to not always hold selected tempurature.
As a former appliance repairman, the installation went just like the repair instruction video. Just use care not to scratch anything and clean behind the appliance and cabinet walls, etc. It's worth a hug and a piece of pie!
Other Parts Used:
LELAND from HERMISTON, OR
Difficulty Level:
Really Easy
Total Repair Time:
15 - 30 mins
Tools:
Pliers, Screw drivers
4 of 4 peoplefound this instruction helpful.
Was this instruction helpful to you?
Thank you for voting!
< Prev
1
2
3
Next >
Questions and Answers
Ask our experts a question about this part and we'll get back to you as soon as possible!
71 questions answered by our experts.
< Prev
1
2
3
Next >
Sort by:
Search filter:
Clear Filter
Your search term must have 3 or more characters.
Keep searches simple. Use keywords, e.g. "leaking", "pump", "broken" or "fit".
Sorry, we couldn't find any existing answers that matched.Try using some different or simpler keywords, or submit your new question by using the "Ask a Question" button above!
Bob
August 22, 2017
While cooking i lost control of the temperature on the 8" burner, could it be the switch? The temperature went too high and i couldn't turn it down but i could turn it down. Thanks
For model number RF365PXYN2
Hello Bob, thank you for contacting us. It does sound like you would need to replace the switch due to the run away element, that should fix the problem. Hope this helps!
67 people found this helpful.
Was this helpful?
Thank you for voting!
Bill
April 6, 2018
The right front burner on glass cooktop (white circle on black glass measures 10") won't hold temp (gets very hot and fluctuates). I believe the control switch for right front burner (farthest right on control panel) has gone bad, but I'm not sure what replacement switch to get. Can you help? Thanks.
For model number WFE361LVT0
Hello Bill, Thank you for contacting us. I have researched the model you have provided and have found the part you’re looking for is PartSelect Number: PS11740783. Hope this helps!
23 people found this helpful.
Was this helpful?
Thank you for voting!
Rob
June 5, 2019
Hello, When I turn the knob on for the large burner, I hear a popping and crackling noise behind the knob (like an electrical arc). Is it the switch that needs replacing? If so what is the part number I need to lookup?
For model number YWFE510S0ES0
Hi Rob,
Thank you for your question. If you are hearing a popping sound behind the knob, then the issue is the switch and you will need to replace it. I hope this helps. Thank you and have a great day!
13 people found this helpful.
Was this helpful?
Thank you for voting!
Rob
June 5, 2019
Hello, I need a replacement switch for the large burner on my range for model number YWFE510S0ES0. The website is only listing a 8 inch switch. Is this switch used for both the small and large burner?
For model number YWFE510S0ES0
Hi Rob,
Thank you for your question. There would be a switch for the dual burner, the 8 inch burner and the 6 inch burner. The part number listed under your model number for the dual burner switch is PS11754687, the part number listed for the 8 inch burner switch is PS11740783 and the part number listed for 6 inch burner switch is PS11740785. I hope this helps. Thank you and have a great day!
8 people found this helpful.
Was this helpful?
Thank you for voting!
Cheryl
October 3, 2019
When using my large front stove eye, i can have it set on medium heat, and it will turn itself up until the element is red hot. The only way i can make it cooler, is to turn it off and start over again. What could this be ?
For model number WFC310SOAS
Hello Cheryl, thank you for inquiring. This is due to either a faulty Surface Element, part number PS11751367, or Surface Burner Element Switch, part number PS11740783 for your model. Good luck with your repair!
7 people found this helpful.
Was this helpful?
Thank you for voting!
Michael
February 27, 2019
Hello i need to order a replacement surface burner element switch for this Whirlpool electric range (see model number) because it sounds like it is arcing when it turns the burner on and off. What i am not sure about is whether the larger dual burner elements have a different switch from the smaller burners. The switch that i need is for the right front burner that measures
For model number WFE515S0ES0
Hello Michael, Thank you for contacting us. I have researched the model you have provided and have found the part you are looking for is Part Number: PS11740785. Hope this helps, good luck with this repair!
The right front burner on glass cooktop (white circle on black glass measures 10") won't hold temp (gets very hot and fluctuates). I believe the control switch for right front burner (farthest right on control panel) has gone bad, but i'm not sure what replacement switch to get. Can you help? Thanks.
For model number RF265LXTY0
Hi Butch. I believe you are correct it is switch WP3149400. However I have no sources confirming this 100 percent. I recommend contacting the manufacturer directly to verify. Thank you for your question and good luck with your repair!
6 people found this helpful.
Was this helpful?
Thank you for voting!
Ken
April 11, 2018
Large non-dual front burner began to lose temperature control and ultimately stopped working. What is the likely problem? Thanks.
For model number WFE361LVS0
Hi Ken, Thank you for the question. I would first check the switch for continuity and if the switch is good you may need to replace the element its self. Hope this helps!
4 people found this helpful.
Was this helpful?
Thank you for voting!
Deborah
August 21, 2019
Hello, My dual burner on my stove won't heat. I went through your trouble shooting guide and the recommended part states it's for an 8 inch burner. I believe my dual burner is larger than that. Can you tell me the correct part to buy? thank you so much!
For model number WFE515S0EB0
Hello Deborah, Thank you for contacting us. I have researched the model you have provided and have found the part you are looking for is PartSelect Number PS11764929. Hope this helps!
Burner would not completely turn off, still had low heat, removed switch and I ordered new one, plug stove back into power supply and little red light came on as in use and no switch, is this normal until I get new switch put back in.
For model number WFC310S0EW0
Hi Harry,
Thank you for your question. If the indicator light is on, it will stay on until the problem switch is replaced. I hope this helps. Thank you and have a great day!
3 people found this helpful.
Was this helpful?
Thank you for voting!
< Prev
1
2
3
Next >
✖
Ask a Question
Ask our experts a question on this part and we'll respond as soon as we can.


 – Part Number: W11517959")