Average Repair Rating: 2.6 / 5.0, 5 reviews.
What's this?
< Prev
1
Next >
Sort by:
Search filter:
Clear Filter
Your search term must have 3 or more characters.
Keep searches simple. Use keywords, e.g. "leaking", "pump", "broken" or "fit".
Sorry, we couldn't find any existing installation instruction that matched.
Dryer would not start.
The first issue I had was diagnosing the problem, but after researching on the internet I was able to determine that the High Limit Switch caused the Thermal Fuse to blow. I found instructions on how to check the Thermal Fuse with an Ohm Meter, which was bad. This was a simple test. I removed the Thermal Fuse from the machine and tested it by using my Ohm Meter on the continuity setting. The instruction said that the fuse should always be closed and have continuity. Simply put, its like having a light switch in the on position. I put the leads from the Ohm Meter on the two connectors of the Thermal Fuse and found that there was no current passing through it, telling me that it was bad and needed replacing. The bigger issue for me was what caused the Thermal Fuse to go bad in the first place, which was evident after I opened the dryer to check the part. The dryer was full of lint. Now understand that the lint that was inside the dryer was just a dusty coating, but I am one of those people that when he takes something apart and it is dirty I have to clean it before I put it back together, which payed off for me. I removed the front panel to make it easier to clean the machine. This is when I noticed that the lint trap was almost completely blocked. Most people like me just before starting a load will clean the lint screen, but we never think that over time some of that lint gets by the screen and has to go somewhere. Well in this machine this happened and eventually clogged the tunnel leading out of the machine, which caused the machine to not be able to breath, which caused the heating element to overheat and blow the Thermal Fuse. I also used this time to inspect the rest of the machine, which again payed off. During my inspection I found that the belt was beginning to fray, the drum seals were starting to tear and the pads under the drum glides had started to fall out, so I decided to order all the parts and refurbish the machine. While I was waiting on the parts to arrive I disassembled the machine and cleaned everything and removed the old parts. The first step I took was to clean out the lint tunnel on the front panel of the machine. To do this I first had to remove the front drum seal which is held on using a double sided tape. I then opened the door and removed the two screws that held the tunnel in place. I then removed the tunnel from the front panel and was able to remove all the lint that was clogged inside. This tunnel also has a foam seal, which is used to seal it against the front panel stopping the lint from escaping into the inside of the dryer compartment, which I also replaced. It was easy to install as it comes with a self adhesive backing. The next step was to reassemble these parts in the reverse order that I took them apart. This is where I ran into my first setback. Reinstalling the tunnel was not a problem but, when I went to install the felt drum seal I found that it did not come with a self adhesive backing and I had no way to secure it on the machine. So I had to go the next day and purchase some double sided tape which I used to attach the seal. The next thing I did was to remove the drum from the machine. I did this by reaching inside the machine and releasing the belt off the tensioner. I then took hold of the front of the drum and lifted it slightly while pulling it towards me which allowed it to pop off the rollers which the back side of the drum rides on. I then removed the felt seal from the back side of the machine. This seal was a little more difficult to remove as the factory glues this seal in place. I cleaned this surface and reattached the felt seal using the double sided tape. The next step was to replace the front drum glides. These glides are a two part component. The first part is a Teflon coated glide and the second part is a felt pad that goes underneath it. I removed the old parts, cleaned the surfaces and reinstalled the glides in the reverse order.
I was replacing the rear drum support wheels and the felt gasket in the back of the drum. Since I had this done by a repairman last time 6 years ago for $180 I decided to try it myself this time. First, this job isn't hard, just very inconvenient to do. You have to remove the drum by taking off the front panel of the dryer. Then lift up slightly on the drum and remove. Then you unscrew the existing drum support wheels in the back and replace. The instructions for installing the new drum wheels are in the package with the wheels. Replace both even if one looks ok. The trick to getting the retaining clips on is to get them placed on the groove in the front of the wheel shaft and use plyers to clamp down on the clip and shaft - then they just snap into place.
The other thing I replaced was the felt gasket at the rear of the drum. Getting the old worn one off was easy. Scrape off as much of the old adhesive as you can, clean with some Goo Gone or similar adhesive remover and dry. I used the hi-temp adhesive from this website to attach the new felt gasket - this stuff is runny! If it gets on your hands or other surfaces, miner spirits or goo gone will get it off. I found it easier to apply a bit to the felt then hold it on the while the stuff started curing (a few minutes). Once you have glued the felt all the way around the drum, let it sit for an hour or so before trying to put the drum back on. Before you reinstall the drum, gently fold over the felt toward the back of the machine so it forms a "U" shape. Then carfully put the drum back on, making sure you have it sitting on the new wheels. Since the felt is new, you will have to work the drum a bit to get it seated evenly on the wheels and the new gasket.
Since there were no instruction on the tube of hi-temp adhesive about cure time, I waited a full day before running the dryer. It's been a week and 4 loads of laundry later and everything is running fine. I saved about $120.
The top was hard to figure out but I found that it pops off at the front with a flat screw driver. Be careful not to scratch the paint. I found that a rear drum roller was bad and the drum seals were deteriorated. I ordered a new belt, roller kit, front, and rear seals. This way I hoped I will not have to take it apart again. The seal were the hardest parts to replace. Make sure you look and remember how they were on before removing them. The directions were not to clear on the seals. The rest were good. It is much better to do it once. Take a picture if possible, it might come in handy as I took mine apart a week or so before the parts came in. I also cleaned out all of the accumulated lint buildup with a shop-vac, including the vent pipe, heater area, and front door. When I was done with this it worked like brand new.
Loud screeching metal to metal sound. The roller and "axle" were worn out.
First I disconnected the power cord. Next the top of the dryer was easily popped upen with a screw driver by inserting it between the top panel and the front door panel. I removed the two sheet metal screws that held the door panel on the upper right and left sides. The door panel was easily lifted up and out and set it to the side (the door switch can stay connected, the wire is long enough). d I pulled the drum out from off of the rollers that hold the drum in place. No need to remove the belt, it stays in place. I reached through the drum and removed the two hex-head screws that held the roller in place ( I only replaced the left one) and added the new one. I pushed the drum back in place over the rollers (it snaps in place). I propped the drum up with a short screw driver to raise it off of the right and left drum glides (on the bottom). I replaced the felt pads and the plastic glides and set the drum back in place. I also replaced the felt ring (seal) that circles the door opening that the drum also glides on. I glued it in place in spots (with gasket glue). It folds back over itself and forms a double thick pad. You will see what I mean when you see how the old one looks. I replaced the front door panel and snapped the top panel back in place. I let the dryer set over night so the glue would set up. I turned it on the next morning and it is as quiet now as when it was new. Oh ...Jay (the husband) did the work not Jean the wife (her dryer, her credit card)
The support roller broke and that made the noise as the rubber came off the wheel. It took about 8 months before the belt finally broke. Since I had it apart I decided to change both the drum felt seals and idler pulley wheel. I had trouble finding high temperature adhesive for the drum felt seal. Lowe's and Home depot didn't have anything that indicated it would take the heat. Finally located an adhesive at a craft store and the label claimed it was good on washers and dryers. Although I was able to glue and stretch the felt onto the dryer by myself if you have two people it will be alot easier. My dryer had made so much noise for so long I couldn't believe how quiet it is now.
Ask our experts a question about this part and we'll get back to you as soon as possible!
4 questions answered by our experts.
< Prev
1
Next >
Sort by:
Search filter:
Clear Filter
Your search term must have 3 or more characters.
Keep searches simple. Use keywords, e.g. "leaking", "pump", "broken" or "fit".
Sorry, we couldn't find any existing answers that matched.Try using some different or simpler keywords, or submit your new question by using the "Ask a Question" button above!
Patrick
November 14, 2017
Does this dryer door seal (wp31001747) require any type of adhesive to install? Thanks!
For model number PYG3300AWW
Hi Patrick, Thank you for the great question.Yes you will need the High Temperature Adhesive, PartSelect Number PS11757492. Good luck with the repair!
Does the felt gasket come with a tube of glue for installation?
For model number PS11740735
Hi William,
Thank you for your question. The adhesive is sold separately. The part number listed under your model number for the adhesive is PS11757492. I hope this helps. Thank you and have a great day!
1 person found this helpful.
Was this helpful?
Thank you for voting!
Roy
February 2, 2018
Can a poor felt seal cause excess lint to go out the vent?
For model number PYE2300AYW
Hello Roy, Thank you for your inquiry. Yes, it can. Hope this helps!
Was this helpful?
Thank you for voting!
Judith
February 25, 2018
Is there a place we can see how to put adhesive on and how to put gasket back into dryer in front
For model number PYE2200AYW
Hi Judith,
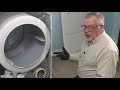
Thank you for your question. There is a video on our website that you can reference on how to install the drum felt seal. The dryer and the drum felt seal in the video may not show exactly like the ones you have, but it will give you a general idea on how to install the part. You will find the video under part number PS11741917. I hope this helps. Thank you and have a great day!
Was this helpful?
Thank you for voting!
< Prev
1
Next >
✖
Ask a Question
Ask our experts a question on this part and we'll respond as soon as we can.
This is replacement high temperature adhesive for your washer and dryer. It is designed to hold objects together, and will not disintegrate at a high temperature. This is a 2-ounce tube of adhesive that is sold individua...
Model Cross Reference
This part works with the following models:
PartSelect Number: PS11740735
Manufacturer Part Number: WP31001747