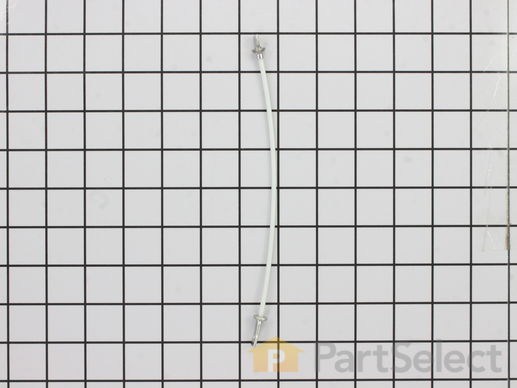
Part Location Diagram of WP230131 Whirlpool Door Cable
See part 9 in the diagram
( Grid squares measure 1x1 inch )
Customer Service Representative

Get in touch, we're here to help!

Daily 8am - 9pm EST

customerservice@partselect.ca

Door Cable

$12.55
  In Stock

Get this part fast! Average delivery time for in-stock parts via standard shipping: 1.8 days.

PartSelect Number PS11740194
Manufacturer Part Number WP230131
Manufactured by Whirlpool
Product Description

Door Cable Specifications

This dryer door cable is intended for use with spring part number PS343422. This cable is compatible with many of Whirlpool/Kenmore's brands of gas and electric clothes dryers.
How Buying OEM Parts Can Save You Time and Money

How Buying OEM Parts Can Save You Time and Money

Troubleshooting
This part fixes the following symptoms:
Door won’t close
This part works with the following products:
Dryer.
This part works with the following products:
Kenmore, Whirlpool, Roper, Kenmore.
Part# WP230131 replaces these:
AP6007087, 2021, 230131, 230131BULK, 26000230131, 8209
Back to Top
Customer Repair Stories
 Average Repair Rating: 3.6 / 5.0, 10 reviews. What's this?
  • 1
Sort by:
Sorry, we couldn't find any existing installation instruction that matched.
Ravages of time and 7 children.
Dryer was making a thump-thump sound as it turned and door had to be held shut with a prop rod or it would pop open all the time.

First I reviewed the exploded diagrams of my model on the PartSelect website. I kept referring to it as I went.

Two screws held the console down, I removed those and disconnected all the wiring to the console and set the console aside. I popped the top from the front after removing the ground wire that the console had hidden. Oops ... forgot the screws holding the filter enclosure to the top panel. I removed them, then the top came off of the rear hinge-like things.

I turned the drum by hand and confirmed that it was "thump-thumping". There were two internal screws that held the front panel and door to the side panels, I removed them and then the front panel/door assembly buckled away from the drum slightly. I had to disconnect the wires from the door switch and remove the wire retainer from the front panel.

The front panel/door lifted slightly and came off of retainers to the side panels near the floor. The drum was now suspended on the two rollers, belt tensioner pulley, and motor pulley. I removed the belt from the tensioner and motor and removed the drum.

I could see that one of my drum support wheels had a chunk melted or gashed out of it. Every time the divoted portion contacted the drum, it made a thump. I also noticed all the stuff that the kids had dumped in the dryer by lifting the front of the top panel, thinking it was a good hiding spot. The stuff included crayons, beads, assorted spare change, and a package of peanuts that had broken open.

I took this opportunity to vacuum out the interior of the dryer. Wow.

One of drum support roller axles has a front support. Both are bolted into the interior panel with a washer and nut. I wanted to remove both axles to replace the support wheels, so I crawled behind my dryer (by climbing over my washing machine).

I had to remove the flexible vent and the rear panel cover to access the roller axle nuts. But one of the axle nuts was covered by the dryer filter enclosure, so I had to take it loose. Boy am I glad that I did. It was chock full of caked together lint and more crud that the kids had shoved down the filter hole when the filter wasn't in place. I cleaned it and removed the axle nuts.

I had to remove and replace these funky little plastic triangles that acted as retainers for the drum support wheels. It was difficult and I eventually had to use pliers to help. I swapped drum support wheels, installed the new plastic triangles and reinstalled the axles, filter enclosure, back panel, and flexible duct (this involved all sorts of tools and several trips back and forth over my washing machine).

I installed the drum, making sure the felt was not bent the wrong way and that the drum support wheels were in the drum groove. To rethread the drum belt I had to lay on the ground and hold the drum in position with my foot while guiding the belt with two hands. Once the belt was properly threaded, the drum would dangle in position, but I used the prop rod to support if firmly while I worked on the front panel.

The front panel was in sorry shape. I replaced both hinges, cleaned the area between the door and the front panel that cannot be reached easily, and replaced the door support wires and guides, reattaching their springs. I also replaced the door retention hardware. (Note: pliers recommended by my poor cut fingers).

I installed the front panel to the side panels by sliding it onto the two lower supports while holding the drum in position. I reconnected the door switch and wire retainers. I screwed the upper screws from the side panels to the front panel.

I popped the top panel back in place, routing the wiring through and reconnecting the grounds. I rewired the console and slid it back into position. I screwed down the console and reattached the filter enclosure to the top panel.

I plugged it in, turned it o
Other Parts Used:
Rear Drum Support Roller Kit Door Support Cable Guide - Right Side Guide Door Catch Kit Door Hinge - Left Side Hinge
  • John from Plymouth, MI
  • Difficulty Level:
    A Bit Difficult
  • Total Repair Time:
    More than 2 hours
  • Tools:
    Nutdriver, Pliers, Screw drivers, Socket set
52 of 245 people found this instruction helpful.
Was this instruction helpful to you?
Thank you for voting!
Dryer door cable broken
1. Remove the lint filter. Then remove 2 screws at the lint filter housing.

2. At the back of the dryer, remove 2 screws that restrain the hinges for the dryer top. Do NOT remove the hinges.

3. Remove the front lower access panel. It snaps at the top and hinges at the bottom. It can be slipped off the hinges.

4. Remove 2 screws at the bottom of the main front panel

5. The front of the dryer top is held in place by two plastic clips. Use a flat blade screwdriver (with a rag wrapped around the tip to minimize paint damage) to pry the top up at each front corner. Then tilt the top up to just past vertical. You now can see the top of the spring that is connected to the door cable.

6. Open the dryer door. Use a putty knife to pry up the plastic plug that holds the cable in place at the door. Remove the old cable from the door and insert the new one. Be sure the cable end without a hole goes into the dryer door. Replace the plastic plug.

7. Feed the new cable through the main front panel and close the door.

8. Loosen but do NOT remove two screws that hold the main front panel to each side panel. Tilt the bottom of the front panel out about 2 inches.

9. Working through the gap between the main front panel and the side, hook the spring into the hole in the cable end.

10. Working through the open top and the gap on the side, move the spring+cable up to the top. Pass the upper end of the spring through the rectangular hole in the top of the main front panel and hook the end into the small hole there.

11. Repeat for other cable as needed.

12. Reassemble all parts. You may need to hold the top of the drum up as you move the main front panel back into place. Install the main front panel lower screws before tightening the upper screws.
Other Parts Used:
  • George from Rochester Hills, MI
  • Difficulty Level:
    Easy
  • Total Repair Time:
    30 - 60 mins
  • Tools:
    Nutdriver, Screw drivers
37 of 46 people found this instruction helpful.
Was this instruction helpful to you?
Thank you for voting!
door cables broke
Removed the screws holding the dryer door together and pushed the plastic pin out that the cable end went through. removed the screws at the dryer filter then popped up the top. put the cable through the door and then reached down with the door spring and went through the hole in the cable end, fastened the spring and pushed back down the top and replaced all screws. job complete. the hardest part was getting the spring through the small hole on the cable end but with a little patience and persistance it was accomplished.
Other Parts Used:
  • CAROL from HUNTINGDON, PA
  • Difficulty Level:
    Easy
  • Total Repair Time:
    Less than 15 mins
  • Tools:
    Screw drivers
16 of 23 people found this instruction helpful.
Was this instruction helpful to you?
Thank you for voting!
The dryer door was broken down, dryer would not come one
I pried up the lid, and removed two screws from the lint trap door.
Removed to screws that held top front of dryer. One on each side near top.

Cables replaced easily, popped plastic retainer from door, inserted cable and connect to spring.

Removed two screws that held the door switc on. Replaced with new switch and pushed wire clips onto new switch.

Things went back together just as they came off.

When I pulled the dryer front away, the tumbler (tub?) pulls out and drops down an inch or so. When putthing it back together , I had to life the tub up to fit into front again.
Other Parts Used:
Lid Switch
  • Randall from Johnstown, PA
  • Difficulty Level:
    Easy
  • Total Repair Time:
    15 - 30 mins
  • Tools:
    Screw drivers
12 of 17 people found this instruction helpful.
Was this instruction helpful to you?
Thank you for voting!
Door cable and spring broke.
I looked up my paperwork on the dryer and found out how to remove the proper panel to get to the inside of the door. (I was able to find the manual on the internet also).

I cleaned all the dust while I was inside. The actual repair of the broken parts took about 5 minutes.

Parts received were exactly like the broken ones.

Thanks Parts Select. Saved me $139.00

John
Other Parts Used:
Door Catch Kit
  • John from Oxford, OH
  • Difficulty Level:
    Easy
  • Total Repair Time:
    30 - 60 mins
  • Tools:
    Screw drivers
7 of 13 people found this instruction helpful.
Was this instruction helpful to you?
Thank you for voting!
Door springs and cables were broke, and the door catch was broke.
Removed screws by lint trap, used putty knife to pry top of dryer apart, use nut driver for two bolts that hold the front panel of dryer on, replaced parts, put it back together.
Other Parts Used:
Single Door Spring Door Catch Kit
  • Terry from ONAMIA, MN
  • Difficulty Level:
    Very Easy
  • Total Repair Time:
    Less than 15 mins
  • Tools:
    Pliers
4 of 5 people found this instruction helpful.
Was this instruction helpful to you?
Thank you for voting!
The door cables broke and latch was warn to the point of being too loose
This model top can be popped off after removing the two screws under the lint filter. Once exposed remove the old cables and feed them through the hole on the front panel. Feed the springs through the ends of the cables and hook the other end into the dryer side panel slots towards the top on each side. Once both cables are fed, feed the opposite ends of the cables into the slots in the dryer door (after popping the white plastic covers out of them first). Put the white covers back into the slots to hold cables into doors. The door catch kit install is pretty obvious.
Other Parts Used:
Single Door Spring Door Catch Kit
  • Wiley from LIVONIA, MI
  • Difficulty Level:
    Really Easy
  • Total Repair Time:
    30 - 60 mins
  • Tools:
    Screw drivers
4 of 4 people found this instruction helpful.
Was this instruction helpful to you?
Thank you for voting!
the cable for the dryer door broke.
simple repair, pop the dryer lid, remove the screw for the front of the door. install cable and spring and then reassemble.

The only task that took some time was remembering to take out the screws for the lint port prior to lifting the lid.
Other Parts Used:
Single Door Spring
  • Todd from WESTERVILLE, OH
  • Difficulty Level:
    Very Easy
  • Total Repair Time:
    15 - 30 mins
  • Tools:
    Nutdriver
2 of 2 people found this instruction helpful.
Was this instruction helpful to you?
Thank you for voting!
broken door cables
followed directions that came with order confirmation e-mail
Other Parts Used:
  • Richard from LA BELLE, PA
  • Difficulty Level:
    Really Easy
  • Total Repair Time:
    30 - 60 mins
2 of 2 people found this instruction helpful.
Was this instruction helpful to you?
Thank you for voting!
The door cables broke.
I replaced the springs and cables in the dryer door.
Other Parts Used:
  • Robert from Perris, CA
  • Difficulty Level:
    Really Easy
  • Total Repair Time:
    30 - 60 mins
  • Tools:
    Nutdriver, Screw drivers
1 person found this instruction helpful.
Was this instruction helpful to you?
Thank you for voting!
  • 1
Questions and Answers

Be the first to ask our experts a question about this part!

Model Cross Reference
This part works with the following models:
PartSelect Number: PS11740194
Manufacturer Part Number: WP230131
Brand
Model Number
Description
Kenmore
1105807410
Dryer
Kenmore
1105807500
Dryer
Kenmore
1105807501
Dryer
Kenmore
1105807700
Dryer
Kenmore
1105807701
Dryer
Kenmore
1105807800
Dryer
Kenmore
1105807801
Dryer
Kenmore
1105807810
Dryer
Kenmore
1105807811
Dryer
Kenmore
1105807850
Dryer
Kenmore
1105807851
Dryer
Kenmore
1105807860
Dryer
Kenmore
1105807861
Dryer
Kenmore
1105807950
Dryer
Kenmore
1105807951
Dryer
Kenmore
1105807960
Dryer
Kenmore
1105807961
Dryer
Kenmore
1105808500
Dryer
Kenmore
1105808700
Dryer
Kenmore
1105808800
Dryer
Kenmore
1105808810
Dryer
Kenmore
1105808850
Dryer
Kenmore
1105808860
Dryer
Kenmore
1105808950
Dryer
Kenmore
1105808960
Dryer
Kenmore
1105817500
Dryer
Kenmore
1105817501
Dryer
Kenmore
1105817800
Dryer
Kenmore
1105817801
Dryer
Kenmore
1105817811
Dryer
Customer Service Representative

Get in touch, we're here to help!

Daily 8am - 9pm EST

Contact Customer Service