This water inlet valve attaches the water lines to the back of your appliance. The attaching solenoids on the valve open and close according to the desired temperature, or amount of water needed.
How Buying OEM Parts Can Save You Time and Money
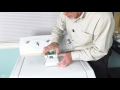
Part Videos
Replacing your Maytag Washer Water Inlet Valve
Troubleshooting
This part fixes the following symptoms:
Leaking | No hot or cold water
This part works with the following products:
Washer.
This part works with the following products:
Maytag.
Part# WP22004333 replaces these:
AP6006446, 22004191, 22004333
Customer Reviews
Average Rating:
★★★★★
★★★★★
5 Reviews
5.0
Filter By Rating:
5 Stars
5
4 Stars
0
3 Stars
0
2 Stars
0
1 Star
0
< Prev
1
Next >
Sort by:
Search filter:
Clear Filter
Your search term must have 3 or more characters.
Keep searches simple. Use keywords, e.g. "leaking", "pump", "broken" or "fit".
Sorry, we couldn't find any existing reviews that matched. Try using some different or simpler keywords.
★★★★★
★★★★★
Robert J - December 7, 2021
Verified Purchase
Replaced part in less than 15 minutes.
Part was exactly as ordered, installation instructions were clear. Appliance now works like new.
★★★★★
★★★★★
Adam J - September 26, 2021
Verified Purchase
No more floods
Part was fairly easy to install, took 15 minutes in all. It fixed the overflowing symptom like it said it would. Would have no issue ordering from this site again, part was cheap and delivered in a timely manner. Thanks @partselect, saved me from buying a new washing machine!
★★★★★
★★★★★
Kevin H - July 14, 2020
Verified Purchase
Fast delivery and easy repair.
The part was easy to order, was delivered quicker than expected, and hassle free. Thanks!
★★★★★
★★★★★
SALU S - June 23, 2019
Verified Purchase
Easy Repair
got the part in time, works good.
★★★★★
★★★★★
David S - August 23, 2018
Verified Purchase
Good experience
Part arrived quickly, videos and follow up very helpful, great customer service. Machine fixed and running.
< Prev
1
Next >
Customer Repair Stories
Average Repair Rating: 4.1 / 5.0, 17 reviews.
What's this?
< Prev
1
2
Next >
Sort by:
Search filter:
Clear Filter
Your search term must have 3 or more characters.
Keep searches simple. Use keywords, e.g. "leaking", "pump", "broken" or "fit".
Sorry, we couldn't find any existing installation instruction that matched.
Water would continue to trickle into tub after spin cycle.
Disconnect power to washer, remove H & C water hoses attached to water valve inlet (for me this was the hardest part of the whole job...hard to get to and a bit tight.) Remove washer top by depressing 2 spring loaded clamps (located between the top and the cabinet about two inches from each edge A flashlight can help you locate the clips.) with a screw driver (recommend using a shim to keep top up after first clip is released until you can release second). Lift up forward end of top, lift back of top off of hinges, and slide top forward on cabinet so you can access water valve. Remove and note position of electrical connections to water valve. Remove one screw holding the plastic fixture surrounding valve and one screw holding valve bracket. Install new valve, reconnect electrical, re-install top, reconnect hoses and you're all set.
Other Parts Used:
John from Vail, AZ
Difficulty Level:
Easy
Total Repair Time:
15 - 30 mins
Tools:
Nutdriver, Pliers, Screw drivers
71 of 81 peoplefound this instruction helpful.
Was this instruction helpful to you?
Thank you for voting!
Water continued to run after the machine shut off
Turn off water and unplug washer. Use putty knife to release the catches in order to lift the top. Remove the screw that holds the entire assembly to the back of the washer. Pull the valve assembly forward in order to make the remaining repairs easier. Next remove the screw that allows you to separate the front water difuser from the valve bracket. The last is a phillips screw that holds the valve/solenoid to the mounting bracket. Reverse these steps to install the new part.
Other Parts Used:
DeRay from Goshen, IN
Difficulty Level:
Really Easy
Total Repair Time:
Less than 15 mins
Tools:
Socket set
20 of 23 peoplefound this instruction helpful.
Was this instruction helpful to you?
Thank you for voting!
water continued to trickle, (sometimes flow), during spin cycle thereby leaving tub with 1/4 to 1/2 filled with water at end of each wash.
Removed washer top by depressing spring loaded clamps with a screw driver. Tricky part was determining location of clamps so that I knew where to insert screw driver; (I used diagrams of my model found on the Internet). With top lifted up, I located water control valve and removed brackets and plastic fixture surrounding it. Was careful to disconnect electronic wiring into valve. Then removed hoses and replaced with new part. Most of the time spent was diagnosing problem, determining plan for getting access to part, and reassembling without losing parts down in tub area. Saved an estimated $150-250 by doing it myself.
Doing this repair was a breeze. After disconnecting the power and water I popped the lid and it was 3 screws and 2 wire connectors. Reassembled and done. This was beyond cost effective to do and with simple look see at a diagram anyone with basic mechanical know how and some basic tools could do this.
Just installed the valve 7-18-2010. Removed electrical plug from the wall and closed the water supply valve. Removed supply hoses. Had to use pliers to get into recessed connections. Bad design. Raised lid using narrow putty knife to release clips under lid on corners. Removed connectors from solonoids, marking their positions, and set aside wires to prevent pinching or slicing them accidentally. Opened chute by depressing tabs on both sides. Removed the only screw in the water chute on left side and depressed the tab beneath other side to slide chute off. Removed single screw on left side holding valve bracket and slid bracket out of slot on right side. Removed screw from bracket holding valve in place. Reversed order to reassemble. This is the second valve replaced in this five year old Maytag along with one transmission at two and one half years old. This new valve appears to be leaking through at this writing but I'm running the washer through a cycle to see if it will then seal tight. Will post follow up if possible. P.S. Valve is holding as of 8-5-2010.
Other Parts Used:
Gary from Independence, MO
Difficulty Level:
Really Easy
Total Repair Time:
15 - 30 mins
Tools:
Nutdriver, Pliers
10 of 14 peoplefound this instruction helpful.
Was this instruction helpful to you?
Thank you for voting!
Hot water valve leaked by and then at last wouldn't open
Easy repair replacing the water valve assembly. Good advise from other posts helped much.
Parts look up was simple. part was priced right. part received in a timely manner and was as advertised. installation was quick and painless.
Other Parts Used:
Jason from New Braunfels, TX
Difficulty Level:
Easy
Total Repair Time:
Less than 15 mins
Tools:
Nutdriver
5 of 7 peoplefound this instruction helpful.
Was this instruction helpful to you?
Thank you for voting!
water valve leaking after wash cycle
Very simply put a screwdrive under the top and lift up off the clips and lay it back will expose the Water Inlet Valve,take the 2 screws off,pull the 2 water lines off,2 electrical wires and thats it.
Other Parts Used:
Larry from Granite Falls, NC
Difficulty Level:
Easy
Total Repair Time:
30 - 60 mins
Tools:
Screw drivers
4 of 6 peoplefound this instruction helpful.
Was this instruction helpful to you?
Thank you for voting!
would not stop dispensing water at any setting
followed directions you gave. Simple
Other Parts Used:
BEN from DEXTER, MI
Difficulty Level:
Really Easy
Total Repair Time:
15 - 30 mins
Tools:
Screw drivers
3 of 4 peoplefound this instruction helpful.
Was this instruction helpful to you?
Thank you for voting!
water was leaking while spin drying
top cover lifts up and folds back to expose the water solenoid switch. Disconnect water inlet hoses and wires and replace switch.
Other Parts Used:
Kevin from SUNNYVALE, CA
Difficulty Level:
Easy
Total Repair Time:
30 - 60 mins
Tools:
Pliers, Screw drivers
3 of 3 peoplefound this instruction helpful.
Was this instruction helpful to you?
Thank you for voting!
< Prev
1
2
Next >
Questions and Answers
Ask our experts a question about this part and we'll get back to you as soon as possible!
3 questions answered by our experts.
< Prev
1
Next >
Sort by:
Search filter:
Clear Filter
Your search term must have 3 or more characters.
Keep searches simple. Use keywords, e.g. "leaking", "pump", "broken" or "fit".
Sorry, we couldn't find any existing answers that matched.Try using some different or simpler keywords, or submit your new question by using the "Ask a Question" button above!
Salu
June 5, 2019
Looking for Maytag atlantis washer water inlet valve, please let us know whether the store has it.
For model number MAV9501EWW
Hello Salu, thank you for inquiring. The Water Inlet Valve for your model is this part PS11739520 on our website.
3 people found this helpful.
Was this helpful?
Thank you for voting!
Salu
June 6, 2019
Thanks for responding , i would like to reconfirm before ordering that our machine is Maytag atlantis washer with hot and cold sensors, the helpful video shown under the part doesn't show the sensors, wondering if part select no. Ps11739520 has it.
For model number MAV9501EWW
Hi Salu, thank you for your question. If that is the case then you may actually need the water inlet valve with thermistor on it. I have linked that part below for you. Good luck with your repair.
Water will not stop and it overflow the tub. According to your website, the issue is resolve 94% of the time by replacing the water inlet valve. My question is in case replacing the valve do not solve problem, can I return the part (complete intact) with a full refund ? Thank you, Ken
For model number MAV7504EWW
Hello ken, Thank you for the question. Since the valve is electrical, once installed it can not be returned. Here is a link to our return policy. Hope this helps!
https://www.partselect.com/Thirty-Day-Returns.htm
1 person found this helpful.
Was this helpful?
Thank you for voting!
< Prev
1
Next >
✖
Ask a Question
Ask our experts a question on this part and we'll respond as soon as we can.