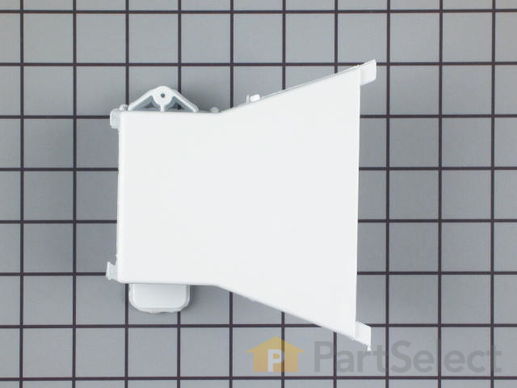
Part Location Diagram of WP22001186 Whirlpool Lower Fill Injector
See part 22 in the diagram
( Grid squares measure 1x1 inch )
Customer Service Representative

Get in touch, we're here to help!

Daily 8am - 9pm EST

customerservice@partselect.ca

Lower Fill Injector

$65.05
  In Stock

Get this part fast! Average delivery time for in-stock parts via standard shipping: 1.8 days.

PartSelect Number PS11739270
Manufacturer Part Number WP22001186
Manufactured by Whirlpool
Product Description

Lower Fill Injector Specifications

This lower fill injector is just over five inches long. It is white, made of plastic and is used on some washing machines.
How Buying OEM Parts Can Save You Time and Money

How Buying OEM Parts Can Save You Time and Money

Troubleshooting
This part fixes the following symptoms:
Leaking
This part works with the following products:
Washer, Washer Dryer Combo.
This part works with the following products:
Maytag, International, Jenn-Air.
Part# WP22001186 replaces these:
AP6006204, 22001186
Back to Top
Customer Repair Stories
 Average Repair Rating: 3.5 / 5.0, 8 reviews. What's this?
  • 1
Sort by:
Sorry, we couldn't find any existing installation instruction that matched.
Plastic thing (Fill Injector) that puts water in the washer broke
Unfortunately, I couldn't find instructions for removing the top for exactly this model. First step was to remove the front panel by removing the two lower screws, grabbing the bottom of the panel, and lifting up until the clips on top of the panel let go. Next was removing from underneath the two screws towards the front that held the top of the washer on. This gives you easy access to the Fill Injector, but if working alone you'll need something to prop up the front of the top lid while you work on it. There is one screw that hold on the Fill Injector assembly (top and bottom). This screw is removed from the top, via the control panel. To get inside the control panel you need to remove the back of the control panel (very easy), just unscrew the 5 screws on the back of it. Then remove the one screw that holds the Fill Injector assembly in place. From under the front panel, use your pliers to remove the hose clamp and then remove the Fill Injector from the hose. ONE IMPORTANT ITEM, YOU'LL DEFINITELY NEED A REPLACEMENT HOSE CLAMP. The one you remove to take off the old, broken fill injector cannot be put back on. Put the new clamp loosely on the hose, then connect the hose to the new Fill Injector Assembly. Put the Fill Injector Assembly in place and use a piece of duct tape to hold it there. Then reinstall the screw that holds it in place from the top, inside the control panel. Reinstall everything in reverse, give it a test and then have a beer. You've just "given it to the man" and saved yourself $100+ on a repair bill.
Other Parts Used:
Upper Fill Injector
  • AMY from Mount Kisco, NY
  • Difficulty Level:
    Easy
  • Total Repair Time:
    30 - 60 mins
  • Tools:
    Pliers, Socket set
19 of 20 people found this instruction helpful.
Was this instruction helpful to you?
Thank you for voting!
leaking water under back left of washer
The first thing I did was look at the diagrams for my specific appliance on the parts select web site to locate fastners. I removed the front panel(2 screws 4" from floor on front panel), then removed the corner bolts of top panel(found under in front). Next I removed the 4 screws on the control panel (on top). I located the screw holdling the fill injector to the top Lid. Then I removed the clamp holding the unit to the regulator. Assembled the unit and placed it in position. First attaching the fill injector to top panel, then clamping the hose to regulator, then replacing 4 screws in control panel. Next the two corner screws in corners under the top panel. Replaced front panel and 2 screws. Then had a trail run and no water leaks any where.
Other Parts Used:
Injector Hose Upper Fill Injector Hose Clamp Clamp
  • Gregory from Louisville, KY
  • Difficulty Level:
    Really Easy
  • Total Repair Time:
    30 - 60 mins
  • Tools:
    Nutdriver, Pliers, Screw drivers
15 of 21 people found this instruction helpful.
Was this instruction helpful to you?
Thank you for voting!
Upper and lower filler injectors broken
Power cord out, of course.Popped off the front panel, swinging bottom outward. Wedge shaped protrusions on top of front panel work as a hinge until the bottom is swung out and the entire front lowered. Unscrewed the top--one screw in each front corner accessed from the front opening (removed panel). Panel behind control panel must be removed (5 hex head screws). Tilted front of top up revealing broken injector. Retaining screw for injector accessible from behind control panel loosened and broken injector assembly removed. New (easily assembled--snap together) injector slid into holding slot on one side and screwed down with previously removed hex screw. Reassemble in reverse.
Other Parts Used:
Upper Fill Injector
  • Henry from Southside, AL
  • Difficulty Level:
    Really Easy
  • Total Repair Time:
    15 - 30 mins
  • Tools:
    Screw drivers, Socket set
6 of 7 people found this instruction helpful.
Was this instruction helpful to you?
Thank you for voting!
Upper and Lower Fill Injector snapped off and water was leaking out of the back of the machine
I looked at the machine diagram on the website and removed the screw on the bottom and lifted up the from panel which allowed me to have easier access to the fill injector. Then I removed the back panel off of the control panel on the top of the machine and removed the screw that held the fill injector in place, attached the new fill injector using the hose clamp I ordered with the part ( you need a new hose clamp because the other one is useless after you remove the old injector). Tightend up the screw to hold the injector in place and replaced the back panel and front panel. It was an easy repair and only cost $28.00 with shipping. I easily saved $150.
Other Parts Used:
Upper Fill Injector Hose Clamp
  • Daryl from Newton, NJ
  • Difficulty Level:
    Easy
  • Total Repair Time:
    15 - 30 mins
  • Tools:
    Screw drivers, Socket set
5 of 9 people found this instruction helpful.
Was this instruction helpful to you?
Thank you for voting!
Overloaded my washer and broke the water-injector!
Had to look up how to pop the front panel off the washing machine - that was the hardest part. Once that was off, the top unbolted and the cover came off the back of the control panel with a few screws. Tilting the washer-top back, I was able to clip the new upper and lower injector (attached to each other in advance) to the washing machine. Then I realized that I needed to clamp the water line to the injector FIRST - so I found a small screw clamp and attached the water line. One screw and one plastic tab hold the injector in place. Everything went back together fine and worked great! Maytag washer keeps on truckin for another ten years!
Other Parts Used:
Upper Fill Injector
  • Richard from Coudersport, PA
  • Difficulty Level:
    Easy
  • Total Repair Time:
    30 - 60 mins
  • Tools:
    Nutdriver, Screw drivers
4 of 6 people found this instruction helpful.
Was this instruction helpful to you?
Thank you for voting!
Fill Injector Broke - A mouse may have contributed
I opend up the housing, found the broken part, ordered it, installed it, and had the washer working within 4 days of the initial break down.
Saved a lot of money over a service call, as well as time, and trips to the laundramat.
Other Parts Used:
Upper Fill Injector
  • Todd from Evansville, WI
  • Difficulty Level:
    Easy
  • Total Repair Time:
    30 - 60 mins
  • Tools:
    Nutdriver, Screw drivers, Socket set
1 person found this instruction helpful.
Was this instruction helpful to you?
Thank you for voting!
Timer not functioning properly
Turned power off, unscrewed back panel with nut driver, disconnected wiring harness and removed old timer and replaced. Reversed process.
Other Parts Used:
TIMER Upper Fill Injector
  • Jim from The Woodlands, TX
  • Difficulty Level:
    Easy
  • Total Repair Time:
    30 - 60 mins
  • Tools:
    Nutdriver, Screw drivers
1 of 2 people found this instruction helpful.
Was this instruction helpful to you?
Thank you for voting!
Plastic Fill injector broke. Water was leaking.
Used the Butter knife to push in the clips on the front panel of the washing machine. Remove the two screws from the top. Remove the metal plate on the back. Lifted up the top and unscrewed the old Fill Injector and removed hose. Connected new Fill Injector to hose with new hose clamp. Attached Fill injector with screw to top of washer lid. Replaced all screws. Checked for leaks. Good to go!
Other Parts Used:
Upper Fill Injector
  • Jason from Palm Harbor, FL
  • Difficulty Level:
    Easy
  • Total Repair Time:
    30 - 60 mins
  • Tools:
    Pliers, Screw drivers, Socket set
1 of 2 people found this instruction helpful.
Was this instruction helpful to you?
Thank you for voting!
  • 1
Questions and Answers

Be the first to ask our experts a question about this part!

Related Parts
Model Cross Reference
This part works with the following models:
PartSelect Number: PS11739270
Manufacturer Part Number: WP22001186
Brand
Model Number
Description
Maytag
6329
Washer - MAYTAG AUTOMATIC WASHER
Maytag
6349
Washer - MAYTAG AUTOMATIC WASHER
Maytag
6359
Washer - MAYTAG AUTOMATIC WASHER
Maytag
LAT1916AAE
Washer - Residential
Maytag
LAT1916ABE
Washer - Residential
Maytag
LAT2200AAE
Washer - Residential
Maytag
LAT2300AAE
Washer - Residential
Maytag
LAT2300AWW
Washer - Residential
Maytag
LAT2500AAE
Washer - Residential
Maytag
LAT2914AAE
Washer - Residential
Maytag
LAT2914AAL
Washer - Residential
Maytag
LAT2914AAM
Washer - Residential
Maytag
LAT2915AAE
Washer - Residential
Maytag
LAT2915AAM
Washer - Residential
Maytag
LAT2916AAE
Washer - Residential
Maytag
LAT2916AAM
Washer - Residential
Maytag
LAT2916ABE
Washer - Residential
Maytag
LAT3500AAE
Washer - Residential
Maytag
LAT3500AAQ
Washer - Residential
Maytag
LAT3914AAE
Washer - Residential
Maytag
LAT3914AAL
Washer - Residential
Maytag
LAT3914AAM
Washer - Residential
Maytag
LAT4000AAW
Washer - Residential
Maytag
LAT4914AAE
Washer - Residential
Maytag
LAT4914AAL
Washer - Residential
Maytag
LAT4914AAM
Washer - Residential
Maytag
LAT4915AAE
Washer - Residential
Maytag
LAT4915AAM
Washer - Residential
Maytag
LAT4916AAE
Washer - Residential
Maytag
LAT4916AAM
Washer - Residential
Customer Service Representative

Get in touch, we're here to help!

Daily 8am - 9pm EST

Contact Customer Service