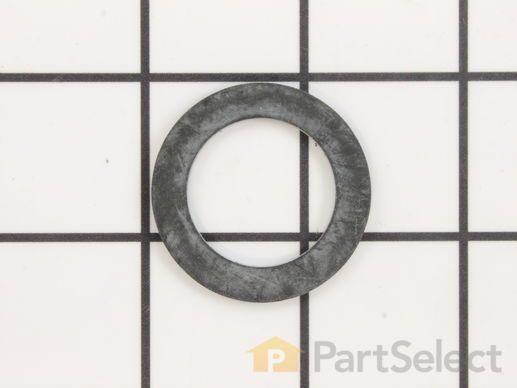
Part Location Diagram of WP215233 Whirlpool Injector Tube Seal
See part 7 in the diagram
( Grid squares measure 1x1 inch )
Customer Service Representative

Get in touch, we're here to help!

Daily 8am - 9pm EST

customerservice@partselect.ca

Injector Tube Seal

$12.45
  In Stock

Get this part fast! Average delivery time for in-stock parts via standard shipping: 1.8 days.

PartSelect Number PS11738906
Manufacturer Part Number WP215233
Manufactured by Whirlpool
Product Description

Injector Tube Seal Specifications

This injector tube seal is just over an inch in diameter. It is black in color and made of rubber.
How Buying OEM Parts Can Save You Time and Money

How Buying OEM Parts Can Save You Time and Money

Troubleshooting
This part fixes the following symptoms:
Leaking
This part works with the following products:
Washer, Washer Dryer Combo.
This part works with the following products:
Maytag, Jenn-Air.
Part# WP215233 replaces these:
2-15233, 215233
Back to Top
Customer Repair Stories
 Average Repair Rating: 3.5 / 5.0, 10 reviews. What's this?
  • 1
Sort by:
Sorry, we couldn't find any existing installation instruction that matched.
Front load washing machine leaking on floor while in fill mode.
Removed two screws at bottom of front panel and then removed front panel. Then removed two self-tapping bolts (one on each side) holding top panel in place and swung the panel up, out of the way, to expose top of tub and water injection components. Cut off one pinch clamp and loosened screw clamp holding two injector hoses to the injector sleeve. Removed these water injector hoses from injector sleeve assembly which is mounted on top of left side panel upper flange. Replaced deteriorated rubber injector valve, nozzle and the sleeve for the injector (plastic housing containing the injector valve and nozzle). Also replaced deteriorated injector tube seal where injector tube elbow mounts to top of tub assembly. Reinstalled injector hoses with a replacement screw clamp to replace the one cut off. tightened the new clamp and the other, original, screw clamp and checked for leaks. This solved the leakage problem. Secured top panel and re-installed front panel. Hardest part of the task was determining where the leak emanated from but once found and parts ordered, it was a relative snap to fix.
Other Parts Used:
Rubber Injector Valve Injector Sleeve Plastic Injector Nozzle
  • Catherine from Wyandotte, MI
  • Difficulty Level:
    Easy
  • Total Repair Time:
    15 - 30 mins
  • Tools:
    Screw drivers, Socket set
175 of 185 people found this instruction helpful.
Was this instruction helpful to you?
Thank you for voting!
Agitator Not Woking
Unplugged power cord then disconnected the water supply and drain hose. Removed 2 screws and took the front panel off. Laid washer on it's side and posistioned the transmission with the cover facing upward. Removed the hex head screws then used a razor knife and a putty knife to remove the silicone sealant. Found that the agitator shaft spring had broken and fallen into the housing jamming the gears that's used in agitation. Removed the oil and all broken pieces of the spring. Installed new shaft spring, replaced the oil then applied sealant to the cover and screwed the cover back down. Let the washer stay in the same posistion for about 18 hours to let sealant dry completely. Then I sat the washer back on it's feet and removed 2 screws that holds the top lid in place. This allowed me access to the tub cover where the injector t is located. Installed the injector t along with the injector tube seal. Connected the hose and hose clamp. Then I put the lid back down and secured with the screws. Connected the water supply and drain hose then the power and selected a wash time and observed the operation. Everything worked ok so I put the front cover back on. Note: I had used the injector t from this washer to fix another washer that an appliance dealer had given me to use for parts to repair the one just described above. That was the only thing that was wrong with it. It was used for about a year and a half and it developed a problem in the spin cycle. Appears to be a brake problem. I intend to repair it as well.
Other Parts Used:
Injector Tube Hose Clamp Agitator Shaft Spring
  • Richard from Alexander City, AL
  • Difficulty Level:
    Easy
  • Total Repair Time:
    1- 2 hours
  • Tools:
    Nutdriver, Pliers, Screw drivers, Socket set
20 of 24 people found this instruction helpful.
Was this instruction helpful to you?
Thank you for voting!
I had a leak that started just under the rim of the washer and then ran down the outside of the machine
Your website is wonderful. I read another womans account of how she fixed her machine and then I just followed her instructions...how cool is that!
Other Parts Used:
Rubber Injector Valve Injector Sleeve Plastic Injector Nozzle
  • Janis from Georgetown, TX
  • Difficulty Level:
    Really Easy
  • Total Repair Time:
    15 - 30 mins
  • Tools:
    Screw drivers, Socket set
9 of 11 people found this instruction helpful.
Was this instruction helpful to you?
Thank you for voting!
washer leaking
First I took all the screws out of the side and back cabinet, then tried to pry off the top, after breaking a couple of clips, saw that the front came off with two screws at the bottom, then removed, then two hex head screws to hold on the top, then lift top and saw that the injector was clogged and leaking out the top. If I had read the repair section first, I could have saved alot of time by not removing all the side and back screws. This would be a simple 15 minute job, if you follow the repair guide. Just cut off the clamps, stick in the injector and holder , reclamp and reassemble the washer.
Other Parts Used:
Rubber Injector Valve Injector Sleeve Plastic Injector Nozzle
  • danny from Seymour, IN
  • Difficulty Level:
    Easy
  • Total Repair Time:
    15 - 30 mins
  • Tools:
    Nutdriver, Pliers, Screw drivers
7 of 8 people found this instruction helpful.
Was this instruction helpful to you?
Thank you for voting!
Hot water overflow injector, ran onto floor
You will need 2 hose clamps not sold as maytag parts.

Remove front washer panel screws.

Remove bolts holding front of top to side panels

Remove hose clamp from front hose to injector sleeve.

Twist fill hose ccw 90 degrees at tub fitting to remove.

Clean corrosion at tub attachment point wuth wire brush.

Paint bare metal to seal. Allow to thoroughly dry.

Remove injector sleeve and injector hose.

Trim new injector hose to match length of removed hose (I cut off abt 4 inches)

Install injector hose and plastic sleeve. Ensure clocking is correct on hose.

Install gasket on fill hose fitting.

Insert fitting into tub. Rotate 90 deg CW to latch.

Install gear clamps loosely on fill tube.

Attach fill tube to fill fitting and injector sleeve.

Slide clamps onto tube ends ensuring clamp clocking provides access and clears tub top..

Test tub fill to ensure injector works without leaks
Other Parts Used:
Injector Fill Hose Rubber Injector Valve Injector Sleeve Injector Tube Plastic Injector Nozzle Injector Hose
  • Padraic from SAINT PAUL, MN
  • Difficulty Level:
    Easy
  • Total Repair Time:
    30 - 60 mins
  • Tools:
    Nutdriver, Screw drivers, Socket set
4 of 4 people found this instruction helpful.
Was this instruction helpful to you?
Thank you for voting!
Tub injector hose had hole in it from rubbing on side of cabinet.
Remove front panel of machine, 2 screws at
bottom. Remove 2 bolts at top front with nut
driver and whole top can be lifted to expose
all parts. Remove injector hose clamps and
clamp new hoses in place. I replaced both
injejctor hoses while open although only one
had small hole in it. This is the only repair
done on this coin-op machine in 20 years. At
this time I did replace both drive belts but they
could have run for more years, no cracks or
breaks in belts. This machine is in a 12 unit
apartment building. We have two on them,
same age. We purchased both coin ops new
in 1987.
Other Parts Used:
Injector Fill Hose Injector Tube Injector Hose
  • Linn from El Segundo, CA
  • Difficulty Level:
    Really Easy
  • Total Repair Time:
    Less than 15 mins
  • Tools:
    Nutdriver, Screw drivers
4 of 6 people found this instruction helpful.
Was this instruction helpful to you?
Thank you for voting!
leaking
Watched the video first that was offered. Stating what tools needed size of socket needed. Step by step and how to do the job. Which was very helpful.
Other Parts Used:
Rubber Injector Valve Plastic Injector Nozzle
  • James from BEECHER, IL
  • Difficulty Level:
    Easy
  • Total Repair Time:
    15 - 30 mins
  • Tools:
    Screw drivers, Socket set
2 of 2 people found this instruction helpful.
Was this instruction helpful to you?
Thank you for voting!
water was flowing from the side as it would fill
remove the front and opened the top, removed the old parts and added the new plus a new clamp that I purchased from the local store.
I'm a single mom, one income so doing repairs myself is very important. The parts came when promised and it cost me about $23.00 where a repair man could have charged me well over $100.00 just for the parts.
First time I used this website or ordered parts, I will definitely do it in the future.
Other Parts Used:
Rubber Injector Valve Injector Sleeve Plastic Injector Nozzle
  • Cindy from Jim Thorpe, PA
  • Difficulty Level:
    Really Easy
  • Total Repair Time:
    Less than 15 mins
  • Tools:
    Screw drivers
2 of 4 people found this instruction helpful.
Was this instruction helpful to you?
Thank you for voting!
Washer was leaking when filling
I removed the front of the washer and lifted the top. I could see the water was leaking from injector nozzle. I looked online at PartSelect.com, found my model and make. Looked up the defective parts and ordered them. They came in three days. I installed the parts in about 20 minutes and it worked fine.
Other Parts Used:
Injector Sleeve Bracket - Side Mounting Rubber Injector Valve Plastic Injector Nozzle
  • Stephen from Mercer, PA
  • Difficulty Level:
    Easy
  • Total Repair Time:
    30 - 60 mins
  • Tools:
    Nutdriver, Screw drivers, Socket set
1 person found this instruction helpful.
Was this instruction helpful to you?
Thank you for voting!
Leaking fill hose injector and a hose
Remove fron cover raised lid slightly and moved it slightly to the right exposing injector and hoses. replace one hose and installed new injector and clamps. Problem solved.

But what needs to be said is that the PARTS SELECT Website made it easily to identify the parts needed, fair pricing, way lower than local Maytag dealer, and exceptional speedy delivery (basic delivery option).
Other Parts Used:
Injector Fill Hose Injector Hose
  • Joseph from Ellisville, MO
  • Difficulty Level:
    A Bit Difficult
  • Total Repair Time:
    1- 2 hours
  • Tools:
    Nutdriver, Pliers, Screw drivers
0 of 1 people found this instruction helpful.
Was this instruction helpful to you?
Thank you for voting!
  • 1
Questions and Answers

Be the first to ask our experts a question about this part!

Related Parts
Model Cross Reference
This part works with the following models:
PartSelect Number: PS11738906
Manufacturer Part Number: WP215233
Brand
Model Number
Description
Maytag
A104
Washer - Top Loading
Maytag
A105
Washer - Top Loading
Maytag
A112
Washer - Top Loading
Maytag
A183
Washer - Top Loading
Maytag
A190
Washer - Top Loading
Maytag
A1910
Washer - Top Loading
Maytag
A211
Washer - Top Loading
Maytag
A211S
Washer - Top Loading
Maytag
A212
Washer - Top Loading
Maytag
A212S
Washer - Residential
Maytag
A23CA
Washer
Maytag
A23CDL
Washer - Commercial
Maytag
A23CDW
Washer - Commercial
Maytag
A23CSL
Washer
Maytag
A23CSW
Washer
Maytag
A23CT
Washer
Maytag
A24CA
Washer
Maytag
A25CA
Washer
Maytag
A25CAE
Washer
Maytag
A25CM
Washer
Maytag
A25CME
Washer
Maytag
A25CS
Washer
Maytag
A25CT
Washer
Maytag
A26CA
Washer
Maytag
A26CAE
Washer
Maytag
A26CD
Washer
Maytag
A26CDC
Washer
Maytag
A282
Washer - Top Loading
Maytag
A283
Washer - Top Loading
Maytag
A284
Washer - Top Loading
Customer Service Representative

Get in touch, we're here to help!

Daily 8am - 9pm EST

Contact Customer Service