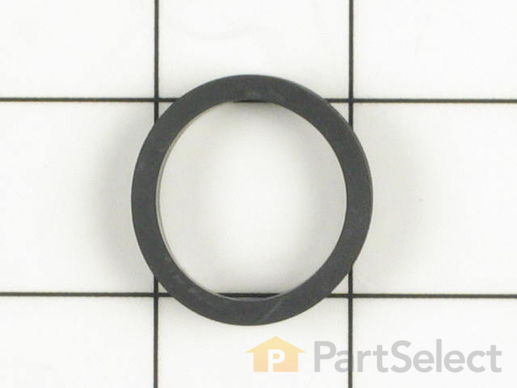
Part Location Diagram of WP214765 Whirlpool Syphon Break Gasket
See part 41 in the diagram
( Grid squares measure 1x1 inch )
Customer Service Representative

Get in touch, we're here to help!

Daily 8am - 9pm EST

customerservice@partselect.ca

Syphon Break Gasket

$66.84
  In Stock

Get this part fast! Average delivery time for in-stock parts via standard shipping: 1.8 days.

PartSelect Number PS11738895
Manufacturer Part Number WP214765
Manufactured by Whirlpool
Product Description

Syphon Break Gasket Specifications

This syphon break gasket is just over an inch in diameter. It is black in color and made of rubber.
How Buying OEM Parts Can Save You Time and Money

How Buying OEM Parts Can Save You Time and Money

Troubleshooting
This part fixes the following symptoms:
Leaking
This part works with the following products:
Washer, Washer Dryer Combo.
This part works with the following products:
Maytag, International, Jenn-Air.
Part# WP214765 replaces these:
AP6005834, 2-14765, 214765
Back to Top
Customer Repair Stories
 Average Repair Rating: 2.8 / 5.0, 5 reviews. What's this?
  • 1
Sort by:
Sorry, we couldn't find any existing installation instruction that matched.
Water leak noted on floor at front of washer and at sides
Occasional noted leak became worse and I had a repair service out. Incorrect detection of outer tub seal made so cancelled them and read comments about raising the top. Did so just at start of a rinse cycle to see soapy water shoot from top of syphon break then continue to dribble out through tub empty process--this is what had cause the water to flow down the interior drain hose and out through the side and bottom near the pump.

Ordered all the parts shown here and they arrived just in time for planned work. Did not need or use the clamp and gasket purchased as the gasket was included in the break package and I really like the old-style clamps much better.

Replaced the break and the elbow and put it back together. Things went south on a rinse as water shot out the back hose at the new elbow. I had not realized the size of the new elbow was smaller than the original. Went back to the old elbow but it bothered me that it would still move when the 4 assembly bolt-screws were completely tight.

So far this seems to have worked. There does not seem to be any leaking at all. For those who read this, the job could be done in about and hour for less than I spent if you observe and diagnose properly. It appears that the washer at the end of the Syphon Break wore out and that is what caused the leak.

Thanks much to PartSelect for being in business and to all the posters on this site for helping everyone to get these things done right!
Other Parts Used:
Syphon Break Elbow Kit with Clamp Hose Clamp Siphon Break Connector Kit
  • Jeff from Moorpark, CA
  • Difficulty Level:
    Difficult
  • Total Repair Time:
    More than 2 hours
  • Tools:
    Screw drivers, Socket set
57 of 65 people found this instruction helpful.
Was this instruction helpful to you?
Thank you for voting!
I broke the elbow when I pulled the washer too far from the wall for another repair.
I removed 2 screws holding the front of the cabinet and set the front panel aside. Next I removed the screw securing the relay and water level switch to the front of the cabinet, and removed 4 screws holding the top of the washer to the cabinet. I removed the hose, then removed the 4 screws securing the siphon break to the rear panel and pulled it inside the cabinet. I removed the elbow and gasket, installed the new elbow and gasket, and reassembled all parts previously removed. I reconnected the hose and fastened it to the drain, and I was back in business. It took about 35 minutes.
Other Parts Used:
Corrugated Drain Hose Syphon Break Elbow Kit with Clamp
  • George from Smithfield, KY
  • Difficulty Level:
    Easy
  • Total Repair Time:
    30 - 60 mins
  • Tools:
    Nutdriver, Screw drivers
12 of 19 people found this instruction helpful.
Was this instruction helpful to you?
Thank you for voting!
broken syphon elbow
no one in my town could identify this part, much less had it in stock. i didn't know what it was called. your online illustration gave me the information i needed to order the correct part, and replacing it was a breeze. replaced for less than the price of a service call! my 26 year old daughter did the work, supplying some much-needed validation of her girl-power!
Other Parts Used:
Syphon Break Elbow Kit with Clamp Hose Clamp
  • audrey from laurium, MI
  • Difficulty Level:
    Really Easy
  • Total Repair Time:
    15 - 30 mins
  • Tools:
    Nutdriver, Wrench (Adjustable)
1 of 3 people found this instruction helpful.
Was this instruction helpful to you?
Thank you for voting!
Broken break elbows, burned out bulb
Removed the tub cover screws, removed the broken elbow (4 screws) replaced the gasket, installed the new elbow, replaced the tub cover and screws. Tested the repair for leaks. Job finished.
Other Parts Used:
Cylinder Light Bulb Syphon Break Elbow Kit with Clamp
  • Michael from Agoura Hills, CA
  • Difficulty Level:
    Easy
  • Total Repair Time:
    30 - 60 mins
  • Tools:
    Nutdriver, Pliers, Screw drivers, Socket set, Wrench (Adjustable)
1 of 3 people found this instruction helpful.
Was this instruction helpful to you?
Thank you for voting!
broke syphon elbow while moving machine
Performed repair through access cover in rear of machine. Removed screws with a nut driver and took out broken elbow. Pulled hose down to access hole to replace gasket then put back into position. installed elbow and reinstalled screws.
( this was tricky, have a helper to start the screws or place the screw in the nut driver with a piece of cloth to hold it in place), Make sure the screws are tightend evenly so the elbow sits completely against the gasket
Other Parts Used:
Syphon Break Elbow Kit with Clamp
  • Michael from White Plains, NY
  • Difficulty Level:
    A Bit Difficult
  • Total Repair Time:
    15 - 30 mins
  • Tools:
    Nutdriver, Screw drivers
0 of 1 people found this instruction helpful.
Was this instruction helpful to you?
Thank you for voting!
  • 1
Questions and Answers

Be the first to ask our experts a question about this part!

Related Parts
Model Cross Reference
This part works with the following models:
PartSelect Number: PS11738895
Manufacturer Part Number: WP214765
Brand
Model Number
Description
Maytag
6329
Washer - MAYTAG AUTOMATIC WASHER
Maytag
6349
Washer - MAYTAG AUTOMATIC WASHER
Maytag
6359
Washer - MAYTAG AUTOMATIC WASHER
Maytag
A104
Washer - Top Loading
Maytag
A105
Washer - Top Loading
Maytag
A110
Washer - Top Loading
Maytag
A112
Washer - Top Loading
Maytag
A180
Washer - Top Loading
Maytag
A181
Washer - Top Loading
Maytag
A182
Washer - Top Loading
Maytag
A183
Washer - Top Loading
Maytag
A190
Washer - Top Loading
Maytag
A1910
Washer - Top Loading
Maytag
A209
Washer - Top Loading
Maytag
A209S
Washer - Top Loading
Maytag
A210
Washer - Top Loading
Maytag
A210S
Washer - Residential
Maytag
A211
Washer - Top Loading
Maytag
A211S
Washer - Top Loading
Maytag
A212
Washer - Top Loading
Maytag
A212S
Washer - Residential
Maytag
A282
Washer - Top Loading
Maytag
A283
Washer - Top Loading
Maytag
A284
Washer - Top Loading
Maytag
A305
Washer - Top Loading
Maytag
A310
Washer - Top Loading
Maytag
A310S
Washer - Residential
Maytag
A312
Washer - Top Loading
Maytag
A312S
Washer - Residential
Maytag
A382
Washer - Top Loading
Customer Service Representative

Get in touch, we're here to help!

Daily 8am - 9pm EST

Contact Customer Service