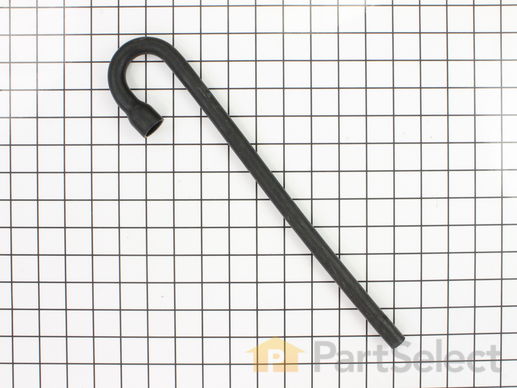
Part Location Diagram of WP213013 Whirlpool Injector Hose
See part 8 in the diagram
( Grid squares measure 1x1 inch )
Customer Service Representative

Get in touch, we're here to help!

Daily 8am - 9pm EST

customerservice@partselect.ca

Injector Hose

$44.04
  In Stock

Get this part fast! Average delivery time for in-stock parts via standard shipping: 1.8 days.

PartSelect Number PS11738877
Manufacturer Part Number WP213013
Manufactured by Whirlpool
Product Description

Injector Hose Specifications

This washing machine injector hose runs from your washer's inlet to its injector. It is black and made of rubber. It is also available in an injector kit.
How Buying OEM Parts Can Save You Time and Money

How Buying OEM Parts Can Save You Time and Money

Troubleshooting
This part fixes the following symptoms:
Leaking
This part works with the following products:
Washer, Washer Dryer Combo.
This part works with the following products:
Maytag, Jenn-Air.
Part# WP213013 replaces these:
2-13013, 213013
Back to Top
Customer Repair Stories
 Average Repair Rating: 3.1 / 5.0, 10 reviews. What's this?
  • 1
Sort by:
Sorry, we couldn't find any existing installation instruction that matched.
Washer leaked from top, left corner of machine.
Removed front of machine; then tilted back the top of machine, after removing the two screws in top front. Removed the old parts, trimmed the injector hose which was slightly longer than necessary, put new injector nozzle in ruber injector valve and inserted into the new sleeve, clamping the new hose to sleeve as well as clamping the remaining functioning hose to sleeve. The new sleeve mounting bracket was slightly different from the old one, but I was able to make it work with a small block of wood and two screws. The washing macine no longer leaks, the parts arrived timely, and the price was right. Thanks.
Other Parts Used:
Hose Clamp Rubber Injector Valve Injector Sleeve Plastic Injector Nozzle
  • Robert from Hudson, WI
  • Difficulty Level:
    Easy
  • Total Repair Time:
    1- 2 hours
  • Tools:
    Screw drivers, Socket set
21 of 26 people found this instruction helpful.
Was this instruction helpful to you?
Thank you for voting!
The hot water intake valve did not function
This clothes washer is 35 years old and runs like a champ. I did notice a bit of water below the left rear and assumed that a hose was leaking. I let it go for about 6 months, until I could fit it into the "to-do" list. During that time, the hot/cold water intake valve died. I ordered the replacement hot/cold valve a month ago but noticed, upon removal of the valve, that there was significant water drip evidence around the electrical valve solenoids. The water drips caused the valve to die. Drips came from a clogged injector hose air break directly above the valve. Replaced all hoses and water level vacuum air line. Very easy process. The front drops off with two screws. The lid is off with two screws. All hoses easy to R/R. It took about 2 hours to complete. All replacement parts were perfect. My belts are fine so I'm ready for another 30 years of service.
Other Parts Used:
Injector Sleeve Bracket - Side Mounting Air Tube for Tub Fill Volume Rubber Injector Valve SEAL FOR I Dispenser Tube Plastic Injector Nozzle Injector Hose Seal - SEAL NO LONGER INCLUDES HOSE
  • Paul from Huntington Beach, CA
  • Difficulty Level:
    Really Easy
  • Total Repair Time:
    More than 2 hours
  • Tools:
    Nutdriver, Pliers, Screw drivers, Socket set, Wrench set
17 of 20 people found this instruction helpful.
Was this instruction helpful to you?
Thank you for voting!
When Filling Tub To Soak, Water Leaked From Left Rear Corner
Removed front cover by removal of 2 phillips screws at bottom of front panel. Removed two cap screws from lf and rf corners attaching the top to the side panels. Raised and blocked up with piece of wood the hinged top of machine. Removed hose clamps with nut driver and cotter pin remover to expand the maytag clamps for reuse and to break the stick of the hoses to the old sleeve. Removed the clamp at the water fill valve on the water hose run up to the sleeve. Removed the water injector from the washer fill hose and removed the plastic injector for reuse in the injector hose. Inserted it into the fill hose as the old removed sample revealed. Installed the new improved plastic sleeve with one of two original screws, no longer using two but one screw for mounting. Installed original clamps on new hoses and reinstalled hoses on new sleeve. Pressed run dial center to start fill to ensure water leak was now cured. Reinstalled lf and rf cap screws to side panels. Reinstalled front panel 2 phillips retaining screws. Tested cycles and no leaks, on this 1966 machine bought new in may of 1966, along with its companion maytag dryer. Both remain in good use. A comparable maytag washer is 799. 00 At lowes. . . Thank you, fred maytag, for the best washer with the easiest design to repair, if it ever needs parts. . . And thanks, partselect. Com for having these 44 year old washing machine parts. Interesting to note that this sleeve not only had an added water fence around its open vent slots to prevent water overflow, but that it now tilted rearward on the oem mount to aid in that desire. It is always good to see american companies that are continually upgrading their parts to work better and to fit in older machines, like maytag has always done, in their search for excellence.
Other Parts Used:
Injector Sleeve Bracket - Side Mounting Rubber Injector Valve Washing Machine Lid Hinge Ball
  • EL from O'Fallon, IL
  • Difficulty Level:
    Really Easy
  • Total Repair Time:
    15 - 30 mins
  • Tools:
    Nutdriver, Screw drivers, Socket set
7 of 9 people found this instruction helpful.
Was this instruction helpful to you?
Thank you for voting!
Hot water overflow injector, ran onto floor
You will need 2 hose clamps not sold as maytag parts.

Remove front washer panel screws.

Remove bolts holding front of top to side panels

Remove hose clamp from front hose to injector sleeve.

Twist fill hose ccw 90 degrees at tub fitting to remove.

Clean corrosion at tub attachment point wuth wire brush.

Paint bare metal to seal. Allow to thoroughly dry.

Remove injector sleeve and injector hose.

Trim new injector hose to match length of removed hose (I cut off abt 4 inches)

Install injector hose and plastic sleeve. Ensure clocking is correct on hose.

Install gasket on fill hose fitting.

Insert fitting into tub. Rotate 90 deg CW to latch.

Install gear clamps loosely on fill tube.

Attach fill tube to fill fitting and injector sleeve.

Slide clamps onto tube ends ensuring clamp clocking provides access and clears tub top..

Test tub fill to ensure injector works without leaks
Other Parts Used:
Injector Fill Hose Rubber Injector Valve Injector Sleeve Injector Tube Injector Tube Seal Plastic Injector Nozzle
  • Padraic from SAINT PAUL, MN
  • Difficulty Level:
    Easy
  • Total Repair Time:
    30 - 60 mins
  • Tools:
    Nutdriver, Screw drivers, Socket set
4 of 4 people found this instruction helpful.
Was this instruction helpful to you?
Thank you for voting!
Tub injector hose had hole in it from rubbing on side of cabinet.
Remove front panel of machine, 2 screws at
bottom. Remove 2 bolts at top front with nut
driver and whole top can be lifted to expose
all parts. Remove injector hose clamps and
clamp new hoses in place. I replaced both
injejctor hoses while open although only one
had small hole in it. This is the only repair
done on this coin-op machine in 20 years. At
this time I did replace both drive belts but they
could have run for more years, no cracks or
breaks in belts. This machine is in a 12 unit
apartment building. We have two on them,
same age. We purchased both coin ops new
in 1987.
Other Parts Used:
Injector Fill Hose Injector Tube Injector Tube Seal
  • Linn from El Segundo, CA
  • Difficulty Level:
    Really Easy
  • Total Repair Time:
    Less than 15 mins
  • Tools:
    Nutdriver, Screw drivers
4 of 6 people found this instruction helpful.
Was this instruction helpful to you?
Thank you for voting!
water leaking when in use ,upper back left side
unplug machine ,shut off water supply,Removed 2 lower front panel screws ,raise panel upward "hinge type motion"and removed , Remove 2 self tapping screws from under front corners, removed liquid bleach tube from upper connector ,raise top toward back of machine , place prop "piece of wood" to hold top up,removed 1 screw attaching injector ,now replaced injector assy and install with new hoses and clamps. then assemble in reverse order
Other Parts Used:
Injector Fill Hose Rubber Injector Valve Injector Sleeve Plastic Injector Nozzle
  • Kenneth from Franklin, MA
  • Difficulty Level:
    Really Easy
  • Total Repair Time:
    15 - 30 mins
  • Tools:
    Pliers, Screw drivers, Socket set
3 of 5 people found this instruction helpful.
Was this instruction helpful to you?
Thank you for voting!
Water leek
Replace the injector hose
Other Parts Used:
  • Ahmad from Las Cruces, NM
  • Difficulty Level:
    Easy
  • Total Repair Time:
    30 - 60 mins
  • Tools:
    Screw drivers, Socket set, Wrench set
2 of 3 people found this instruction helpful.
Was this instruction helpful to you?
Thank you for voting!
Water leaking onto the floor while washer was filling.
By removing the front panel and raising the top panel, I was able to observe that water was overflowing from a small plastic "cup" that was positioned midway along the inlet lines for water entering the washer tub. None of the adjacent parts were visibly damaged or broken, but the rubber ones were soft and "gummy" to some degree. I ordered the three parts that I was able to identify, based on the photos at PartSelect.com. They arrived ahead of schedule and I was able to install them the same day. The only additional disassembly involved disconnecting the hot and cold water lines, removing the water inlet shield and gaining access to the upstream end of the old rubber hose in order to replace it with the new one.
Other Parts Used:
Rubber Injector Valve Plastic Injector Nozzle
  • Richard from Houston, TX
  • Difficulty Level:
    A Bit Difficult
  • Total Repair Time:
    30 - 60 mins
  • Tools:
    Nutdriver, Pliers
2 of 5 people found this instruction helpful.
Was this instruction helpful to you?
Thank you for voting!
Water was leaking on to the floor.
Assembled the parts, put them into the machine, moved it back into place, started it up and it is running fine. Thanks for the good service, good parts and they arrived on time.
Other Parts Used:
Injector Sleeve Bracket - Side Mounting Rubber Injector Valve Plastic Injector Nozzle Injector Hose Seal - SEAL NO LONGER INCLUDES HOSE
  • Ronald from Meridian, ID
  • Difficulty Level:
    Really Easy
  • Total Repair Time:
    1- 2 hours
  • Tools:
    Screw drivers, Socket set, Wrench set
1 of 4 people found this instruction helpful.
Was this instruction helpful to you?
Thank you for voting!
Leaking fill hose injector and a hose
Remove fron cover raised lid slightly and moved it slightly to the right exposing injector and hoses. replace one hose and installed new injector and clamps. Problem solved.

But what needs to be said is that the PARTS SELECT Website made it easily to identify the parts needed, fair pricing, way lower than local Maytag dealer, and exceptional speedy delivery (basic delivery option).
Other Parts Used:
Injector Fill Hose Injector Tube Seal
  • Joseph from Ellisville, MO
  • Difficulty Level:
    A Bit Difficult
  • Total Repair Time:
    1- 2 hours
  • Tools:
    Nutdriver, Pliers, Screw drivers
0 of 1 people found this instruction helpful.
Was this instruction helpful to you?
Thank you for voting!
  • 1
Questions and Answers

Be the first to ask our experts a question about this part!

Related Parts
Model Cross Reference
This part works with the following models:
PartSelect Number: PS11738877
Manufacturer Part Number: WP213013
Brand
Model Number
Description
Maytag
A104
Washer - Top Loading
Maytag
A105
Washer - Top Loading
Maytag
A106
Washer - Top Loading
Maytag
A106S
Washer - Residential
Maytag
A107
Washer - Top Loading
Maytag
A107S
Washer - Residential
Maytag
A108
Washer - Top Loading
Maytag
A108S
Washer - Residential
Maytag
A110
Washer - Top Loading
Maytag
A112
Washer - Top Loading
Maytag
A15CA
Washer
Maytag
A15CM
Washer
Maytag
A15CT
Washer
Maytag
A16CA
Washer
Maytag
A16CM
Washer
Maytag
A16CT
Washer
Maytag
A17CA
Washer
Maytag
A17CM
Washer
Maytag
A17CT
Washer
Maytag
A180
Washer - Top Loading
Maytag
A181
Washer - Top Loading
Maytag
A182
Washer - Top Loading
Maytag
A183
Washer - Top Loading
Maytag
A18CA
Washer
Maytag
A18CM
Washer
Maytag
A18CT
Washer
Maytag
A190
Washer - Top Loading
Maytag
A1910
Washer - Top Loading
Maytag
A206
Washer - Top Loading
Maytag
A206S
Washer - Top Loading
Customer Service Representative

Get in touch, we're here to help!

Daily 8am - 9pm EST

Contact Customer Service