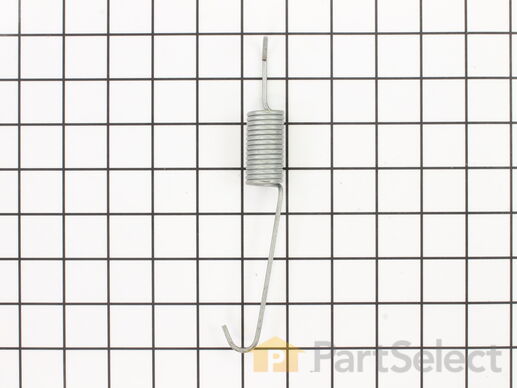
Part Location Diagram of WP21001598 Whirlpool Suspension Spring
See part 18 in the diagram
Replacing your Maytag Washer Suspension Spring
( Grid squares measure 1x1 inch )
Customer Service Representative

Get in touch, we're here to help!

Daily 8am - 9pm EST

customerservice@partselect.ca

Suspension Spring

★★★★★
★★★★★
1 Review
$11.48
  In Stock

Get this part fast! Average delivery time for in-stock parts via standard shipping: 1.8 days.

PartSelect Number PS11738823
Manufacturer Part Number WP21001598
Manufactured by Whirlpool
Product Description

Suspension Spring Specifications

This suspension spring is used with many washing machines. It is made entirely of metal and is seven inches long.
How Buying OEM Parts Can Save You Time and Money

How Buying OEM Parts Can Save You Time and Money

Part Videos

Replacing your Maytag Washer Suspension Spring

Replacing your Maytag Washer Suspension Spring
Troubleshooting
This part works with the following products:
Washer.
This part works with the following products:
Maytag, Admiral, Crosley, Magic Chef.
Part# WP21001598 replaces these:
AP6005764, 21001598, 31001375, WP21001598VP
Back to Top
Customer Reviews
Average Rating:
★★★★★
★★★★★
1 Review
4.0
Filter By Rating:
  • 5 Stars
    0
  • 4 Stars
    1
  • 3 Stars
    0
  • 2 Stars
    0
  • 1 Star
    0
  • 1
Sort by:
Sorry, we couldn't find any existing reviews that matched. Try using some different or simpler keywords.
  • 1
Customer Repair Stories
 Average Repair Rating: 2.7 / 5.0, 20 reviews. What's this?
  • 1
  • 2
Sort by:
Sorry, we couldn't find any existing installation instruction that matched.
Washer jumping in spin cycle (white flakes under the washer)
Unlug the AC cord,open the top from the front it snaps open with a little force and hinges on the back, remove the 2 screws on the front cover and take it off, tip the washer and remove the belt, take off the pump hose from the back (I removed the back cover also) and the little hose going to the basket. Remove the 6 springs and lift the complete drum out of the waser and turn it upside down. You can see the plastic snubber ring that is worn, loosen the 6 screws just enough to get the old ring out and the new one in. WARNING (DO NOT TAKE THE SCREWS ALL THE WAY OUT OR THE BRAKE ASSEMBLY WILL RELEASE AND A SPECIAL TOOL IS NEEDED TO PUT IT BACK) Install the new ring, tighten the screws and put the tub back in connecting everything back up and use the 6 new springs. It really isn't that hard to do.
Other Parts Used:
Snubber Ring
  • David from Butler, PA
  • Difficulty Level:
    A Bit Difficult
  • Total Repair Time:
    1- 2 hours
  • Tools:
    Pliers, Screw drivers, Wrench set
288 of 301 people found this instruction helpful.
Was this instruction helpful to you?
Thank you for voting!
broken spring in bottom of washing machine
Opened the front panel by using a flathead screwdriver (to pop the top lid up) and socket wrench (to loosen the front panel off). I then had to reach in and replace the missing/broken suspension spring. The spring was very difficult to extend so I used coins to lodge into the spring to elongate it. After the spring coils were loaded and held apart with coins (nickels and quarters) the spring could be installed using a pliers for leverage. The washer doesn't make the loud banging noise anymore!
Other Parts Used:
  • Mike from Rochester, MN
  • Difficulty Level:
    Easy
  • Total Repair Time:
    30 - 60 mins
  • Tools:
    Socket set
22 of 22 people found this instruction helpful.
Was this instruction helpful to you?
Thank you for voting!
washing machine was rocking back and forth
Removed the two screws holding the control panel in place. Removed two metal clips holding outer shell in place. Removed outer shell. Used vise grips to remove three horizontally mounted suspension springs around the perimeter of suspension carriage and replaced with new springs. Removed single vertically mounted suspension spring at the back of the suspension carriage and replaced with new spring. Replaced outer shell, metal clips, and control panel screws. Done!!! My washing machine doesn't try to run away anymore!!!
Other Parts Used:
Suspension Spring
  • Kevin from San Diego, CA
  • Difficulty Level:
    Really Easy
  • Total Repair Time:
    Less than 15 mins
  • Tools:
    Pliers, Screw drivers
22 of 30 people found this instruction helpful.
Was this instruction helpful to you?
Thank you for voting!
washer making pounding and rocking sound
Took a screwdriver and pried up the top of washer, then reached in and unscrewed the front two screws that allowed the front to be lifted off.
Removed two screws on lower right side that allowed us to pry open right side of washer. There are six springs along the bottom of washer that keep the tub stable and keep it from bouncing against sides while in spin mode. One of the springs broke and needed to be replaced. Off course it was the one that was in the far back and the hardest to get too. But by prying open the right side it was reachable. The wife pushed against the tub to make the spring stretch a little less but still was too difficult. We took the advice of another home repair guy and put quarters in the spring (about $1.75 worth) to make it stretch out, then it was simple to connect the two ends, remove the quarters and voila....it was done. Screwed theright side back on, but the minimum order on the springs was six and the others seemed fine, we just put the other five inside the washer cabinet, replaced the front panel, reset the clamps on top of the front panel, slammed the top down and we were back in business. The parts including shipping was a little over $10.00. So I am sure we saved at least $140 repair job.
Other Parts Used:
  • serenade from charleston, SC
  • Difficulty Level:
    Easy
  • Total Repair Time:
    1- 2 hours
  • Tools:
    Nutdriver, Screw drivers, Socket set
10 of 11 people found this instruction helpful.
Was this instruction helpful to you?
Thank you for voting!
shakes, noisey
Removed the waterlines. Set the ends in a small pan or bucket to catch the water.Do the same with the drain line.
Keep an old towell handy as water will drain out of the drain pump when you remove the drain hose. Removed the back panel. Use a flat bladed screw driver to pop the top off the two clips in front holding the top down. Lift the top and pull the two screws which holds the front in place. Remove the front and set aside. Underneath, use gloves and the screw driver to remove the six springs by placing the screwdriver through the top hook end about an inch and with both hands lift the spring off. Carefull not to let the blade slip off and bust your knuckles on something,hence the gloves. Lean the machine over and walk the belt off the pulley. Disconnect the small tube in the back left corner from the drum and lift the unit out from the top. Set the drum on it's top and loosen the six screws under the big pulley just enough to pull the snubber out. Replace new snubber, tighten screws. Set drum back in place and reattach springs. Lean unit over and replace belt. Reconnect the small tube, back left corner. Replace the front panel and top. Connect the drain line and replace the rear panel. Connect waterlines and check for leaks. I went ahead and replaced all springs. I recommend replacing the belt while your at it. I'm wishing I would have. It runs like new, gets more water out on the spin cycle and the dryer dosn't take as long to dry the clothes.
Other Parts Used:
Snubber Ring
  • Dan from Lafayette, CO
  • Difficulty Level:
    Easy
  • Total Repair Time:
    30 - 60 mins
  • Tools:
    Screw drivers, Socket set
9 of 11 people found this instruction helpful.
Was this instruction helpful to you?
Thank you for voting!
Original issue water in tub, replace belt, all fine but noisey like dry bearings.
After new belt, load dry bearing sound in spin cycle and brake squeal. Videos were very helpful, but limited. Thinking with new belt pulling pressure, it had to be bearings. Top bearing I was worried of possible water seal being disturbed ? 1 * Not so, the big top bearing sits alone under brake housing, but spent most time prying off with a wheel puller. Need like 10inch reach for puller. Has a plastic housing around it, that you have to pry on, but no damage seemed evident when done. This was the worse part ! 2 * Pulled springs, (with vise grips) water level hose,(fingers) and pump hose,(pliers and twist to free) removed motor (two 1/2 inch bolts and wires), then v belt. Tub/transmission all pulled out easy with front cover removed already. 3* Inverted, pop plastic cover, pry spring clip with screwdriver,(a little stubborn) and pulley pulls out easy. Now look good at the pulley inner part, it has to be adjusted when done, and instructions are not that clear. So here I will try to give a better clue. The instruction sheet shows the outer ring part with small inner space to tabs, and a bigger space to tabs. The larger 2/3 tab swing space is the control setting area.. Inner part swings left and right around to the tabs, A small 1/3 area, and bigger 2/3 area. Looking at the large side, the outer ring has two exterior raised notch of plastic. If you twist the pulley CW looking down, until it hits the first left tab, this would be the start point for adjusting. Instructions state, the first outer notch is the "MIN" point, and the next notch (about an inch away) is the "MAX" point. When reassembling and WITH the washer &clip in the groove (use the old one and just push one side into the goove to temporary hold center shaft in place) Key is the pulley has to be turned CW, and needs the clip to hold shaft, as pressure is put on the lower brake spring. OK, clip holding, CW turn pulley until the left tab stop is hit, now slowly turn pulley CCW and watch when the shaft starts turning. Plastic inner part has a 3-d arrow formed in it close to the first exterior notch. Setting is to turn the CCW direction with the arrow moving in between the MIN /Max outer notch, before the shaft start to turn. Ideally in the middle of the two exterior notches. Instructions state this, but never said the clip had to be in place ! What happens is CW releases the brake spring for the brake on, CCW applies preasure to unlock the brake, and that should be about the middle of the notches on outer side of ring, when the shaft starts to turn. Two washers are with pulley/bearing kit, one is used depending oh where the middle arrow starts to turn shaft. Apply the grease as instructed. 4 * Brake use of three 10/24 bolts worked well, described by other reviews. Spring is 200 lb. rating, so an adult can push down for most of the movement. The screw turned out easy, and reassembly by pushing down some pressure and screwing in faster saves time. It is the distance of about 1.5x oem screw size that the spring preasure gets hard, so then just keep turning the screws 2-4 turns each, to press back into place. First brake cover plate was totally glazed at brake pad area. I replaced it, but could have possible just sanded it some. Next lower brake pad disc, showed lots of brake pad, Replaced it to since I bought the parts, but maybe just sanding a little would have been good too. 5 * If you pull the two brake parts out, underneath is the upper bearing that was the hard thing to pull off. Start Access by removing the three screws under the brake, and then the outer metal ring support screws.( set of three/two screws. 9/16 inch). Pull cover off and here is the big top bearing with the plastic support housing under it, with no room to move it away. A couple drops of oil in the inner ring, and wheel puller use, the bearing started to slide off easy abut half way off. 6 * All this done and my snubber ring was showing wear, so good idea I bought the new snubber ring and all six tub springs. 7 * Tub springs are a little tough, vise grips, wiggle yourself into position, and do the rear ones first. My washer had all the springs inserted CCW position, spring inserted into base on left side hole that is oval. A little grease on spring bottom loop as per video. 8 * Long story, easy two hours plus, but took my time, brake squeal is gone, tub seems a little less wobble in spin cycle, but still sounds like a dry bearing ! Now starting to think it is the motor bearings just transmitting the sound up the tub like a megaphone ? OEM bearings did not seem worn enough to be an issue. Top bearing is a standard ball bearing, and lower bearing is a thrust roller bearing. Parts so far cost almost half the price of a new washer ! Best of luck, tried to clear up some "what issues" !
Other Parts Used:
Washer Brake Stator Washer Brake Rotor Spin Bearing Snubber Ring Transmission Pulley and Bearing Kit
  • john from BEACHWOOD, NJ
  • Difficulty Level:
    A Bit Difficult
  • Total Repair Time:
    More than 2 hours
  • Tools:
    Nutdriver, Pliers, Screw drivers, Socket set, Wrench set
7 of 9 people found this instruction helpful.
Was this instruction helpful to you?
Thank you for voting!
Washer had broken suspension spring, difficulty balancing during spin cycle
Removed entire cabinet from base, removed drive belt, removed suspension springs, removed tub and transmission together.
Removed 6 screws from brake housing to access snubber. Didn't have the special tool to compress the spring for reassembly, but used 3 longer screws to pull the brake housing back down...worked fine. Reinstalled transmission / tub and replaced all 6 springs. Reassembled cabinet. Unit spins great now...like new.
Other Parts Used:
Snubber Ring
  • Dwayne from Maryville, TN
  • Difficulty Level:
    A Bit Difficult
  • Total Repair Time:
    More than 2 hours
  • Tools:
    Nutdriver, Pliers, Screw drivers, Socket set, Wrench set
5 of 8 people found this instruction helpful.
Was this instruction helpful to you?
Thank you for voting!
WASHER OUT OF COUNTER BALANCE
Problem fix after replace Snubber ring, I also replace suspension spring and driver belt due to the fact I'm already taking it a part
Other Parts Used:
Drive Belt - 51 inches long Snubber Ring
  • Ryan from SAN DIEGO, CA
  • Difficulty Level:
    Really Easy
  • Total Repair Time:
    1- 2 hours
  • Tools:
    Pliers, Screw drivers, Socket set
4 of 4 people found this instruction helpful.
Was this instruction helpful to you?
Thank you for voting!
tub banging against cabinet during spin cycle with load evenly distributed
I'm not a washing machine technician but I did nurse a new Kenmore machine for 23 years and was ready for a replacement. Craigslist advertised a Maytag I was interested in and I bought it with the seller's assurance that it worked perfectly. It didn't and I went online to try and figure out what might be wrong. Clearly, the tub was traveling beyond it's design limit and I suspected a spring or two might be involved. Somewhere online, I found the illustrated parts diagram and then went looking for additional information. To my extreem delight, I came across a do it yourself repair video that demonstrated the procedure well enough that I was completely confident I could make the repair with little effort. That video was one of several service related appliance videos offered for free throughhttp://www.do-it-yourself-washing-machine-and-dryer-repair-help.com/index.html/ The final consideration was whether I could buy the replacement suspension springs and snubber ring for less than I paid for the washer. I found PartSelect and within minutes, I had the parts ordered. The parts arrived within 4 or 5 days, as promised, well packaged and in perfect shape. This morning, using the video as a final reference and the new parts, I completed the repair with only a minor hitch. Without the special spring tool used in the video, I struggled a bit with getting the new springs attached. That's where my wife came in handy (after all, she was movitated). Having her tilt the drum toward the spring landing made it much easier for me to stretch it into place using an adjustable locking plier. I actually enjoyed the whole procedure.
Other Parts Used:
Snubber Ring
  • Wayne from Parish, NY
  • Difficulty Level:
    Easy
  • Total Repair Time:
    More than 2 hours
  • Tools:
    Nutdriver, Pliers, Screw drivers, Socket set
4 of 5 people found this instruction helpful.
Was this instruction helpful to you?
Thank you for voting!
replaced the snubber ring / the belt / springs
As for how I did the repair , I just followed your instruction video . The instruction video provided by Part Select was very very valuable.
The snubber ring was a piece of cake BUT would have been really difficult without the helpful hints in the video like replacing three of the screws in the rings collar with three longer screws so as not to disturb the spring under it.
The suspension springs were a bit more trouble since my washer doesn't have an access panel on the back however THANKS TO YOUR TIP to stretch the spring and put coins between the coils made this much easier . I don't know many guys that are strong enough to lay down and reach through the front and put those springs on the back.
Of coarse the belt was easy.

I also really like you list of probable solutions to the problems with the machine.

My wife is now happy with her washer again therefore I am also happy.

Thanks so much.
I can see me being be a loyal customer for many years to come.
Other Parts Used:
Drive Belt - 52 inches long Snubber Ring
  • BARDELL from BASTROP, LA
  • Difficulty Level:
    Easy
  • Total Repair Time:
    30 - 60 mins
  • Tools:
    Nutdriver, Pliers, Screw drivers, Socket set
3 of 3 people found this instruction helpful.
Was this instruction helpful to you?
Thank you for voting!
  • 1
  • 2
Questions and Answers

Be the first to ask our experts a question about this part!

Related Parts
Model Cross Reference
This part works with the following models:
PartSelect Number: PS11738823
Manufacturer Part Number: WP21001598
Brand
Model Number
Description
Admiral
AAV1000AWW
Washer - Residential
Admiral
AAV1200AGW
Washer - Residential
Admiral
AAV1200AJW
Washer - Residential
Admiral
AAV1200AKW
Washer - Residential
Admiral
AAV1200ARW
Washer - Residential
Admiral
AAV1200AWW
Washer - Top Loading
Admiral
AAV2200AGW
Washer - Residential
Admiral
AAV2200AJA
Washer - Residential
Admiral
AAV2200AJW
Washer - Residential
Admiral
AAV2200AWA
Washer - Residential
Admiral
AAV2200AWW
Washer - Residential
Admiral
AAV3000AWW
Washer - Residential
Admiral
AAV4200AGW
Washer - Residential
Admiral
AAV4200AWA
Washer - Residential
Admiral
AAV4200AWW
Washer - Residential
Admiral
AAV7000AGW
Washer
Admiral
AAV7000AJW
Washer
Admiral
AAV7000AKW
Washer
Amana
ALW221RJW
Washer - Residential
Magic Chef
CAV2000AGW
Washer - Residential
Magic Chef
CAV2000AJW
Washer - Residential
Magic Chef
CAV2000AKW
Washer - Residential
Magic Chef
CAV2000AWA
Washer - Residential
Magic Chef
CAV2000AWQ
Washer - Residential
Magic Chef
CAV2000AWW
Washer - Residential
Magic Chef
CAV2050AWW
Washer - Residential
Magic Chef
CAV4000AGW
Washer - Residential
Magic Chef
CAV4000AKW
Washer - Residential
Magic Chef
CAV4000AWA
Washer - Residential
Magic Chef
CAV4000AWW
Washer - Residential
Customer Service Representative

Get in touch, we're here to help!

Daily 8am - 9pm EST

Contact Customer Service