Keep searches simple. Use keywords, e.g. "leaking", "pump", "broken" or "fit".
Sorry, we couldn't find any existing reviews that matched. Try using some different or simpler keywords.
★★★★★
★★★★★
Brent H - November 22, 2023
Verified Purchase
Perfect fit. Quick delivery
Perfect fit. Quick delivery.
★★★★★
★★★★★
Deborah B - September 24, 2023
Verified Purchase
Great part ; great help on phone
Part is perfect. Person I dealt with in the phone was wonderful and helpful
★★★★★
★★★★★
Louise L - March 5, 2023
Verified Purchase
Great
It was as expected, the right part and easy to install. In addition, the delivery was fast. Thanks
★★★★★
★★★★★
Alexander S - November 10, 2022
Verified Purchase
Easy repair, the right part.
The correct part was delivered in a couple of days. Installation was easy. What else could I ask for!
★★★★★
★★★★★
Monique P - November 8, 2022
Verified Purchase
Easy repair!
Thanks to the comments on the specifics of the right side part. It went exactly as expected, easy peasy :)
★★★★★
★★★★★
Lynne R - September 1, 2022
Verified Purchase
Easy repair
The part came really quickly. Watched the video for replacing the part. Simply explained . Done in 30 minutes.
★★★★★
★★★★★
Jason H - March 11, 2022
Verified Purchase
Quick delivery and correct part
Fast delivery and correct part equals happy customer
★★★★★
★★★★★
Neil B - July 10, 2021
Verified Purchase
Crispier side panel
Arrived in excellent condition, easy to install, Works well.
★★★★★
★★★★★
Jeffrey D - December 3, 2020
Verified Purchase
Easy repair, and was EXACTLY what I needed!!
Thank you for the perfect part
★★★★★
★★★★★
Rafal D - October 6, 2020
Verified Purchase
Excellent service
Part was delivered in 24 hours. After watching installation video on partselect.ca website it took me 10 minutes to install it.
< Prev
1
2
3
Next >
Customer Repair Stories
Average Repair Rating: 4.0 / 5.0, 39 reviews.
What's this?
< Prev
1
2
3
Next >
Sort by:
Search filter:
Clear Filter
Your search term must have 3 or more characters.
Keep searches simple. Use keywords, e.g. "leaking", "pump", "broken" or "fit".
Sorry, we couldn't find any existing installation instruction that matched.
Broken pins holding pantry door
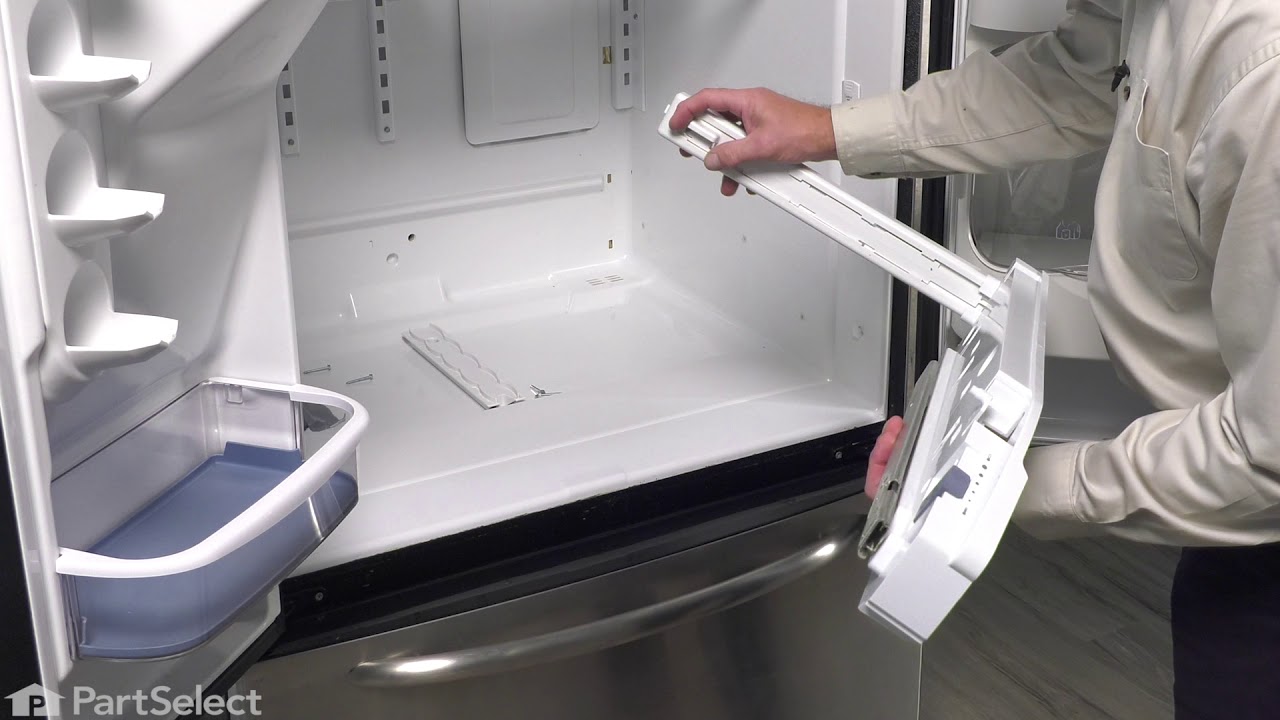
Removed door and crisper pans. Removed nuts on left end cap - think there were 3. Removed nuts on right end cap and one or two on back air regulator attached to right end cap. Replaced left end cap with new one using reserved nuts. Carefully removed back air regulator from right end cap. Attached back air regulator to new right end cap. Replaced right end cap and back air regulator and attached with nuts. Carefully inserted pantry door into pin on one side and slightly bent both right and left pins to insert door fully into end caps. Replaced crisper pans. That's it.
While cleaning frig, I broke the right side pin the crisper door pivits on.
First I looked at new replacement part, saw what held the part to the frig. Then removed the crisper drawers and vegie drawers and related support pieces. Used socket wrench to take out three screws and started so remove endcap. Realized endcap was attached to a piece that controls air flow to drawer, located supporting screw, removed and entire assembly came right out. I fumbled my way through the linking mechanism being very careful not to force and break anything. Once I figured out how all this worked, it went back together in a few minutes. Replaced the four screws that held the 2 pieces (endcap and airflow) to frig, replace drawer slid, replaced all draws. Done 30 minutes, start to finish. I found Customer Service VERY helpful while ordering piece, couldn't believe it was under $10 and fit exactly! Thanks PartSelect.com!
Other Parts Used:
Bryan from Panora, IA
Difficulty Level:
Easy
Total Repair Time:
15 - 30 mins
Tools:
Nutdriver, Screw drivers
31 of 38 peoplefound this instruction helpful.
Was this instruction helpful to you?
Thank you for voting!
The guide pin, which opens the crisper/pantry lid, broke off. It is integral to the end cap.
First, I removed the drawers at the bottom of the fridge and then I removed the three hex head (7/32) screws that hold the end cap on. Then I disengaged the slider which connects to the temperature control for the pantry drawer. Then, unscrewed the drawer slides with a Phillips from the old end cap. Also the slide push rod has to be disengaged from the clips on the back of the endcap.
Then, I reinserted the push rod to the new end cap and reattached the drawer sliders and the slider itself. At this point I realized I SHOULD have unscrewed the temperature slider at the back where it covers the cold air outlet. The screw had slipped out. I replaced it with a slightly larger wood screw. Reinstall the drawers, all done.
Other Parts Used:
Dave from Seattle, WA
Difficulty Level:
Really Easy
Total Repair Time:
Less than 15 mins
Tools:
Screw drivers, Socket set
21 of 28 peoplefound this instruction helpful.
Was this instruction helpful to you?
Thank you for voting!
Hinge pin for Chef's Pantry Door broke off endcap
First, I removed the Climate control drawers, the lower shelf pieces and the Chef's Pantry drawer so I had room to work.
Next, I unfastened the two screws that held the pantry drawer gilder on the broken righthand end cap and removed the glider.
With a socket tool, I unfastened the three socket-head mounting screws that held the endcap to the refrigerator wall.
The righthand endcap has a climate control adjustment mechanism which includes a finger slider and an extenson bar snapped to the backside of the endcap. This extension bar connects with another bar mounted to back inside of the refrigerator.
I carefully disconnected the climate control mechanism fixed to the refrigerator from the endcap.
With the endcap out of the refrigerator, I next had to disconnect the climate control slide and extension bar from the broken endcap by unclipping several snaps holding these pieces in place.
Now with the new endcap, I clipped the extension bar in place, snapped the finger silder in place, and reconnected this assembly to the climate control bar in the refrigerator and clipped the mechanism to the rear of the endcap.
The socket mounting screws were used to fasten the endcap to the wall. The pantry drawer glider was attached to the endcap with it's screws. The shelves and climate control drawers were put back. Finally, I carefully snapped the Pantry door to the hinge pins on both the left and the (new) right end caps and put the pantry drawer back.
Other Parts Used:
Rick from Foxboro, MA
Difficulty Level:
Easy
Total Repair Time:
15 - 30 mins
Tools:
Screw drivers, Socket set
18 of 23 peoplefound this instruction helpful.
Was this instruction helpful to you?
Thank you for voting!
Plastic peg hinging lid to drawer broke
It actually took 1 day and 15 minutes to fix this problem.
I removed the drawers and shelves in the area around the pantry. I carefully took apart the sliders and plastic parts that comprise the endcap/temperature adjuster. Then I tried to replace the unbroken part into the assembly. At that point I realized that something was wrong and I had ordered the wrong part. So I cleaned and put the broken part back in the refrigerator to wait for the replacement.
PartSelect customer service person was terrific and had the correct part on the way to my home immediately. I don't know how, but it arrived the NEXT day!
THEN, it took me 15 minutes to unscrew the sliders, endcap and replace both. Thank you PartSelect.
Other Parts Used:
Lee from North Potomac, MD
Difficulty Level:
Really Easy
Total Repair Time:
Less than 15 mins
Tools:
Screw drivers
9 of 9 peoplefound this instruction helpful.
Was this instruction helpful to you?
Thank you for voting!
Broken Tab
You will need a Nutdriver a 1/4" size and a philips screwdriver, I'm a young woman, It was easy find the pc. I need here since I lost my manual, in this particular piece the inside part is not included the tab that controls the tempeture, you will have to use the same from the broken one, snap off all and carefully remove it from the insideout of the broken piece to intall it in the replacement, make sure you remember how its going back, that was the hard part of all the repair! after that it was easy as 1, 2, 3!!! have fun!!
Other Parts Used:
CARMEN from CORAL GABLES, FL
Difficulty Level:
Easy
Total Repair Time:
15 - 30 mins
Tools:
Nutdriver, Screw drivers
8 of 9 peoplefound this instruction helpful.
Was this instruction helpful to you?
Thank you for voting!
little hinge thingy that holds pantry door snapped off
Removed the three screws that held part, lifted and removed old part and replaced with new piece. Couldn't have been easier. Saved me the $100 the repair man quoted me. Cannot believe it was so easy and the part was soooo affordable! Thank you very much for the speedy delivery. It came within days of my order. I will use your service again for sure! Thank you! Allyn Rosenzweig
Other Parts Used:
Allyn from los angeles, CA
Difficulty Level:
Really Easy
Total Repair Time:
Less than 15 mins
Tools:
Screw drivers
7 of 9 peoplefound this instruction helpful.
Was this instruction helpful to you?
Thank you for voting!
Broken right side peg for deli drawer cover
First, make sure you have the correct part. I had trouble with mine, at first, until I realized that I had received the wrong part... it was same shape but larger. To begin, remove both fruit/vegetable drawers. Remove deli drawer. Remove deli drawer glass panel with both supports. Remove 3, 1/4" hex screws that attach end-cap. Disengage temp control slide and arm from end-cap by carefully moving parts in the direction where they will disengage. Remove temp control slide from end-cap. Now that end-cap is out, remove 2 screws that hold metal drawer slide to end-cap. Attach drawer slide to new end-cap. Attach temp contol slide and connect the plastic arm. Attach end-cap to refrigerator. Replace glass shelf, supports and drawers. Done.
Other Parts Used:
jose from friendswood, TX
Difficulty Level:
Easy
Total Repair Time:
15 - 30 mins
Tools:
Nutdriver
7 of 11 peoplefound this instruction helpful.
Was this instruction helpful to you?
Thank you for voting!
Pivot axle for the cripser door was broken off.
I brought you the exploded view of the crisper parts on your website and proceeded accordingly. Besides the three nuts holding the end cap to the frig interior wall the temperature adjustment linkage had to be disassembled on reassemblied on the new replacement end cap. Plastic linkage parts present the problem of breakage, so one must be careful during the disassembly process. Some other type of fasteners for the linkage assembly (screw and nut, ball and socket) would be prefereable. All and all, its a machine. Wtith exploded view, what could go wrong?
Other Parts Used:
ROY from NEW YORK, NY
Difficulty Level:
Easy
Total Repair Time:
30 - 60 mins
Tools:
Nutdriver, Screw drivers
5 of 9 peoplefound this instruction helpful.
Was this instruction helpful to you?
Thank you for voting!
a small tip from the to of the cover broke off where it opens
we removed all the lower stuff,so we could get to the part. unscrewed all pieces 3 screws than removed it all in order.. than the hard part came ,when we had to figure out how to remove all the moving parts.from the back ..after a little wiggling we figured it all out and got a part...the new piece in and all back together...my husband and i did it in about 45 minutes,,,also gave us a chance to get those really hard places in the back to clean...thanks for all your help in helping me id the part.. thanks linda landsdowne
Other Parts Used:
linda from el Cajon, CA
Difficulty Level:
A Bit Difficult
Total Repair Time:
30 - 60 mins
Tools:
Screw drivers
5 of 7 peoplefound this instruction helpful.
Was this instruction helpful to you?
Thank you for voting!
< Prev
1
2
3
Next >
Questions and Answers
Ask our experts a question about this part and we'll get back to you as soon as possible!
26 questions answered by our experts.
< Prev
1
2
3
Next >
Sort by:
Search filter:
Clear Filter
Your search term must have 3 or more characters.
Keep searches simple. Use keywords, e.g. "leaking", "pump", "broken" or "fit".
Sorry, we couldn't find any existing answers that matched.Try using some different or simpler keywords, or submit your new question by using the "Ask a Question" button above!
Lucia
July 31, 2017
I think i need a replacement right pantry drawer support. The peg that holds the lid broke off. Please check if ps11738568 is what i need. If not please let me know what i should order. Thanks
For model number Jenn Air jfi2089aes2
Hi Lucia,
Thank you for your question. The right side end cap with the peg that the lid swivels open on is part number PS11738568.
Hope this helps!
56 people found this helpful.
Was this helpful?
Thank you for voting!
Kathleen
August 11, 2017
When the description states 'right side', is that on the right as you face the inside of the refrigerator or is it the right side as if you were standing with your back to the refrigerator?
For model number JFC2089HTB2
Hi Kathleen,
That is a great question. It will be your right side if you are standing in front of the appliance looking in or at the appliance.
Hope this helps!
40 people found this helpful.
Was this helpful?
Thank you for voting!
Steve
September 11, 2017
The lid to the deli drawer on the bottom is falling off due to the pin holding the lid on has broken. It's on the right hand side. Which part do I order to get a new pin? Thx!
For model number KFIS20XVMS8
Hi Steve,
Thank you for the question. The pin comes as part of the Pantry End Cap - Right Side and the end cap will need to be replaced.
Good luck with the repair!
11 people found this helpful.
Was this helpful?
Thank you for voting!
Michael
July 1, 2019
S/n KY2189941 the deli door retaining plastic pin broke off on right side (end cap w/temp-adjusting control slide). Is this end cap easily replaceable and is the part #ps11738568 ? It appears to have 2 or 3 mounting hex head screws holding it in place. I’m guessing the drawer metal slide detaches and reattached to end cap?
For model number KFIS25XVBL1
Hi Michael, thank you for your question. We have an installation video that you can view for how a part like this is installed: https://www.youtube.com/watch?v=0G8QcWb_2Fw&t=10s. Good luck with your repair.
9 people found this helpful.
Was this helpful?
Thank you for voting!
MARIELLEN
December 30, 2017
The pin on right side of the pantry drawer has broken off. I want to make sure i am ordering the right part, ps11738568, is that the correct #? Your parts list only showed the left side on the original list i saw.
For model number ARB8057CSL
Hello Mariellen, Thank you for your inquiry. Yes this is the end cap for the right side of the pantry drawer. Hope this helps!
6 people found this helpful.
Was this helpful?
Thank you for voting!
MARY LOU
March 6, 2019
I need the right side end clip for my pantry drawer door. The right side clip broke off. Is the part number that i need ps11738134? Thank you!Ml
For model number ABC2037DPS
Hello Mary Lou, thank you for inquiring. Yes, the Right Side Pantry End Cap for model ABC2037DPS is PS11738568.
2 people found this helpful.
Was this helpful?
Thank you for voting!
Stacy
October 4, 2019
My kitchen aid refrigerator is counter depth. Is this the correct part for the pantry drawer support it has the temp-adjustment control. When I'm facing my fridge its the right side draw support i want to replace.
For model number KFCO22EVBL0
Hello Stacy, Thank you for contacting us. I have researched the model you have provided and have found the part you are looking for is PartSelect Number PS11748630. Hope this helps!
I need a pantry end cap. If i am facing the front of the refrigerator it would be the one on the right.
For model number MFC2061KES2
Hello Harold, thank you for your question. The right side end cap for this unit is PartSelect Number: PS11738568. I hope this helps!
2 people found this helpful.
Was this helpful?
Thank you for voting!
Vickie
April 10, 2023
I need the part that the pantry door hooks on too. The right side hook I has broken off.
For model number Gi0fsaxvy08
Hello Vickie, we are glad you asked! Yes, the End Cap Right Side PS11738568 you had chosen is correct. We are pleased to have been able to help.
1 person found this helpful.
Was this helpful?
Thank you for voting!
Ken
April 6, 2018
The part # i wish to order is #:Ps11738568 which is the right side end cap for our Amana refer; however, the picture shown when i go to check out shows the part sloping up from the end, but ours slops down from the top. The knob that holds the pantry cover is broken off on ours. So how do i order the down sloping part?
For model number Amana Model #:ABC2037DEW
Hello Ken, Thank you for your inquiry. This part is the one that is compatible to your model, and it does actually slope down from the top, the pictures we have show it at two different angles. Hope this helps!
1 person found this helpful.
Was this helpful?
Thank you for voting!
< Prev
1
2
3
Next >
✖
Ask a Question
Ask our experts a question on this part and we'll respond as soon as we can.