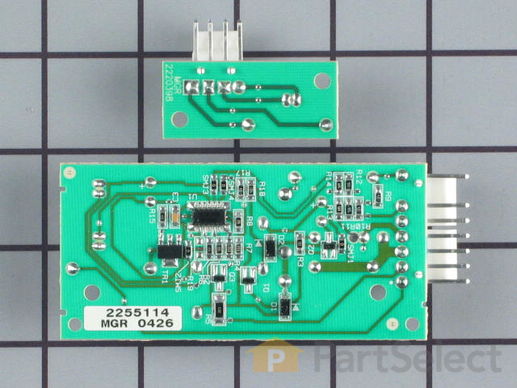
Part Location Diagram of W11629974 Whirlpool CNTRL-ELEC
See part 26 in the diagram
( Grid squares measure 1x1 inch )
Customer Service Representative

Get in touch, we're here to help!

Daily 8am - 9pm EST

customerservice@partselect.ca

CNTRL-ELEC

★★★★★
★★★★★
3 Reviews
$491.08
  In Stock

Get this part fast! Average delivery time for in-stock parts via standard shipping: 1.8 days.

PartSelect Number PS16875489
Manufacturer Part Number W11629974
Manufactured by Whirlpool
Product Description

CNTRL-ELEC Specifications

This set of two electronic control boards contains both the emitter and the receiver. These boards tells the icemaker when it's full and that it has to dump the ice, and it also tells the icemaker when to refill with water.
How Buying OEM Parts Can Save You Time and Money

How Buying OEM Parts Can Save You Time and Money

Troubleshooting
This part fixes the following symptoms:
Ice maker not making ice | Ice maker won’t dispense ice | Ice maker dispenses too much ice
This part works with the following products:
Refrigerator.
This part works with the following products:
Kenmore, KitchenAid, Whirlpool, Jenn-Air.
Part# W11629974 replaces these:
2198585, 2198586, 2220398, 2220402, 2255114, 4388635, 4389102, 4389102R, W10193666, W10193840, W10290817, W10757851, W11553040, W11553041
Back to Top
Customer Reviews
Average Rating:
★★★★★
★★★★★
3 Reviews
5.0
Filter By Rating:
  • 5 Stars
    3
  • 4 Stars
    0
  • 3 Stars
    0
  • 2 Stars
    0
  • 1 Star
    0
  • 1
Sort by:
Sorry, we couldn't find any existing reviews that matched. Try using some different or simpler keywords.
  • 1
Customer Repair Stories
 Average Repair Rating: 4.2 / 5.0, 70 reviews. What's this?
  • 1
  • 2
  • 3
Sort by:
Sorry, we couldn't find any existing installation instruction that matched.
Ice Maker would not stop making ice.
First, I tested the ice maker "switch" that actually just covers the beam that regulates the ice maker. In the "off" position, it still made ice. Then, I removed the three screws on the cover over the transmitter and disconnected the circuit board at the wire connector. It stopped. After ordering and receiving the new transmitter and receiver boards, I replaced both boards. They are located on either side of the freezer compartment under panels held in place by three screws. Probably saved 150 to 200 bucks.
Other Parts Used:
  • Vince from El Cajon, CA
  • Difficulty Level:
    Really Easy
  • Total Repair Time:
    Less than 15 mins
  • Tools:
    Screw drivers
191 of 214 people found this instruction helpful.
Was this instruction helpful to you?
Thank you for voting!
Ice maker just stopped working..
Did the diagnostics with the blinking light and couldn't decide what was bad....so ordered the control boards and the module motor assm. also. Turned out that it was the control boards and would suggest that future customers order that part first...if it isn't that then get the module and motor assm......these guys ship really fast and the prices are literally half of what Sears would charge, not to also mention the cost of their service man to walk through your door...OUCH!
Other Parts Used:
Icemaker Control Assembly
  • RICHARD T. from PATERSON, NJ
  • Difficulty Level:
    Really Easy
  • Total Repair Time:
    15 - 30 mins
  • Tools:
    Screw drivers
72 of 86 people found this instruction helpful.
Was this instruction helpful to you?
Thank you for voting!
Ice maker stopped making ice.
I first removed the power cord of the refrigerator from the receptacle. I then removed the screws (3 each) from both the emitter and receiver face plates with a phillips screw driver. I than carefully removed the connector to the each of the circuit boards. A simple pull maneuver. I removed the circuit boards from the face plates. I took the new parts and put them back in reverse order. I put the power cord back in the receptacle.
Other Parts Used:
  • Thomas from Riverside, CA
  • Difficulty Level:
    Really Easy
  • Total Repair Time:
    Less than 15 mins
  • Tools:
    Screw drivers
65 of 70 people found this instruction helpful.
Was this instruction helpful to you?
Thank you for voting!
no ice
I installed a new icemaker and ice level sensors I also had to replace crummy plastic trim parts because of poor quality and broke during disassembly
Other Parts Used:
Water Inlet Valve Kit Emitter Control Board Cover - White Ice Maker Assembly - 8 Cube Emmiter Door Spring Flipper
  • michael from gurnee, IL
  • Difficulty Level:
    Difficult
  • Total Repair Time:
    30 - 60 mins
  • Tools:
    Nutdriver, Screw drivers, Socket set
43 of 96 people found this instruction helpful.
Was this instruction helpful to you?
Thank you for voting!
Ice maker quit making ice
While looking for parts I read the advice on you web site under the ice maker parts. I also had problems reading the LED codes. They would change each time I unplugged the refrig and powered up. I took the other guys advice, ordered the emittered and receiver and the next morning I had ice. GREAT service guys, thanks. Also the part was on my door step in 1.5 days. Sure beat an expensive service charge.
Other Parts Used:
  • Gerald from Fulton, KY
  • Difficulty Level:
    Really Easy
  • Total Repair Time:
    Less than 15 mins
  • Tools:
    Screw drivers
41 of 43 people found this instruction helpful.
Was this instruction helpful to you?
Thank you for voting!
Ice maker stopped making ice
After researching the problem on parts select I found that there were several reasons why the ice maker would stop working. The number one reason was the electronic sensors fail,these tell the ice maker when ice bucket is filled. The light on the electronic eye will blink a code to diagnose the if there is a problem with the sensor. In my case the sensor was bad(the red sensor light would not stay on). The light transmitter is on the right and the reciever is on the left. First make sure there is nothing blocking the holes by cleaning them with a "q" tip. If they still don't work and the blinking code indicates failure them they need to be replaced.The sensors are behind panels on the left and right; each panel had 3 screws that need to be removed. First shut off power to the frig. Once you remove the screws you will find a quick connect attached to a electronic board on each side. Unplug each board and replace with the new part. Replace the panels and turn on the frig to test. The instructions in the parts box will tell you the light codes that will indicate that the boards are working. One note, I did this repair , the sensors were working and I did not get ice after 30-60 minutes.I found out that the water fill tube(black tube at the top of icemaker) was clogged with frozen water thus the ice tray never filled. After clearing out the ice with a small pipe cleaner the ice maker tray fill with water and the ice maker made ice on schedule.
Other Parts Used:
EveryDrop Water Filter
  • Harry from Audubon, PA
  • Difficulty Level:
    Easy
  • Total Repair Time:
    15 - 30 mins
  • Tools:
    Nutdriver, Screw drivers
35 of 654 people found this instruction helpful.
Was this instruction helpful to you?
Thank you for voting!
The ice maker stopped producing ice.
If you remove the bottom vent panel of the refrigerator there are two schematics for the refrigerator. One for the fridge and one for the icemaker. The icemaker has an emitter and a receiver that will tell the icemaker when it is ok to dump ice and add water. The receiver has an LED that blinks different codes. The codes give you an idea where your problem is located. In my case it coded out to be the optics (emitter and receiver). Replacement of the parts involves the removal of three screws on each component and disconnecting a wire harness on each component. Install the new components by following the removal process in reverse. The total cost was $80.00. This was half the price Sears wanted for the parts and about the same price to have a Sears repairman just show up at the house.
Other Parts Used:
  • Robert E. from Payson, UT
  • Difficulty Level:
    Easy
  • Total Repair Time:
    30 - 60 mins
  • Tools:
    Screw drivers
34 of 36 people found this instruction helpful.
Was this instruction helpful to you?
Thank you for voting!
My ice maker stopped producing ice. It would dispense ice that was already made and the water dispenser worked.
I looked at some online diagnostics info and the owner's manual. The "error code" blinking red light on the receiver unit (located adjacent to the ice bucket) indicated that the emitter/receiver units were faulty. I located the parts on the PartSelect website (their price was less than half of what they wanted on the Sears website) and ordered them. I didn't pay for the expedited shipping and still received the parts within two days of ordering. Powered down the refrigerator, three simple screws to remove each cover for the emitter and receiver, unplug the old units and pop in the new units, replace the covers for each unit, repowered the fridge and, voila, you've got ice. I completed the repairs in less than 10 minutes. Couldn't be happier with the price, the diagnostics links/info or the prompt service. Next time I have an appliance issue, my first stop will be this website.
Other Parts Used:
  • Glenn from San Marcos, CA
  • Difficulty Level:
    Really Easy
  • Total Repair Time:
    Less than 15 mins
  • Tools:
    Screw drivers
26 of 27 people found this instruction helpful.
Was this instruction helpful to you?
Thank you for voting!
Ice maker not working
Well I changed out the optical boards which I thought were the problem and the ice maker is still not making any ice. I can see the ice makers fingers rotating but there is no water entering through the tube. I jumped the water manifold in the back and water comes out but I cant figure out what is not telling it to run water and fill the ice tray. Any ideas would be appreciated I guess i'll replace the ice maker next. Thanks in advance.
Other Parts Used:
  • Lisa from Stuart, FL
  • Difficulty Level:
    Really Easy
  • Total Repair Time:
    Less than 15 mins
  • Tools:
    Screw drivers
20 of 28 people found this instruction helpful.
Was this instruction helpful to you?
Thank you for voting!
Ice maker would not stop making ice (Style 2)
Taped plastic cover to get it out of the way with duct tape - removed three screws on each side - removed retaining screw for each module - carefully disengaged module using small flat head screw driver being sure to release the plastic retainer and then reverse the process. Be sure new modules snap into place.

Biggest problem was initially figuring out what the problem was. Turning off the ice maker had no effect and it just kept making ice.
Other Parts Used:
  • James from Satellite Beach, FL
  • Difficulty Level:
    Really Easy
  • Total Repair Time:
    15 - 30 mins
  • Tools:
    Screw drivers
17 of 18 people found this instruction helpful.
Was this instruction helpful to you?
Thank you for voting!
  • 1
  • 2
  • 3
Questions and Answers

Be the first to ask our experts a question about this part!

Model Cross Reference
This part works with the following models:
PartSelect Number: PS16875489
Manufacturer Part Number: W11629974
Brand
Model Number
Description
Kenmore
10641522500
Refrigerator
Kenmore
10641523500
Refrigerator
Kenmore
10641524500
Refrigerator
Kenmore
10641529500
Refrigerator
Kenmore
10644022600
Refrigerator
Kenmore
10644022601
Refrigerator
Kenmore
10644022602
Refrigerator
Kenmore
10644022603
Refrigerator
Kenmore
10644023600
Refrigerator
Kenmore
10644023601
Refrigerator
Kenmore
10644023602
Refrigerator
Kenmore
10644023603
Refrigerator
Kenmore
10644024600
Refrigerator
Kenmore
10644029600
Refrigerator
Kenmore
10644029601
Refrigerator
Kenmore
10644029602
Refrigerator
Kenmore
10644029603
Refrigerator
Kenmore
10644032600
Refrigerator
Kenmore
10644032601
Refrigerator
Kenmore
10644032602
Refrigerator
Kenmore
10644032603
Refrigerator
Kenmore
10644033600
Refrigerator
Kenmore
10644033601
Refrigerator
Kenmore
10644033602
Refrigerator
Kenmore
10644033603
Refrigerator
Kenmore
10644034600
Refrigerator
Kenmore
10644039600
Refrigerator
Kenmore
10644039601
Refrigerator
Kenmore
10644039602
Refrigerator
Kenmore
10644039603
Refrigerator
Customer Service Representative

Get in touch, we're here to help!

Daily 8am - 9pm EST

Contact Customer Service