Models > CFEF312GSA

CFEF312GSA Frigidaire Range - Overview

Sections of the CFEF312GSA

[Viewing 5 of 5]

Manuals & Care Guides for CFEF312GSA

Click to download
Keep searches simple, eg. "belt" or "pump".
Oven Bake Element – Part Number: 316075103
Oven Bake Element
★★★★★
★★★★★
(240)
PartSelect #: PS438018
Manufacturer #: 316075103
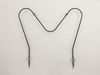
The Oven Bake Element is a black, metal part which supplies heat to the oven. This element is 19-1/2" wide x 18-1/2" long and has 3-1/2" inserts. It is rated as "Easy" to install by users, and attache...
$60.68
  In Stock
Terminal Block Kit – Part Number: 5303935058
Terminal Block Kit
★★★★★
★★★★★
(33)
PartSelect #: PS470125
Manufacturer #: 5303935058
This surface burner terminal block kit comes with interchangeable mounting brackets, terminal box, ceramic wire nuts, heat shrink protective tubing and wires.
$17.64
  In Stock
Infinite Burner Switch – Part Number: 316436001
Infinite Burner Switch
★★★★★
★★★★★
(48)
PartSelect #: PS1145040
Manufacturer #: 316436001
This switch controls the stove top 8" surface burner.
$55.93
  In Stock
Surface Element - 8 Inch - 2600W – Part Number: 316442301
Surface Element - 8 Inch - 2600W
★★★★★
★★★★★
(18)
PartSelect #: PS2339242
Manufacturer #: 316442301
This coil element has looped terminal ends.
$26.00
  In Stock
Rear Drawer Glide – Part Number: 3051163
Rear Drawer Glide
★★★★★
★★★★★
(9)
PartSelect #: PS434227
Manufacturer #: 3051163
This rear drawer glide is for your bottom range drawer. It is sold individually.
$6.80
  In Stock
Electronic Clock Assembly – Part Number: 5304518660
Electronic Clock Assembly
★★★★★
★★★★★
(16)
PartSelect #: PS12728848
Manufacturer #: 5304518660
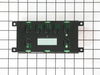
This is the electronic clock timer mechanism only. The overlay or touch pad is NOT included. To get the overlay, please use the model# of your appliance to search.
$219.75
  In Stock
Drip Bowl - 8 Inch – Part Number: A316222301
Drip Bowl - 8 Inch
★★★★★
★★★★★
(9)
PartSelect #: PS1537685
Manufacturer #: A316222301
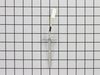
This is an 8-inch drip bowl for your range or cooktop. It is made of porcelain and is black in color. Place the drip pan under your burner to catch food that may drip or spill while you cook. It is 10...
$17.34
  In Stock
Front Drawer Glide – Part Number: 3051162
Front Drawer Glide
★★★★★
★★★★★
(4)
PartSelect #: PS434226
Manufacturer #: 3051162
This front drawer glide is for your bottom range drawer. Your range has 4 in total. This drawer glide is sold individually.
$7.69
  In Stock
Light Bulb – Part Number: 316538904
Light Bulb
★★★★★
★★★★★
(7)
PartSelect #: PS12751166
Manufacturer #: 316538904
Clear, 120 Volt, 40 Watt.
$25.16
  In Stock
Main Terminal Block Kit – Part Number: 5304409888
Main Terminal Block Kit
★★★★★
★★★★★
(8)
PartSelect #: PS471605
Manufacturer #: 5304409888
Terminal blocks (also called terminal boards or strips) provide a convenient means of connecting individual electrical wires.
$11.95
  In Stock
Drip Bowl - 6 Inch – Part Number: A316222201
Drip Bowl - 6 Inch
PartSelect #: PS1537684
Manufacturer #: A316222201
This drip bowl is a genuine OEM replacement part for your stovetop. It is black in color, made of porcelain, and six inches in diameter. To replace the drip pan, you simply need to remove the burner e...
$14.97
  In Stock
6-Inch Coil Burner Element – Part Number: 318372211
6-Inch Coil Burner Element
★★★★★
★★★★★
(5)
PartSelect #: PS2368974
Manufacturer #: 318372211
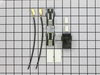
This element has looped terminal ends and comes with a black medallion center. This element is a genuine OEM replacement part, has looped terminal ends, comes with a black medallion center, and fits m...
$50.14
  In Stock

Questions And Answers for CFEF312GSA

Ask our experts a question about this model and we'll get back to you as soon as possible!

2 questions answered by our experts.
  • 1
Sort by:
Sorry, we couldn't find any existing answers that matched.Try using some different or simpler keywords, or submit your new question by using the "Ask a Question" button above!
Mitchell
March 31, 2023
How do you remove front oven door?. Is there a screw you remove?. Tried to push pull turn twist the hinges like other ovens put only the right side came out, now can,t even put that side back in. Worked on it for more than an hour. Any advice is appreciated.... Mitchell
For model number CFEF312GSA
PartSelect logo
Hello Mitchell, thank you for reaching out. To remove the oven door, the following steps need to be followed: 1. Open the oven door completely. 2. Remove two screws located on the inside of the oven door liner. 3. Insert the two screws into the door hinge holes located on the side of the hinge arm, one into each hinge. 4. Close the oven door until the door stops; the placement of these screws should keep the door open in about a 45-degree position. 5. Grasp the oven door firmly on both sides and slide the door up and off the hinges at the same angle. However, to put the right side back in, make sure the hinge arm is in the 45-degree position and the screws are still locking the hinge arm from moving. Insert the door channels at the bottom of the door over the door hinge. We hope this helps, good luck with this repair!

Was this helpful?
Thank you for voting!
James
December 21, 2023
I am looking for the oven control panel which is number 20 and the faceplate is 20a. How do I put this order in to purchase it ?
For model number CFEF312GSA
PartSelect logo
Hi James, Thank you for your question. The part number for the control panel or overlay is PS1149579, and the part number for the electronic control board is PS12728848. We hope this helps!

Was this helpful?
Thank you for voting!
Related Parts:
  • 1

Common Symptoms of the CFEF312GSA

[Viewing 10 of 10]
Element will not heat
Fixed by
these parts
Fixing Fixing Fixing
Show All
Little to no heat when baking
Fixed by
these parts
Fixing Fixing Fixing
Show All
Will Not Start
Fixed by
these parts
Fixing Fixing Fixing
Show All
Door won’t close
Fixed by
these parts
Fixing Fixing
Show All
Oven not heating evenly
Fixed by
these parts
Fixing Fixing Fixing
Show All
Oven is too hot
Fixed by
these parts
Fixing Fixing Fixing
Show All
Little to no heat when broiling
Fixed by
these parts
Fixing Fixing Fixing
Show All
Touchpad does not respond
Fixed by
these parts
Fixing Fixing
Show All
Will not program
Fixed by
these parts
Fixing Fixing
Show All
Gas igniter glows, but will not light
Fixed by
these parts
Fixing
Show All
Keep searches simple. Use keywords, e.g. "leaking", "pump", "broken" or "fit".
Oven woudn't heat
1. Removed two screws, pulled out the element, voltage tested the element and determined it was an open circuit (bad element).
2. Ordered the part from partselect.com
3. Disconnected element, connected the new one, and screwed it back in.
Parts Used:
Oven Bake Element
  • David from Shawnee, KS
  • Difficulty Level:
    Really Easy
  • Total Repair Time:
    Less than 15 mins
  • Tools:
    Screw drivers
1281 of 1357 people found this instruction helpful.
Was this instruction helpful to you?
Thank you for voting!
Element cracked in two pieces
Shut off circuit breaker to stove and collected the tool from the basement. Turned on flashlight. Unscrewed the two hex nuts from the old element/back of the oven. Slid the old element prongs out of the back, exposing the connecting wires. Pulled the connecting wires off of the old element, carefully, so that the connections wouldn't come off of the wires. Threw the old element pieces in the garbage. Connected the new element to the connecting wires and re-fastened the hex nuts. My husband had wanted to call the repair man, but it didn't look too difficult, so I decided to try it on my own. Boy was he surprised when I fixed it, and for a fraction of the cost of hiring a repairman! Ladies, we can do this ourselves!!! :) Thank you for being there for us to order our part from, Parts Select, we had our new part in less than 24 hours, so the shipping was blazing fast!!! Keep up the good work!!! :)
Parts Used:
Oven Bake Element
  • Michael from Green Bay, WI
  • Difficulty Level:
    Really Easy
  • Total Repair Time:
    Less than 15 mins
  • Tools:
    Nutdriver
809 of 913 people found this instruction helpful.
Was this instruction helpful to you?
Thank you for voting!
drawer glides were broke on front and back
used a screwdriver pushed the old ones out put the new in. the video instructions were great.
Parts Used:
Rear Drawer Glide Front Drawer Glide
  • bryan from sparta, WI
  • Difficulty Level:
    Really Easy
  • Total Repair Time:
    Less than 15 mins
  • Tools:
    Screw drivers
570 of 589 people found this instruction helpful.
Was this instruction helpful to you?
Thank you for voting!