This Idler Pulley includes the tri-ring and gasket and everything included here is manufacturer-certified. This part maintains correct tension on the drive belt in order to spin the drum properly. If ...
When connected to electricity the dryer heating element glows red hot and generates heat. When air is blown over it, it heats the air which is used to dry the clothes. The heating element fits inside ...
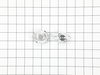
This drum support roller is sold individually. Most dryers require two. The tri-rings are included. This is a drum support roller for a dryer. It is a genuine replacement part. The part includes the d...
This thermostat may differ in appearance, but functions the same as the original part. This part controls the temperature of the inside of the dryer drum and prevents the dryer from overheating.
If you notice that your dryer is noisy or will not tumble, you may need to replace the tri ring. This part is triangular, and is less than an inch in size. Tri rings can be found both on the idler pul...
Also known as Thermal Cut-Off kit. The thermostat acts as a safety mechanism that keeps the dryer from overheating and the fuse is like a backup system - it's set to trip at a higher temperature than...
This is the moisture sensor for your dryer. It helps detect the amount of moisture in your clothes during the dryer cycle. If you notice your clothes are still wet after an automatic dryer cycle is do...
The idler pulley wheel is now sold with this arm. This idler pulley is for dryers.
Idler pulley maintains correct tension on the drive belt to spin the drum.
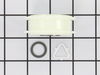
This 18 ml bottle of white appliance touch-up paint is used to cover scratches or marks on your appliance. The white touch-up paint can be used on refrigerators, microwaves, ranges, clothes dryers, an...
$10.20
In Stock
Questions And Answers for 7MMEDX550XW0
Be the first to ask our experts a question about this model!
✖
Ask a Question
Ask our experts a question on this model and we'll respond as soon as we can.
Pryed dryer top open and opened front door. . Unscrewed the 2 retaining screws. Pulled old switch from the wiring harness. Put new switch in place and replaced the retaining screws. Put new switch wire plug into the wiring harness. Before closing top, checked door switch function with dryer on. Dryer cut off when door open and when closed dryer started normally. . . Maint. Note instruction book should warn that letting door slam, which I did on occaision, broke the switch arm. Might save future problems.
Remove the kick plate from the bottom of the dryer by sliding a putty knife along the top edge to release the plastic clamps, one on each side about 4" in from the edges. The kick plate folds out and down. You will see the heat shield on the right, held in by one hex head screw. Remove screw and heat shield. The element is positioned in an open-front housing and is fastened to the left side of the housing by two hex head screws, located on the "rail" of the element and right near the two wires. Remove the hex-head screws that hold the element in place and disconnected the two wires by pulling them out by hand or with needle nose pliers. The only difficulty here is the cramped working area...I recommend a stubby socket driver for these two screws. Most of this I had to do by feel because I could not see the screw heads. Once the screws are out and the wires have been disconnected, slide the old element straight out toward you. You may need to disconnect a small plastic hose located to the left front of the element, but this hose just pulls right off. Vacume the dust & lint build-up out of the whole area, wipe out the element housing and clean up the whole underside of the dryer prior to installing the new element. Installation is reverse of removal. It also might be a good opportunity to clean out your exhaust duct and the vent to the outside. (Never use the aluminum foil-accordian-type duct.) If the exterior dryer vent has any kind of screen over it, remove it and get rid of it. Screens collect lint, lint builds up and burns out elements.


 Diagram and Parts List for Maytag Dryer")