These agitator directional cogs are commonly referred to as dog ears. They come four to a package and are usually used with direct drive washing machines.
This coupling kit is located between the motor and the transmission on direct drive washers with no belt. This is the newer version and is made with new metal sleeves for added strength.
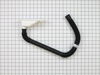
This pump is intended for use with washing machines that do not have belts. This drain pump has two ports for water to pass through: a large one, and a smaller one.
The suspension spring supports the outer tub and keeps the tub steady during loads that could cause an unbalance. If this part breaks, is worn down or has stretched out and lost its spring, it could c...
A worn clutch can cause a slower spin speed which will leave your clothes wet after a cycle. This clutch assembly comes with brake cam driver, blue spring for large capacity washers and black spring f...
The valve body of this part could be blue or green in color. There are two ports for water to enter, and this valve is compatible with a half inch ID hose. It has two 3/4-11x1/2 NHT hose threads.
This 18 ml bottle of white appliance touch-up paint is used to cover scratches or marks on your appliance. The white touch-up paint can be used on refrigerators, microwaves, ranges, clothes dryers, an...
This package of pads contains three tub wear pads.
$21.49
In Stock
Questions And Answers for 11026912691
Ask our experts a question about this model and we'll get back to you as soon as possible!
4 questions answered by our experts.
< Prev
1
Next >
Sort by:
Search filter:
Clear Filter
Your search term must have 3 or more characters.
Keep searches simple. Use keywords, e.g. "leaking", "pump", "broken" or "fit".
Sorry, we couldn't find any existing answers that matched.Try using some different or simpler keywords, or submit your new question by using the "Ask a Question" button above!
David
November 29, 2019
Replaced water pump but water will not drain from washer, the dial stops before it will drain
For model number 11026912691
Hello David and thanks for writing.
There are several culprits that cause slow or stopped washing machine drains. ... A kink or bend in the hose slows the drain down. An improperly attached hose or pump also causes problems. Draining standing water, before it starts to mildew or smell stale, is a messy but straightforward task. Also check the lid switch #PS11742021. You can also, refer to the manual troubleshooting section on our website for your model. We hope this helps. Please contact us anytime.
Hi, thnx for ur help. I suspect my agitator dogs need replacement. Ever video I've watched shows a 7/16 bolt secures the top agitator to the drive train. Mine doesn't have that. It looks like a WHT plastic slotted stepped retainer that's got and internal thread in the middle with a square hole molded into it that looks like it takes either a 3/8 or 1/2 socket driver. My question is: is this a retaining nut that I would unscrew to remove the top agitator in lieu of the bolt that is shown in all the repair videos? Thnx a lot. Regards, Tim
For model number 11026912691
Hello Tim, thank you for reaching out. Yes, in your model there is a plastic retainer that holds the agitator cam kit. Unscrewing this retainer will free your agitator cam kit and separate your upper agitator from the lower agitator. We hope this solves your problem!
1 person found this helpful.
Was this helpful?
Thank you for voting!
Larry
April 19, 2023
Technique to separate the top cover from the tube Shell. Does the starting capacitor on the Moter fail an let the washer stop before a cycle is complete?
For model number 11026912691
Hello Larry, thank you for the question. You will need to first remove the control panel from the plastic casing on its side and unscrew the screws under it. After removing the panel, press the clips under the panel on the washer body to remove the top assembly. Using a screwdriver, press all the clips on the tub's plastic ring and remove the plastic ring body from the top of the tub. Yes, a faulty capacitor can cause the motor to stop functioning, and the cycle does not get completed. In that case, you may need to replace the start capacitor, part number PS11746661. We hope this helps.
Makes loud knocking when in the spin cycle. Tub does spin
For model number 11026912691
Hi Dean, thank you for getting in touch. Based on our research, the issue is with the clutch kit, part number PS334641. It spins the basket during the spin cycle. You may need to replace it to fix the issue. Good luck with your repair!
The job looked intimidating but turned out to be very easy. First take off the water pump by removing the two clips that hold it in place. Place a shallow pan under the pump to catch the water that is in the pump and hoses. Open the hose clamps with a pair of pliers or channel locks (better) and slide the hoses off of the water pump. The motor comes off next. Unplug the electrical connector from the motor and two wires from the capacitor. Remove the two screws holding the clamps in place and then pop off the two clamps. You will need to hold up the motor with one hand while you remove the clamps or it will fall to the floor once the clamps are removed. One piece of the coupling assemble will be attached to the motor and the other will be attached to the gearcase drive shaft. If you want to clean up the mess created by the shredded rubber center piece of the coupling assembly you will have to take off the motor mounting plate. It is held on by two bolts and removing it makes installing the coupling easier but probably not necessary. Push the back half of the coupling on to the gearcase drive shaft until the shaft is flush with the face of the coupling. Install the new rubber center piece on to the coupling then re-install the motor mounting plate. Install the other half of the coupling on to the motor shaft and lift the motor up to the coupling. You have to rotate the motor shaft by spinning the fan blades until the coupling lines up so you can slide it into the other half of the coupling. Then just reattach the motor, connectors and water pump in the reverse order of disassembly.
First pry off the cap of the agitator. Then using a socket remove the bolt that holds the plastic cup in place. Remove this cup by prying it loose from the two tabs that hold it in place. Once this cup is removed you can get to the broken cogs. Slip the new cogs into the underside of the cup, and slide the cup back down in the agitator housing using the slots on the side for a guide. (You may want to remove the entire agitator and assemble everything upside down, then flip it all back over to mount, so the cogs don't fall out). Tighten the bolt, snap the cap back in place on top of the agitator and your'e done. Easy repair.